您好,登錄后才能下訂單哦!
您好,登錄后才能下訂單哦!
在畢設項目中多處用到自定義控件,一直打算總結一下自定義控件的實現方式,今天就來總結一下吧。在此之前學習了郭霖大神博客上面關于自定義View的幾篇博文,感覺受益良多,本文中就參考了其中的一些內容。
總結來說,自定義控件的實現有三種方式,分別是:組合控件、自繪控件和繼承控件。下面將分別對這三種方式進行介紹。
(一)組合控件
組合控件,顧名思義就是將一些小的控件組合起來形成一個新的控件,這些小的控件多是系統自帶的控件。比如很多應用中普遍使用的標題欄控件,其實用的就是組合控件,那么下面將通過實現一個簡單的標題欄自定義控件來說說組合控件的用法。
1、新建一個Android項目,創建自定義標題欄的布局文件title_bar.xml:
<?xml version="1.0" encoding="utf-8"?>
<RelativeLayout xmlns:android="http://schemas.android.com/apk/res/android"
  android:layout_width="match_parent"
  android:layout_height="wrap_content"
  android:background="#0000ff" >

  <Button
    android:id="@+id/left_btn"
    android:layout_width="wrap_content"
    android:layout_height="wrap_content"
    android:layout_centerVertical="true"
    android:layout_margin="5dp"
    android:background="@drawable/back1_64" />

  <TextView
    android:id="@+id/title_tv"
    android:layout_width="wrap_content"
    android:layout_height="wrap_content"
    android:layout_centerInParent="true"
    android:text="這是標題"
    android:textColor="#ffffff"
    android:textSize="20sp" />

</RelativeLayout>
可見這個標題欄控件還是比較簡單的,其中在左邊有一個返回按鈕,背景是一張事先準備好的圖片back1_64.png,標題欄中間是標題文字。
2、創建一個類TitleView,繼承自RelativeLayout:
public class TitleView extends RelativeLayout {

  // 返回按鈕控件
  private Button mLeftBtn;
  // 標題Tv
  private TextView mTitleTv;

  public TitleView(Context context, AttributeSet attrs) {
    super(context, attrs);

    // 加載布局
    LayoutInflater.from(context).inflate(R.layout.title_bar, this);

    // 獲取控件
    mLeftBtn = (Button) findViewById(R.id.left_btn);
    mTitleTv = (TextView) findViewById(R.id.title_tv);

  }

  // 為左側返回按鈕添加自定義點擊事件
  public void setLeftButtonListener(OnClickListener listener) {
    mLeftBtn.setOnClickListener(listener);
  }

  // 設置標題的方法
  public void setTitleText(String title) {
    mTitleTv.setText(title);
  }
}
在TitleView中主要是為自定義的標題欄加載了布局,為返回按鈕添加事件監聽方法,并提供了設置標題文本的方法。
3、在activity_main.xml中引入自定義的標題欄:
<LinearLayout xmlns:android="http://schemas.android.com/apk/res/android"
  android:id="@+id/main_layout"
  android:layout_width="match_parent"
  android:layout_height="match_parent"
  android:orientation="vertical" >

  <com.example.test.TitleView
    android:id="@+id/title_bar"
    android:layout_width="match_parent"
    android:layout_height="wrap_content" >
  </com.example.test.TitleView>

</LinearLayout>
4、在MainActivity中獲取自定義的標題欄,并且為返回按鈕添加自定義點擊事件:
private TitleView mTitleBar;
     mTitleBar = (TitleView) findViewById(R.id.title_bar);

    mTitleBar.setLeftButtonListener(new OnClickListener() {

      @Override
      public void onClick(View v) {
        Toast.makeText(MainActivity.this, "點擊了返回按鈕", Toast.LENGTH_SHORT)
            .show();
        finish();
      }
    });
5、運行效果如下:

這樣就用組合的方式實現了自定義標題欄,其實經過更多的組合還可以創建出功能更為復雜的自定義控件,比如自定義搜索欄等。
(二)自繪控件
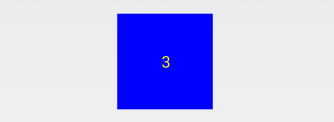
自繪控件的內容都是自己繪制出來的,在View的onDraw方法中完成繪制。下面就實現一個簡單的計數器,每點擊它一次,計數值就加1并顯示出來。
1、創建CounterView類,繼承自View,實現OnClickListener接口:
public class CounterView extends View implements OnClickListener {

  // 定義畫筆
  private Paint mPaint;
  // 用于獲取文字的寬和高
  private Rect mBounds;
  // 計數值,每點擊一次本控件,其值增加1
  private int mCount;

  public CounterView(Context context, AttributeSet attrs) {
    super(context, attrs);

    // 初始化畫筆、Rect
    mPaint = new Paint(Paint.ANTI_ALIAS_FLAG);
    mBounds = new Rect();
    // 本控件的點擊事件
    setOnClickListener(this);
  }

  @Override
  protected void onDraw(Canvas canvas) {
    super.onDraw(canvas);

    mPaint.setColor(Color.BLUE);
    // 繪制一個填充色為藍色的矩形
    canvas.drawRect(0, 0, getWidth(), getHeight(), mPaint);

    mPaint.setColor(Color.YELLOW);
    mPaint.setTextSize(50);
    String text = String.valueOf(mCount);
    // 獲取文字的寬和高
    mPaint.getTextBounds(text, 0, text.length(), mBounds);
    float textWidth = mBounds.width();
    float textHeight = mBounds.height();

    // 繪制字符串
    canvas.drawText(text, getWidth() / 2 - textWidth / 2, getHeight() / 2
        + textHeight / 2, mPaint);
  }

  @Override
  public void onClick(View v) {
    mCount ++;

    // 重繪
    invalidate();
  }

}
2、在activity_main.xml中引入該自定義布局:
<LinearLayout xmlns:android="http://schemas.android.com/apk/res/android"
  android:id="@+id/main_layout"
  android:layout_width="match_parent"
  android:layout_height="match_parent"
  android:orientation="vertical" >

  <com.example.test.CounterView
    android:id="@+id/counter_view"
    android:layout_width="100dp"
    android:layout_height="100dp"
    android:layout_gravity="center_horizontal|top"
    android:layout_margin="20dp" />

</LinearLayout>
3、運行效果如下:

(三)繼承控件
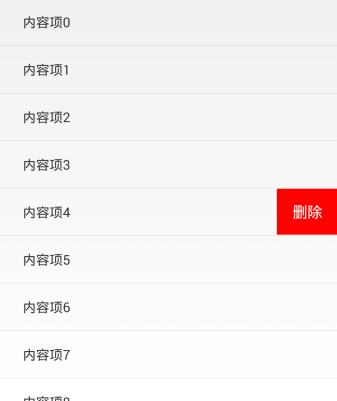
就是繼承已有的控件,創建新控件,保留繼承的父控件的特性,并且還可以引入新特性。下面就以支持橫向滑動刪除列表項的自定義ListView的實現來介紹。
1、創建刪除按鈕布局delete_btn.xml,這個布局是在橫向滑動列表項后顯示的:
<?xml version="1.0" encoding="utf-8"?>
<Button xmlns:android="http://schemas.android.com/apk/res/android"
  android:layout_width="wrap_content"
  android:layout_height="wrap_content"
  android:background="#FF0000"
  android:padding="5dp"
  android:text="刪除"
  android:textColor="#FFFFFF"
  android:textSize="16sp" >

</Button>
2、創建CustomListView類,繼承自ListView,并實現了OnTouchListener和OnGestureListener接口:
public class CustomListView extends ListView implements OnTouchListener,
    OnGestureListener {

  // 手勢動作探測器
  private GestureDetector mGestureDetector;

  // 刪除事件監聽器
  public interface OnDeleteListener {
    void onDelete(int index);
  }

  private OnDeleteListener mOnDeleteListener;

  // 刪除按鈕
  private View mDeleteBtn;

  // 列表項布局
  private ViewGroup mItemLayout;

  // 選擇的列表項
  private int mSelectedItem;

  // 當前刪除按鈕是否顯示出來了
  private boolean isDeleteShown;

  public CustomListView(Context context, AttributeSet attrs) {
    super(context, attrs);

    // 創建手勢監聽器對象
    mGestureDetector = new GestureDetector(getContext(), this);

    // 監聽onTouch事件
    setOnTouchListener(this);
  }

  // 設置刪除監聽事件
  public void setOnDeleteListener(OnDeleteListener listener) {
    mOnDeleteListener = listener;
  }

  // 觸摸監聽事件
  @Override
  public boolean onTouch(View v, MotionEvent event) {
    if (isDeleteShown) {
      hideDelete();
      return false;
    } else {
      return mGestureDetector.onTouchEvent(event);
    }
  }

  @Override
  public boolean onDown(MotionEvent e) {
    if (!isDeleteShown) {
      mSelectedItem = pointToPosition((int) e.getX(), (int) e.getY());
    }
    return false;
  }

  @Override
  public boolean onFling(MotionEvent e1, MotionEvent e2, float velocityX,
      float velocityY) {
    // 如果當前刪除按鈕沒有顯示出來,并且x方向滑動的速度大于y方向的滑動速度
    if (!isDeleteShown && Math.abs(velocityX) > Math.abs(velocityY)) {
      mDeleteBtn = LayoutInflater.from(getContext()).inflate(
          R.layout.delete_btn, null);

      mDeleteBtn.setOnClickListener(new OnClickListener() {

        @Override
        public void onClick(View v) {
          mItemLayout.removeView(mDeleteBtn);
          mDeleteBtn = null;
          isDeleteShown = false;
          mOnDeleteListener.onDelete(mSelectedItem);
        }
      });

      mItemLayout = (ViewGroup) getChildAt(mSelectedItem
          - getFirstVisiblePosition());

      RelativeLayout.LayoutParams params = new RelativeLayout.LayoutParams(
          LayoutParams.WRAP_CONTENT, LayoutParams.WRAP_CONTENT);
      params.addRule(RelativeLayout.ALIGN_PARENT_RIGHT);
      params.addRule(RelativeLayout.CENTER_VERTICAL);

      mItemLayout.addView(mDeleteBtn, params);
      isDeleteShown = true;
    }

    return false;
  }

  // 隱藏刪除按鈕
  public void hideDelete() {
    mItemLayout.removeView(mDeleteBtn);
    mDeleteBtn = null;
    isDeleteShown = false;
  }

  public boolean isDeleteShown() {
    return isDeleteShown;
  }

  /**
   * 后面幾個方法本例中沒有用到
   */
  @Override
  public void onShowPress(MotionEvent e) {

  }

  @Override
  public boolean onSingleTapUp(MotionEvent e) {
    return false;
  }

  @Override
  public boolean onScroll(MotionEvent e1, MotionEvent e2, float distanceX,
      float distanceY) {
    return false;
  }

  @Override
  public void onLongPress(MotionEvent e) {

  }

}
3、定義列表項布局custom_listview_item.xml,它的結構很簡單,只包含了一個TextView:
<?xml version="1.0" encoding="utf-8"?>
<RelativeLayout xmlns:android="http://schemas.android.com/apk/res/android"
  android:layout_width="match_parent"
  android:layout_height="match_parent"
  android:descendantFocusability="blocksDescendants" >

  <TextView
    android:id="@+id/content_tv"
    android:layout_width="wrap_content"
    android:layout_height="wrap_content"
    android:layout_centerVertical="true"
    android:layout_margin="30dp"
    android:gravity="center_vertical|left" />

</RelativeLayout>
4、定義適配器類CustomListViewAdapter,繼承自ArrayAdapter<String>:
public class CustomListViewAdapter extends ArrayAdapter<String> {

  public CustomListViewAdapter(Context context, int textViewResourceId,
      List<String> objects) {
    super(context, textViewResourceId, objects);
  }

  @Override
  public View getView(int position, View convertView, ViewGroup parent) {
    View view;

    if (convertView == null) {
      view = LayoutInflater.from(getContext()).inflate(
          R.layout.custom_listview_item, null);
    } else {
      view = convertView;
    }

    TextView contentTv = (TextView) view.findViewById(R.id.content_tv);
    contentTv.setText(getItem(position));

    return view;
  }

}
5、在activity_main.xml中引入自定義的ListView:
<LinearLayout xmlns:android="http://schemas.android.com/apk/res/android"
  android:id="@+id/main_layout"
  android:layout_width="match_parent"
  android:layout_height="match_parent"
  android:orientation="vertical" >

  <com.example.test.CustomListView
    android:id="@+id/custom_lv"
    android:layout_width="match_parent"
    android:layout_height="wrap_content" />

</LinearLayout>
6、在MainActivity中對列表做初始化、設置列表項刪除按鈕點擊事件等處理:
public class MainActivity extends Activity {

  // 自定義Lv
  private CustomListView mCustomLv;
  // 自定義適配器
  private CustomListViewAdapter mAdapter;
  // 內容列表
  private List<String> contentList = new ArrayList<String>();

  @Override
  protected void onCreate(Bundle savedInstanceState) {
    super.onCreate(savedInstanceState);
    requestWindowFeature(Window.FEATURE_NO_TITLE);
    setContentView(R.layout.activity_main);

    initContentList();

    mCustomLv = (CustomListView) findViewById(R.id.custom_lv);
    mCustomLv.setOnDeleteListener(new OnDeleteListener() {

      @Override
      public void onDelete(int index) {
        contentList.remove(index);
        mAdapter.notifyDataSetChanged();
      }
    });

    mAdapter = new CustomListViewAdapter(this, 0, contentList);
    mCustomLv.setAdapter(mAdapter);
  }

  // 初始化內容列表
  private void initContentList() {
    for (int i = 0; i < 20; i++) {
      contentList.add("內容項" + i);
    }
  }

  @Override
  public void onBackPressed() {
    if (mCustomLv.isDeleteShown()) {
      mCustomLv.hideDelete();
      return;
    }
    super.onBackPressed();
  }

}
7、運行效果如下:

以上就是本文的全部內容,希望對大家的學習有所幫助,也希望大家多多支持億速云。
免責聲明:本站發布的內容(圖片、視頻和文字)以原創、轉載和分享為主,文章觀點不代表本網站立場,如果涉及侵權請聯系站長郵箱:is@yisu.com進行舉報,并提供相關證據,一經查實,將立刻刪除涉嫌侵權內容。