您好,登錄后才能下訂單哦!
您好,登錄后才能下訂單哦!
寫在前面
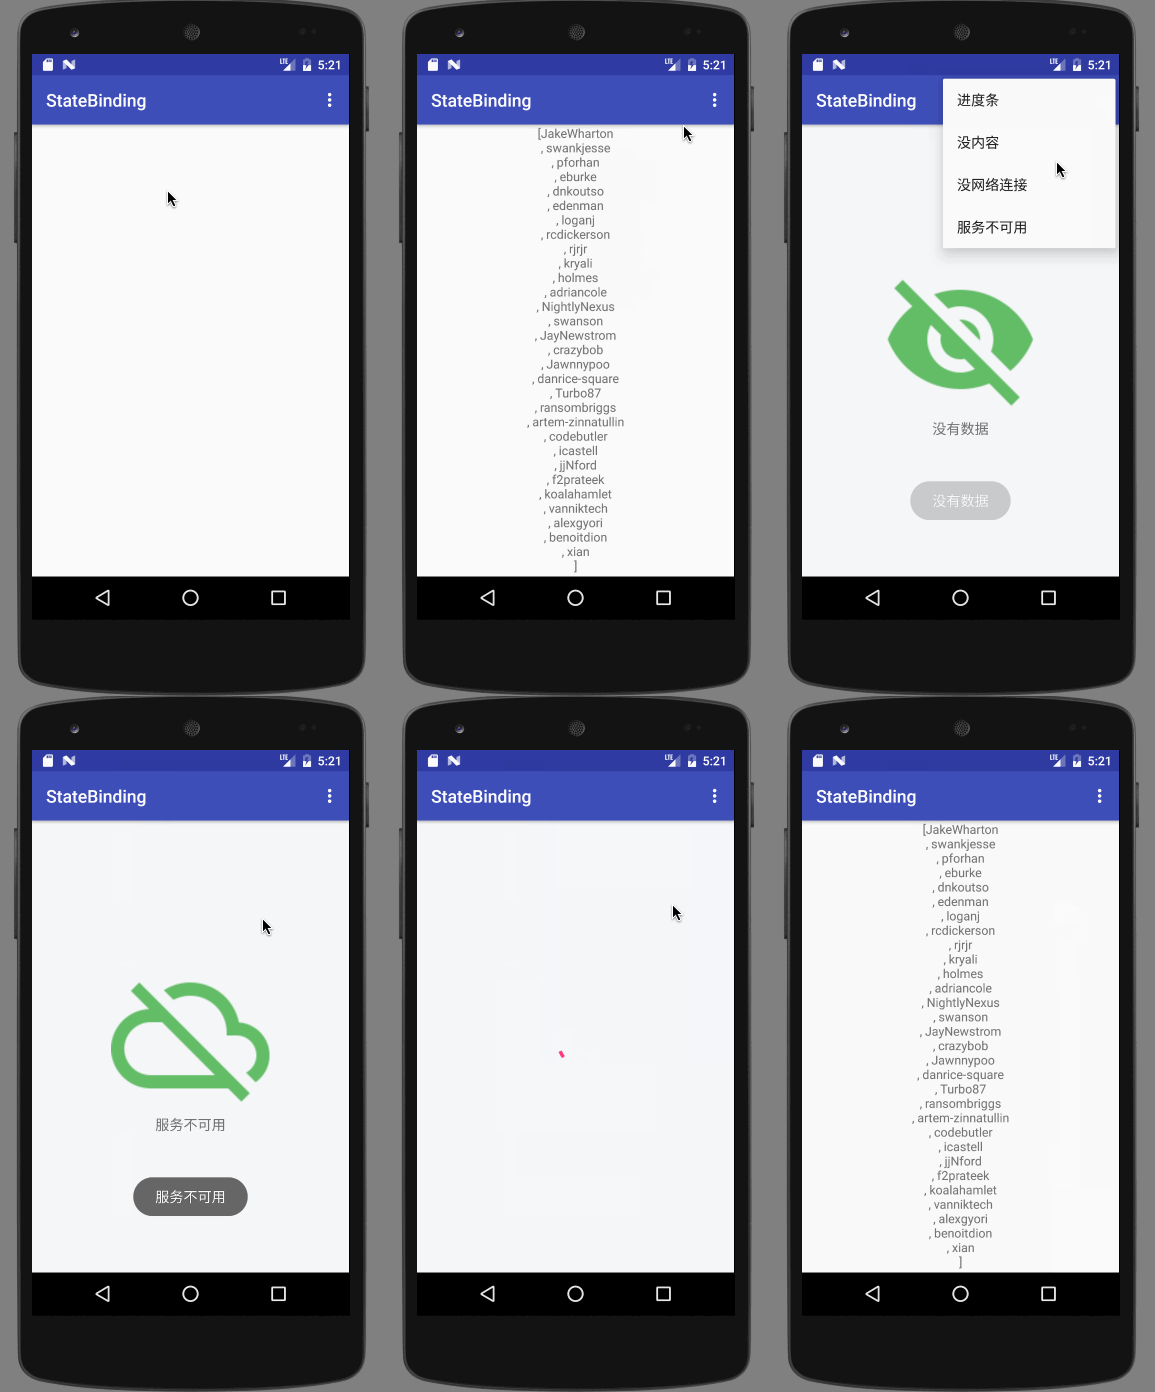
在平時的開發之中,我們需要對于數據加載的情況進行展示:
現在設置頁面狀態的方式有多種,由于筆者近期一直在使用databinding,而數據綁定通過改變模型來展示view的方式和狀態頁的設置也滿契合的。
所以這里就講講使用databinding來設置android中的各種狀態頁。很簡單,先看看效果

首先
在app的build.gradle文件中開啟databinding
android{
  ...
  dataBinding {
    enabled = true
  }
}
我們先定義一些用于狀態的注解EmptyState
/**
 * 頁面描述:空狀態
 * <p>
 * Created by ditclear on 2017/2/24.
 */
@IntDef({NORMAL, PROGRESS, EMPTY, NET_ERROR, NOT_AVAILABLE})
@Retention(RetentionPolicy.SOURCE)
public @interface EmptyState {

  int NORMAL = -1; //正常
  int PROGRESS = -2;//顯示進度條

  int EMPTY = 11111; //列表數據為空
  int NET_ERROR = 22222; //網絡未連接
  int NOT_AVAILABLE = 33333; //服務器不可用

  //...各種頁面的空狀態,可以自己定義、添加

}
再自定義一個異常EmptyException用于顯示我們需要的狀態信息
/**
 * 頁面描述:異常
 * <p>
 * Created by ditclear on 2017/3/5.
 */
public class EmptyException extends Exception {

  private int code;

  public EmptyException(@EmptyState int code) {
    super();
    this.code = code;
  }


  @EmptyState
  public int getCode() {
    return code;
  }

  public void setCode(@EmptyState int code) {
    this.code = code;
  }
}
現在,大多數展示狀態頁的控件都會提供
所以我們的目標也是顯示這些
布局
以數據綁定的形式進行布局,使用StateModel來控制狀態頁展示的消息
<?xml version="1.0" encoding="utf-8"?>
<layout xmlns:android="http://schemas.android.com/apk/res/android"
  >

  <data>

    <import type="android.view.View"/>

    <variable
      name="stateModel"
      type="com.ditclear.app.state.StateModel"/>
  </data>

  <RelativeLayout
    android:id="@+id/rv_empty_view"
    android:layout_width="match_parent"
    android:layout_height="match_parent"
    android:background="@color/background"
    android:clickable="true"
    android:focusableInTouchMode="true"
    android:visibility="@{stateModel.empty?View.VISIBLE:View.GONE}">

    <android.support.v4.widget.ContentLoadingProgressBar

      android:layout_width="wrap_content"
      android:layout_height="wrap_content"
      android:layout_centerInParent="true"
      android:visibility="@{stateModel.progress?View.VISIBLE:View.GONE}"/>

    <LinearLayout
      android:layout_width="match_parent"
      android:layout_height="match_parent"
      android:layout_alignParentBottom="true"
      android:layout_alignParentLeft="true"
      android:layout_alignParentStart="true"
      android:gravity="center"
      android:orientation="vertical"
      android:visibility="@{stateModel.progress?View.INVISIBLE:View.VISIBLE}">

      <ImageView
        android:id="@+id/none_data"
        android:layout_width="345dp"
        android:layout_height="180dp"
        android:scaleType="fitCenter"
        android:src="@{stateModel.emptyIconRes}"/>


      <TextView
        android:layout_width="wrap_content"
        android:layout_height="25dp"
        android:layout_below="@+id/none_data"
        android:layout_centerHorizontal="true"
        android:text="@{stateModel.currentStateLabel}"
        android:textSize="16sp"/>


    </LinearLayout>
  </RelativeLayout>
</layout>
布局文件中有幾個方法
我們定義狀態的ViewModel ,就叫StateModel,來控制狀態
/**
 * 頁面描述:狀態頁面設置模型
 * <p>
 * Created by ditclear on 2017/2/24.
 */

public class StateModel extends BaseObservable {

  private Context mContext = MyApp.instance();

  @EmptyState
  private int emptyState = EmptyState.NORMAL;

  private boolean empty;

  public int getEmptyState() {
    return emptyState;
  }

  /**
   * 設置狀態
   *
   * @param emptyState
   */
  public void setEmptyState(@EmptyState int emptyState) {
    this.emptyState = emptyState;
    notifyChange();
  }

  /**
   * 顯示進度條
   *
   * @return
   */
  public boolean isProgress() {
    return this.emptyState == EmptyState.PROGRESS;
  }

  /**
   * 根據異常顯示狀態
   *
   * @param e
   */
  public void bindThrowable(Throwable e) {
    if (e instanceof EmptyException) {
      @EmptyState
      int code = ((EmptyException) e).getCode();

      setEmptyState(code);
    }
  }

  public boolean isEmpty() {
    return this.emptyState != EmptyState.NORMAL;
  }

  /**
   * 空狀態信息
   *
   * @return
   */
  @Bindable
  public String getCurrentStateLabel() {

    switch (emptyState) {
      case EmptyState.EMPTY:
        return mContext.getString(R.string.no_data);
      case EmptyState.NET_ERROR:
        return mContext.getString(R.string.please_check_net_state);
      case EmptyState.NOT_AVAILABLE:
        return mContext.getString(R.string.server_not_avaliabe);
      default:
        return mContext.getString(R.string.no_data);
    }
  }

  /**
   * 空狀態圖片
   *
   * @return
   */
  @Bindable
  public Drawable getEmptyIconRes() {
    switch (emptyState) {
      case EmptyState.EMPTY:
        return ContextCompat.getDrawable(mContext, R.drawable.ic_visibility_off_green_400_48dp);
      case EmptyState.NET_ERROR:
        return ContextCompat.getDrawable(mContext, R.drawable.ic_signal_wifi_off_green_400_48dp);
      case EmptyState.NOT_AVAILABLE:
        return ContextCompat.getDrawable(mContext, R.drawable.ic_cloud_off_green_400_48dp);
      default:
        return ContextCompat.getDrawable(mContext, R.drawable.ic_visibility_off_green_400_48dp);
    }
  }

}
很普通的視圖模型,主要有幾個用于判斷狀態顯示的方法
下面講講實際運用:
在activity或者fragment布局中,添加狀態頁的布局
<?xml version="1.0" encoding="utf-8"?>
<layout xmlns:android="http://schemas.android.com/apk/res/android"
    xmlns:app="http://schemas.android.com/apk/res-auto">

  <data>

    <import type="android.view.View"/>

    <variable
      name="stateModel"
      type="com.ditclear.app.state.StateModel"/>

  </data>

  <com.ditclear.app.ScrollChildSwipeRefreshLayout
    android:id="@+id/refresh_layout"
    android:layout_width="match_parent"
    android:layout_height="match_parent">

    <RelativeLayout
      android:id="@+id/container"
      android:layout_width="match_parent"
      android:layout_height="match_parent"
      android:orientation="vertical">


      <android.support.v4.widget.NestedScrollView
        android:layout_width="match_parent"
        android:layout_height="match_parent"
        android:fillViewport="false"
        android:overScrollMode="always"
        android:visibility="@{stateModel.empty?View.GONE:View.VISIBLE}">

        <TextView
          android:id="@+id/content_tv"
          android:layout_width="match_parent"
          android:layout_height="match_parent"
          android:gravity="center"/>


      </android.support.v4.widget.NestedScrollView>


      <include
        layout="@layout/widget_layout_empty"
        app:stateModel="@{stateModel}"/>

    </RelativeLayout>
  </com.ditclear.app.ScrollChildSwipeRefreshLayout>
</layout>
最后在activity或者fragment中我們只需要通過state.bindThrowable()和state.setEmptyState()方法便可以輕松設置各種各樣的狀態。
loadData().subscribe(new Subscriber<List<Contributor>>() {

  @Override
  public void onStart() {
    super.onStart();
    if (!mMainBinding.refreshLayout.isRefreshing()) {
      mStateModel.setEmptyState(EmptyState.PROGRESS);
    }
  }

  @Override
  public void onCompleted() {
    mStateModel.setEmptyState(EmptyState.NORMAL);

  }

  @Override
  public void onError(Throwable e) {
    mMainBinding.refreshLayout.setRefreshing(false);
    mStateModel.bindThrowable(e);
    Toast.makeText(MainActivity.this, mStateModel.getCurrentStateLabel(), Toast.LENGTH_SHORT).show();


  }

  @Override
  public void onNext(List<Contributor> contributors) {
    mMainBinding.refreshLayout.setRefreshing(false);
    if (contributors == null || contributors.isEmpty()) {
      onError(new EmptyException(EmptyState.EMPTY));
    } else {
      mMainBinding.contentTv.setText(contributors.toString());
    }
  }
});
寫在最后
對于要使用數據來控制視圖狀態的,使用databinding實在是一個事半功倍的方式。而且也十分容易理解。
最后demo地址:StateBinding_jb51.rar
以上就是本文的全部內容,希望對大家的學習有所幫助,也希望大家多多支持億速云。
免責聲明:本站發布的內容(圖片、視頻和文字)以原創、轉載和分享為主,文章觀點不代表本網站立場,如果涉及侵權請聯系站長郵箱:is@yisu.com進行舉報,并提供相關證據,一經查實,將立刻刪除涉嫌侵權內容。