您好,登錄后才能下訂單哦!
您好,登錄后才能下訂單哦!
本文實例講述了Android開發之文件操作。分享給大家供大家參考,具體如下:
目前,幾乎所有的設備都會涉及到文件的操作,例如什么電腦,手機等設備。Android的文件操作和電腦是比較類似的,既可以存儲在手機內置的存儲器里也可以是sd卡。在這篇文章里主要介紹在手機內置存儲器里的文件操作。
一. 開發流程
(1)界面的設計
(2)設計android的業務層
(3)單元測試
(4)設置android的控制器層
二. 開發步驟
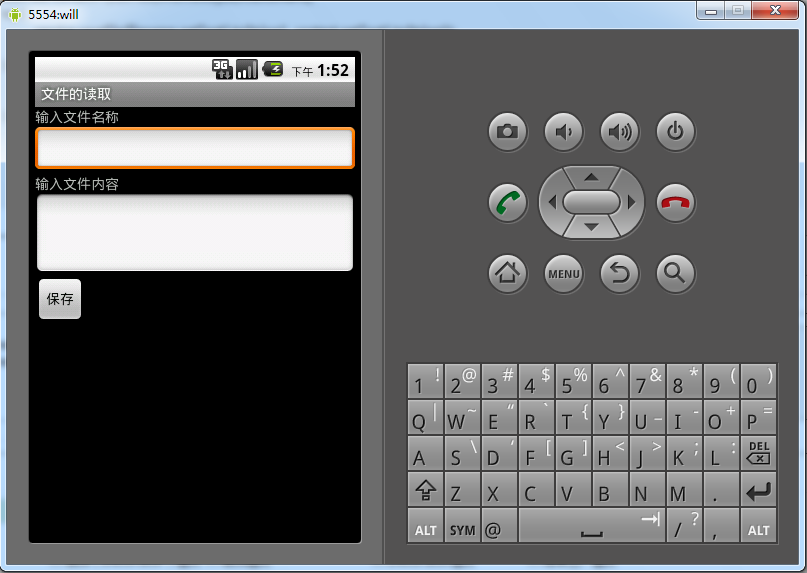
(1)設計軟件界面
<?xml version="1.0" encoding="utf-8"?>
<LinearLayout xmlns:android="http://schemas.android.com/apk/res/android"
  android:orientation="vertical"
  android:layout_width="fill_parent"
  android:layout_height="fill_parent"
  >
<TextView
  android:layout_width="fill_parent"
  android:layout_height="wrap_content"
  android:text="@string/filename"
  />
 <EditText
  android:layout_width="fill_parent"
  android:layout_height="wrap_content"
  android:id="@+id/filename"
  />
  <TextView
  android:layout_width="fill_parent"
  android:layout_height="wrap_content"
  android:text="@string/content"
  />
 <EditText
  android:layout_width="fill_parent"
  android:layout_height="wrap_content"
  android:id="@+id/content"
  android:minLines="3"
  />
  <Button
   android:layout_width="wrap_content"
   android:layout_height="wrap_content"
   android:text="@string/button"
   android:id="@+id/button"/>
</LinearLayout>
這里也把R文件給大家看看
/* AUTO-GENERATED FILE. DO NOT MODIFY.
 *
 * This class was automatically generated by the
 * aapt tool from the resource data it found. It
 * should not be modified by hand.
 */
package org.lxh.file;
public final class R {
  public static final class attr {
  }
  public static final class drawable {
    public static final int icon=0x7f020000;
  }
  public static final class id {
    public static final int button=0x7f050002;
    public static final int content=0x7f050001;
    public static final int filename=0x7f050000;
  }
  public static final class layout {
    public static final int main=0x7f030000;
  }
  public static final class string {
    public static final int app_name=0x7f040001;
    public static final int button=0x7f040004;
    public static final int content=0x7f040003;
    public static final int failure=0x7f040006;
    public static final int filename=0x7f040002;
    public static final int hello=0x7f040000;
    public static final int success=0x7f040005;
  }
}
(2)設計業務層
package org.lxh.service;
import java.io.ByteArrayOutputStream;
import java.io.FileInputStream;
import java.io.FileOutputStream;
import android.content.Context;
import android.util.Log;
public class FileService {
  private Context context;
  public FileService(Context context) { //通過構造方法傳入context
    this.context = context;
  }
  //保存文件
  public void saveFile(String filename,String content) throws Exception{ //異常交給調用處處理
    FileOutputStream out=context.openFileOutput(filename, Context.MODE_PRIVATE);
    out.write(content.getBytes());
    out.close();
  }
  public String readFile(String filename) throws Exception{ //異常交給調用處處理
    FileInputStream in=context.openFileInput(filename);
    byte b[]=new byte[1024];
    int len=0;
    ByteArrayOutputStream array=new ByteArrayOutputStream();
    while((len=in.read(b))!=-1){ //開始讀取文件
      array.write(b,0,len);
    }
    byte data[]=array.toByteArray(); //把內存里的數據讀取出來
    in.close(); //每個流都必須關閉
    array.close();
    return new String(data); //把byte數組轉換為字符串并返回
  }
}
下面開始做單元測試,要添加的環境就不說了
package org.lxh.test;
import org.lxh.service.FileService;
import android.test.AndroidTestCase;
import android.util.Log;
public class Test extends AndroidTestCase {
  public static final String TAG = "Test";
  public void testSave() {
    FileService service = new FileService(this.getContext());
    try {
      service.saveFile("01.txt", "hello");
    } catch (Exception e) {
      Log.i(TAG, e.getMessage());
    }
  }
  public void testRead() {
    FileService service = new FileService(this.getContext());
    try {
      Log.i(TAG,service.readFile("01.txt"));
    } catch (Exception e) {
      Log.e(TAG, e.getMessage());
    }
  }
}
看一下運行之后的效果


單元測試通過了,下面來看下在模擬器上的效果,在這之前要先看下下面的代碼
package org.lxh.file;
import org.lxh.service.FileService;
import android.app.Activity;
import android.os.Bundle;
import android.util.Log;
import android.view.View;
import android.widget.Button;
import android.widget.EditText;
import android.widget.Toast;
public class FileActivity extends Activity {
  private FileService service;
  public void onCreate(Bundle savedInstanceState) {
    super.onCreate(savedInstanceState);
    setContentView(R.layout.main);
    service=new FileService(this);
    Button button=(Button)findViewById(R.id.button);
    button.setOnClickListener(new View.OnClickListener() {
      public void onClick(View v) {
        EditText filename=(EditText)findViewById(R.id.filename);
        EditText content=(EditText)findViewById(R.id.content);
        try {
          service.saveFile(filename.getText().toString(), content.getText().toString());
          Toast.makeText(FileActivity.this, R.string.success, 1).show();
        } catch (Exception e) {
          Toast.makeText(FileActivity.this, R.string.failure, 1).show();
          Log.e("FileActivity", e.getMessage());
        }
      }
    });
  }
}
如果保存成功就給用戶一個圖示通知:

下面把strings.xml的代碼也貼出來
<?xml version="1.0" encoding="utf-8"?>
<resources>
  <string name="hello">Hello World, FileActivity!</string>
  <string name="app_name">文件的讀取</string>
  <string name="filename">輸入文件名稱</string>
  <string name="content">輸入文件內容</string>
  <string name="button">保存</string>
  <string name="success">文件保存成功</string>
  <string name="failure">文件保存失敗</string>
</resources>
更多關于Android相關內容感興趣的讀者可查看本站專題:《Android文件操作技巧匯總》、《Android視圖View技巧總結》、《Android編程之activity操作技巧總結》、《Android布局layout技巧總結》、《Android開發入門與進階教程》、《Android資源操作技巧匯總》及《Android控件用法總結》
希望本文所述對大家Android程序設計有所幫助。
免責聲明:本站發布的內容(圖片、視頻和文字)以原創、轉載和分享為主,文章觀點不代表本網站立場,如果涉及侵權請聯系站長郵箱:is@yisu.com進行舉報,并提供相關證據,一經查實,將立刻刪除涉嫌侵權內容。