溫馨提示×
您好,登錄后才能下訂單哦!
點擊 登錄注冊 即表示同意《億速云用戶服務條款》
您好,登錄后才能下訂單哦!
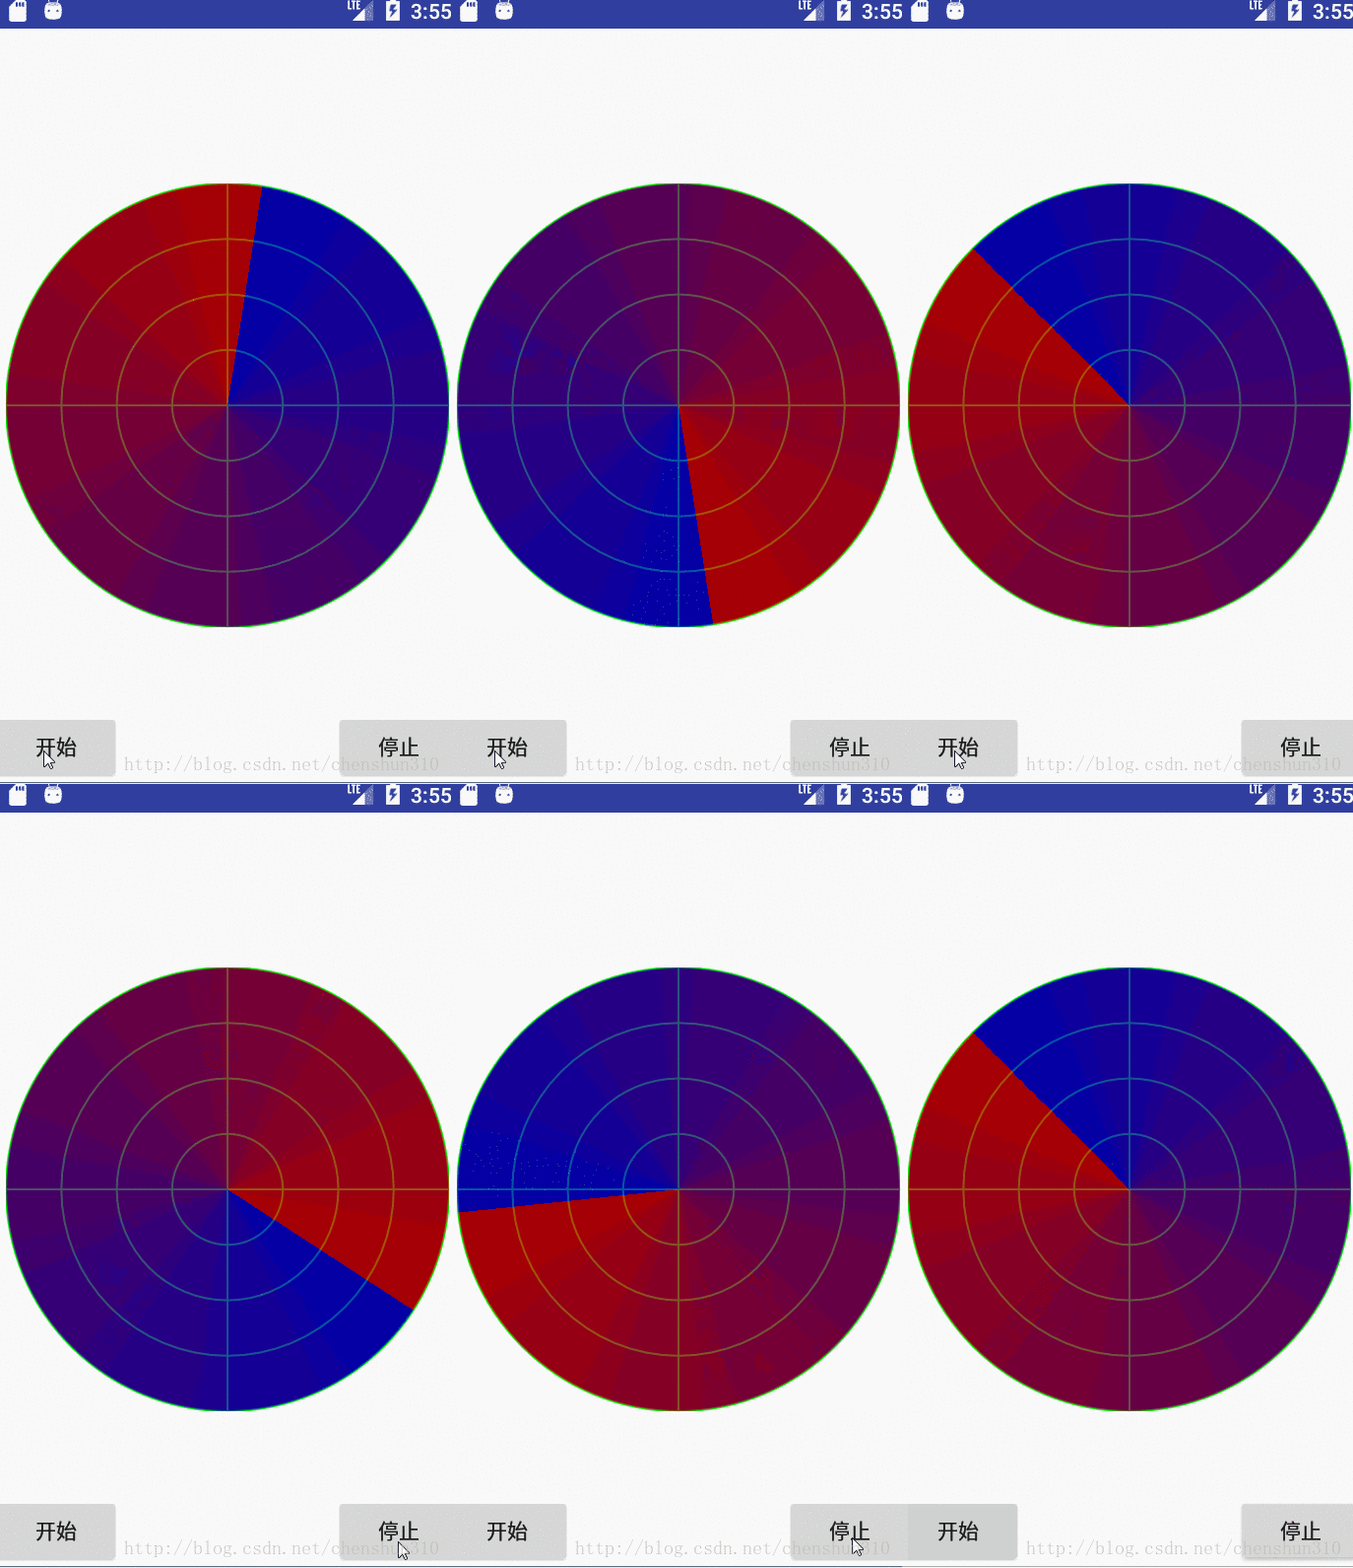
如何制作出類似雷達掃描的效果,具體方法如下
一、效果圖

二、實現思路
1、自定義控件RadarView用來畫雷達的效果圖,可以自定義屬性包括
backgroundColor:背景顏色
circleNum:圓的數量
startColor:開始顏色
endColor:結束顏色
lineColor:線的顏色
2、通過Handler循環發送消息到MessageQueue中,將mRotate加3,使Matrix旋轉mRotate,重繪雷達掃描的圓。
3、通過梯度漸變掃描渲染器SweepGradient,在繪制圓的過程中,將顏色從startColor變為endColor。
三、實例代碼
public class RadarView extends View {
 private final String TAG = "RadarView";

 private static final int MSG_WHAT = 1;

 private static final int DELAY_TIME = 20;

 //設置默認寬高,雷達一般都是圓形,所以我們下面取寬高會取Math.min(寬,高)
 private final int DEFAULT_WIDTH = 200;

 private final int DEFAULT_HEIGHT = 200;
 //雷達的半徑
 private int mRadarRadius;
 //雷達畫筆
 private Paint mRadarPaint;
 //雷達底色畫筆
 private Paint mRadarBg;
 //雷達圓圈的個數,默認4個
 private int mCircleNum = 4;
 //雷達線條的顏色,默認為白色
 private int mCircleColor = Color.WHITE;
 //雷達圓圈背景色
 private int mRadarBgColor = Color.BLACK;
 //paintShader
 private Shader mRadarShader;

 //雷達掃描時候的起始和終止顏色
 private int mStartColor = 0x0000ff00;

 private int mEndColor = 0xaa00ff00;


 private Matrix mMatrix;

 //旋轉的角度
 private int mRotate = 0;

 private Handler mHandler = new Handler() {
  @Override
  public void handleMessage(Message msg) {
   super.handleMessage(msg);

   mRotate += 3;
   postInvalidate();

   mMatrix.reset();
   mMatrix.preRotate(mRotate, 0, 0);
   //延時DELAY_TIME后再發送消息
   mHandler.sendEmptyMessageDelayed(MSG_WHAT, DELAY_TIME);
  }
 };

 public RadarView(Context context) {
  this(context, null);
 }

 public RadarView(Context context, AttributeSet attrs) {
  this(context, attrs, 0);
 }

 public RadarView(Context context, AttributeSet attrs, int defStyleAttr) {
  super(context, attrs, defStyleAttr);
  init(context, attrs);

  //設置抗鋸齒
  mRadarBg = new Paint(Paint.ANTI_ALIAS_FLAG);
  //畫筆顏色
  mRadarBg.setColor(mRadarBgColor);
  //畫實心圓
  mRadarBg.setStyle(Paint.Style.FILL);

  //設置抗鋸齒
  mRadarPaint = new Paint(Paint.ANTI_ALIAS_FLAG);
  //畫筆顏色
  mRadarPaint.setColor(mCircleColor);
  //設置空心的畫筆,只畫圓邊
  mRadarPaint.setStyle(Paint.Style.STROKE);
  //畫筆寬度
  mRadarPaint.setStrokeWidth(2);
  //使用梯度漸變渲染器,
  mRadarShader = new SweepGradient(0, 0, mStartColor, mEndColor);

  mMatrix = new Matrix();
 }


 //初始化,拓展可設置參數供布局使用
 private void init(Context context, AttributeSet attrs) {
  if (attrs != null) {
   TypedArray ta = context.obtainStyledAttributes(attrs, R.styleable.RadarView);
   mStartColor = ta.getColor(R.styleable.RadarView_startColor, mStartColor);
   mEndColor = ta.getColor(R.styleable.RadarView_endColor, mEndColor);
   mRadarBgColor = ta.getColor(R.styleable.RadarView_backgroundColor, mRadarBgColor);
   mCircleColor = ta.getColor(R.styleable.RadarView_lineColor, mCircleColor);
   mCircleNum = ta.getInteger(R.styleable.RadarView_circleNum, mCircleNum);
   ta.recycle();
  }
 }


 @Override
 protected void onSizeChanged(int w, int h, int oldw, int oldh) {
  super.onSizeChanged(w, h, oldw, oldh);
  //雷達的半徑為寬的一半或高的一半的最小值
  mRadarRadius = Math.min(w / 2, h / 2);
 }

 @Override
 protected void onMeasure(int widthMeasureSpec, int heightMeasureSpec) {
  super.onMeasure(widthMeasureSpec, heightMeasureSpec);
  //獲取寬度
  int width = measureSize(1, DEFAULT_WIDTH, widthMeasureSpec);
  //獲取高度
  int height = measureSize(0, DEFAULT_HEIGHT, heightMeasureSpec);

  //取最大的 寬|高
  int measureSize = Math.max(width, height);
  setMeasuredDimension(measureSize, measureSize);
 }


 /**
  * 測繪measure
  *
  * @param specType 1為寬, 其他為高
  * @param contentSize 默認值
  */
 private int measureSize(int specType, int contentSize, int measureSpec) {
  int result;
  //獲取測量的模式和Size
  int specMode = MeasureSpec.getMode(measureSpec);
  int specSize = MeasureSpec.getSize(measureSpec);

  if (specMode == MeasureSpec.EXACTLY) {
   result = Math.max(contentSize, specSize);
  } else {
   result = contentSize;

   if (specType == 1) {
    // 根據傳入方式計算寬
    result += (getPaddingLeft() + getPaddingRight());
   } else {
    // 根據傳入方式計算高
    result += (getPaddingTop() + getPaddingBottom());
   }
  }

  return result;

 }


 @Override
 protected void onDraw(Canvas canvas) {
  super.onDraw(canvas);

  Log.d(TAG, "onDraw " + mRotate);

  mRadarBg.setShader(null);

  //將畫布移動到屏幕的中心點
  canvas.translate(mRadarRadius, mRadarRadius);
  //繪制底色,讓雷達的線看起來更清晰
  canvas.drawCircle(0, 0, mRadarRadius, mRadarBg);
  //畫圓圈
  for (int i = 1; i <= mCircleNum; i++) {
   canvas.drawCircle(0, 0, (float) (i * 1.0 / mCircleNum * mRadarRadius), mRadarPaint);
  }
  //繪制雷達基線 x軸
  canvas.drawLine(-mRadarRadius, 0, mRadarRadius, 0, mRadarPaint);
  //繪制雷達基線 y軸
  canvas.drawLine(0, mRadarRadius, 0, -mRadarRadius, mRadarPaint);
  //設置顏色漸變從透明到不透明
  mRadarBg.setShader(mRadarShader);
  //設置矩陣
  canvas.concat(mMatrix);
  canvas.drawCircle(0, 0, mRadarRadius, mRadarBg);
 }


 public void startScan() {
  mHandler.removeMessages(MSG_WHAT);
  mHandler.sendEmptyMessage(MSG_WHAT);
 }

 public void stopScan() {
  mHandler.removeMessages(MSG_WHAT);
 }
}
布局文件:
<RelativeLayout xmlns:android="http://schemas.android.com/apk/res/android"
 xmlns:app="http://schemas.android.com/apk/res-auto"
 xmlns:tools="http://schemas.android.com/tools"
 android:id="@+id/activity_main"
 android:layout_width="match_parent"
 android:layout_height="match_parent"
 >
 <com.android.demo.ui.shader.RadarView
  android:id="@+id/radarview"
  android:layout_width="300dp"
  android:layout_height="300dp"
  android:layout_centerInParent="true"
  app:backgroundColor="#000000"
  app:circleNum="4"
  app:endColor="#aaff0000"
  app:lineColor="#00ff00"
  app:startColor="#aa0000ff"/>

 <Button
  android:layout_width="wrap_content"
  android:layout_height="wrap_content"
  android:layout_alignParentLeft="true"
  android:layout_alignParentBottom="true"
  android:onClick="start"
  android:text="開始" />

 <Button
  android:layout_width="wrap_content"
  android:layout_height="wrap_content"
  android:layout_alignParentRight="true"
  android:layout_alignParentBottom="true"
  android:onClick="stop"
  android:text="停止" />
</RelativeLayout>
以上就是本文的全部內容,希望對大家的學習有所幫助,也希望大家多多支持億速云。
免責聲明:本站發布的內容(圖片、視頻和文字)以原創、轉載和分享為主,文章觀點不代表本網站立場,如果涉及侵權請聯系站長郵箱:is@yisu.com進行舉報,并提供相關證據,一經查實,將立刻刪除涉嫌侵權內容。