溫馨提示×
您好,登錄后才能下訂單哦!
點擊 登錄注冊 即表示同意《億速云用戶服務條款》
您好,登錄后才能下訂單哦!
圖標改變顏色:Drawable的變色,讓Android也能有iOS那么方便的圖片色調轉換,就像同一個圖標,但是有多個地方使用,并且顏色不一樣,就可以用這個方法了。
搜索框: 一般是EditText實現,本文 實現 TextView圖片和文字居中,鍵盤搜索。
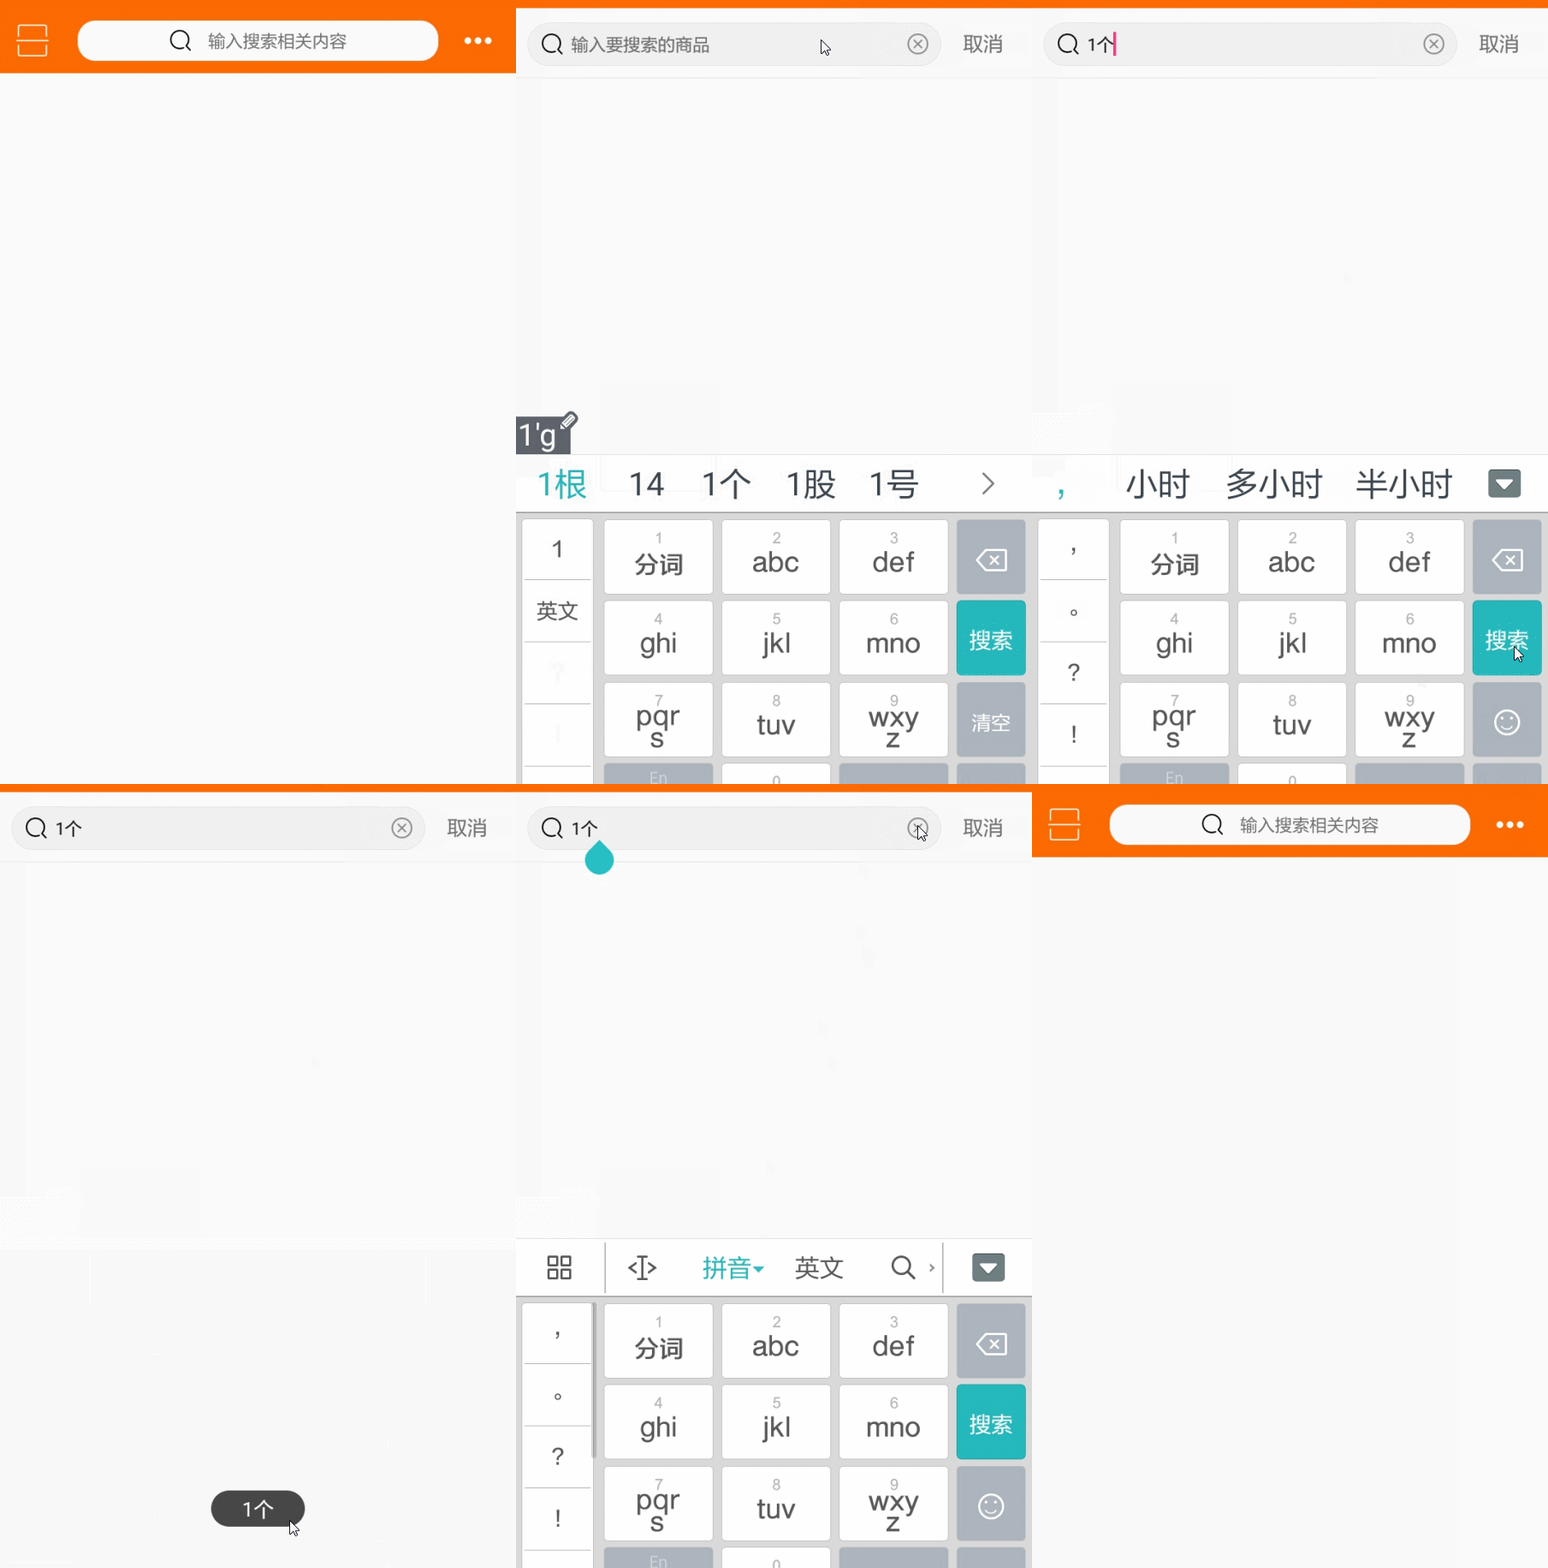
來看看效果圖:

圖標改變顏色:第一個界面的左邊(二維碼)和右邊(更多)兩個實現,我放進去的圖片是黑色的,顯示出來是白色的。

搜索框:第一個界面的圖片和文字居中,還可以設置間距,第二個見面搜索設置鍵盤搜索按鈕,點擊搜索監聽事件,清除內容的圖標。
搜索框布局:
<!--
   搜索圖標設置 左邊
   android:drawableLeft="@mipmap/icon_search"
   android:drawablePadding="5dp" 圖標和文字的間距
   右邊
   android:drawableRight="@mipmap/round_close"
   android:paddingRight="8dp"
   android:imeOptions="actionSearch" 設置成搜索按鈕
  -->
  <EditText
   android:id="@+id/search_text"
   android:layout_width="0dp"
   android:layout_weight="1"
   android:layout_height="30dp"
   android:hint="輸入要搜索的商品"
   android:background="@drawable/search_gray"
   android:layout_marginTop="10dp"
   android:layout_marginLeft="9dp"
   android:textSize="12sp"
   android:drawableLeft="@mipmap/icon_search"
   android:paddingLeft="9dp"
   android:drawablePadding="5dp"
   android:drawableRight="@mipmap/round_close"
   android:paddingRight="8dp"
   android:imeOptions="actionSearch"
   android:maxLines="1"
   android:singleLine="true"
   />
鍵盤監聽:
searchText.setOnEditorActionListener(new TextView.OnEditorActionListener() {
   @Override
   public boolean onEditorAction(TextView v, int actionId, KeyEvent event) {
    if ((actionId == 0 || actionId == 3) && event != null) {
             //提示搜索內容
     Toast.makeText(SearchActivity.this,searchText.getText().toString(),Toast.LENGTH_LONG).show();
     //可以跳轉搜索頁面
     /* Intent intent= new Intent(SearchActivity.this,SearchWebViewActivity.class);
     intent.putExtra("model",model);
     intent.putExtra("search",searchText.getText().toString());
     startActivity(intent);
     finish();*/
    }
    return false;
   }
  });
首頁布局:
<LinearLayout
  android:layout_width="match_parent"
  android:layout_height="wrap_content"
  android:background="@color/colorPrimary"
  android:minHeight="45dp"
  android:orientation="horizontal"
  android:gravity="center_vertical"
  >
  <ImageButton
   android:id="@+id/home_left_scan"
   android:layout_width="wrap_content"
   android:layout_height="wrap_content"
   android:paddingRight="19dp"
   android:paddingTop="3dp"
   android:paddingBottom="3dp"
   android:paddingLeft="11dp"
   android:layout_centerVertical="true"
   android:background="#00000000"
   />
  <com.zhangqie.searchbox.view.DrawableTextView
   android:id="@+id/home_search"
   android:layout_width="match_parent"
   android:layout_height="28dp"
   android:layout_weight="1"
   android:background="@drawable/search_view_background"
   android:gravity="center_vertical"
   android:maxLines="1"
   android:text="輸入搜索相關內容"
   android:drawableLeft="@mipmap/icon_search"
   android:textSize="12sp"
   android:drawablePadding="11dp"
   />
  <ImageButton
   android:id="@+id/home_right_more"
   android:layout_width="wrap_content"
   android:layout_height="wrap_content"
   android:layout_centerVertical="true"
   android:layout_alignParentRight="true"
   android:paddingRight="15dp"
   android:paddingTop="3dp"
   android:paddingBottom="3dp"
   android:paddingLeft="15dp"
   android:background="#00000000"
   />
 </LinearLayout>
自定義DrawableTextView:(文字圖標居中)
public class DrawableTextView extends TextView {
 public DrawableTextView(Context context, AttributeSet attrs,
       int defStyle) {
  super(context, attrs, defStyle);
 }
 public DrawableTextView(Context context, AttributeSet attrs) {
  super(context, attrs);
 }
 public DrawableTextView(Context context) {
  super(context);
 }
 @Override
 protected void onDraw(Canvas canvas) {
  Drawable[] drawables = getCompoundDrawables();
  // 得到drawableLeft設置的drawable對象
  Drawable leftDrawable = drawables[0];
  if (leftDrawable != null) {
   // 得到leftDrawable的寬度
   int leftDrawableWidth = leftDrawable.getIntrinsicWidth();
   // 得到drawable與text之間的間距
   int drawablePadding = getCompoundDrawablePadding();
   // 得到文本的寬度
   int textWidth = (int) getPaint().measureText(getText().toString().trim());
   int bodyWidth = leftDrawableWidth + drawablePadding + textWidth;
   canvas.save();
   canvas.translate((getWidth() - bodyWidth) / 2, 0);
  }
  super.onDraw(canvas);
 }
}
有需要的朋友點擊下載源碼哦!
https://github.com/DickyQie/android-basic-control/tree/search-box
總結
以上所述是小編給大家介紹的Android 改變圖標原有顏色和搜索框的實例代碼,希望對大家有所幫助,如果大家有任何疑問請給我留言,小編會及時回復大家的。在此也非常感謝大家對億速云網站的支持!
免責聲明:本站發布的內容(圖片、視頻和文字)以原創、轉載和分享為主,文章觀點不代表本網站立場,如果涉及侵權請聯系站長郵箱:is@yisu.com進行舉報,并提供相關證據,一經查實,將立刻刪除涉嫌侵權內容。