您好,登錄后才能下訂單哦!
您好,登錄后才能下訂單哦!
Android中怎么實現一個bilibili刷新按鈕,相信很多沒有經驗的人對此束手無策,為此本文總結了問題出現的原因和解決方法,通過這篇文章希望你能解決這個問題。
1、分析
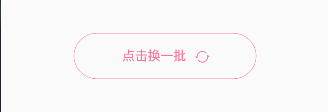
先來看看原版效果:

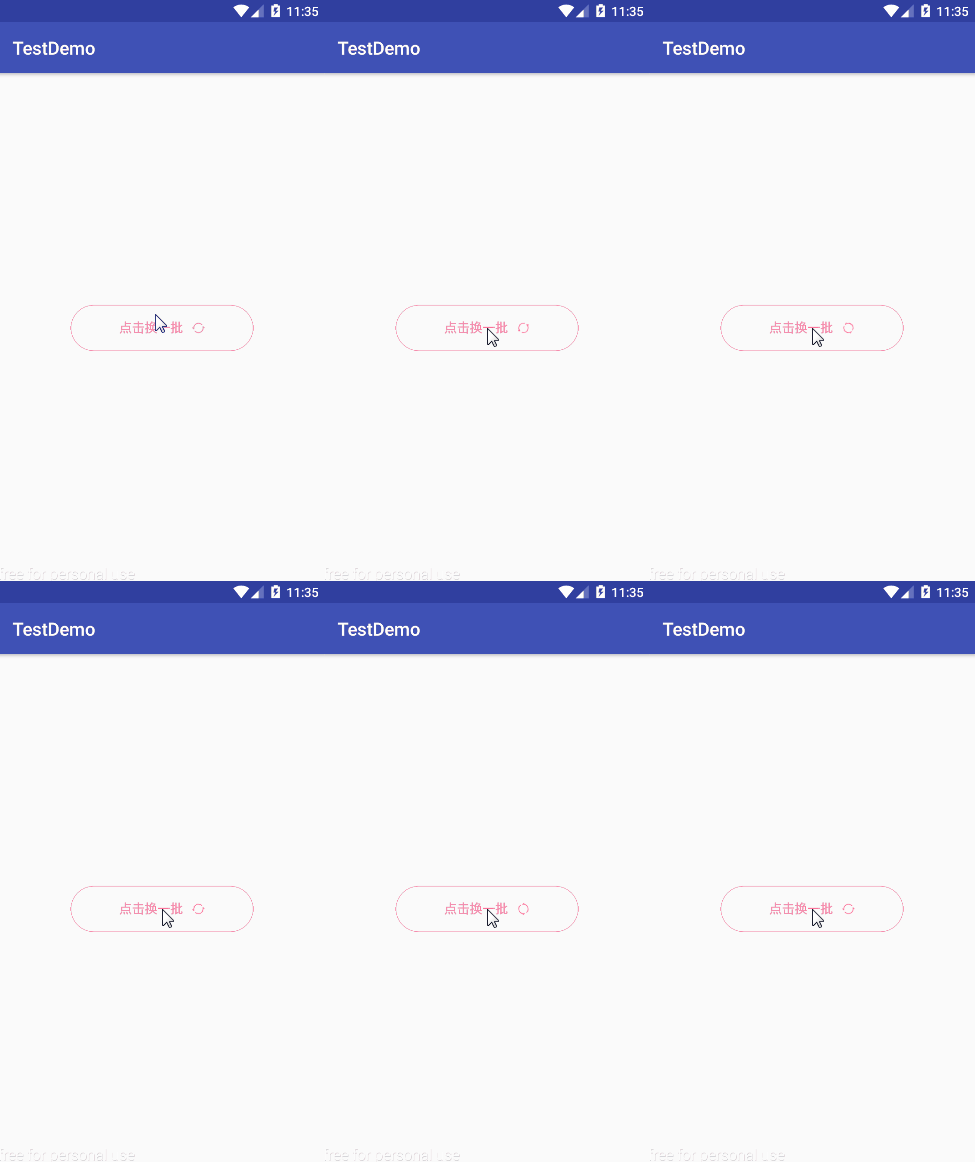
該按鈕由3部分組成,分別是圓角矩形、文字、旋轉圖標。在點擊按鈕后,開始加載數據,旋轉圖標發生旋轉,數據加載完成后,旋轉圖標復位并停止旋轉。話不多說,開始敲代碼。
2、繪制
這里,我們要繪制的部分有3個,分別是上面提到的圓角矩形、文字、旋轉圖標。那么這里就為這3部分分別聲明了一些屬性。
要注意的一點是,這個類中有3個構造函數,因為有部分屬性需要在構造函數中初始化(也為之后自定義屬性做準備),所以,將第1個與第2個構造函數中的super修改為this。
public class LQRRefreshButton extends View {
  // 圓角矩形屬性
  private int borderColor = Color.parseColor("#fb7299");
  private float borderWidth = 0;
  private float borderRadius = 120;
  // 文字屬性
  private String text = "點擊換一批";
  private int textColor = Color.parseColor("#fb7299");
  private float textSize = 28;
  // 旋轉圖標屬性
  private int iconSrc = R.mipmap.tag_center_refresh_icon;
  private float iconSize = 28;
  private Bitmap iconBitmap;
  private float space4TextAndIcon = 20;
  // 畫筆
  private Paint mPaint = new Paint(Paint.ANTI_ALIAS_FLAG);
  public LQRRefreshButton(Context context) {
    this(context, null);
  }
  public LQRRefreshButton(Context context, @Nullable AttributeSet attrs) {
    this(context, attrs, 0);
  }
  public LQRRefreshButton(Context context, @Nullable AttributeSet attrs, int defStyleAttr) {
    super(context, attrs, defStyleAttr);
    // 將圖標資源實例化為Bitmap
    iconBitmap = BitmapFactory.decodeResource(getResources(), R.mipmap.tag_center_refresh_icon);
  }
  @Override
  protected void onDraw(Canvas canvas) {
    super.onDraw(canvas);
    // 1、畫圓角矩形
    // 2、畫字
    // 3、畫刷新圖標
  }
}
接下來著重完成onDraw()方法的實現:
@Override
protected void onDraw(Canvas canvas) {
  super.onDraw(canvas);
  // 1、畫圓角矩形
  mPaint.setStyle(Paint.Style.STROKE);
  mPaint.setColor(borderColor);
  mPaint.setStrokeWidth(borderWidth);
  canvas.drawRoundRect(new RectF(0, 0, getWidth(), getHeight()), borderRadius, borderRadius, mPaint);
  // 2、畫字
  mPaint.setTextSize(textSize);
  mPaint.setColor(textColor);
  mPaint.setStyle(Paint.Style.FILL);
  float measureText = mPaint.measureText(text);
  float measureAndIcon = measureText + space4TextAndIcon + iconSize;
  float textStartX = getWidth() / 2 - measureAndIcon / 2;
  float textBaseY = getHeight() / 2 + (Math.abs(mPaint.ascent()) - mPaint.descent()) / 2;
  canvas.drawText(text, textStartX, textBaseY, mPaint);
  // 3、畫刷新圖標
  float iconStartX = textStartX + measureText + space4TextAndIcon;
  canvas.drawBitmap(iconBitmap, iconStartX, getHeight() / 2 - iconSize / 2, mPaint);
}
先來看看效果:

我給該控件設置了寬為200dp,高為100dp。
可以看到效果還不錯,但還是有一點點問題的,下面就分別說說這3部分是怎么畫的,及存在的小問題。
1)畫圓角矩形
其實畫圓角矩形很簡單,設置好畫筆的樣式、顏色、線粗,再調用canvas的drawRoundRect()方法即可實現。
因為我們要畫的圓角矩形只需要畫線,所以畫筆的樣式便設置為Paint.Style.STROKE。
canvas的drawRoundRect()方法中,第一個參數是繪制范圍,這里就直接按該控件的大小來設置即可。第二、三個參數是x軸和y軸的圓角半徑,第三個參數是畫筆(要畫東西當然需要畫筆~)。
但你有沒有發現,此時的 線粗為0(borderWidth=0),矩形線怎么還有?這是因為畫筆的樣式為Paint.Style.STROKE,當線粗為0時,還要畫出1px的線,因為對畫筆來說,最小的線粗就是1px。所以,上面的代碼需要做如下改動:
// 1、畫圓角矩形
if (borderWidth > 0) {
  mPaint.setStyle(Paint.Style.STROKE);
  mPaint.setColor(borderColor);
  mPaint.setStrokeWidth(borderWidth);
  canvas.drawRoundRect(new RectF(0, 0, getWidth(), getHeight()), borderRadius, borderRadius, mPaint);
}
2)畫字
畫字的一般步驟是設置文字大小、文字顏色、畫筆樣式,繪制起點。其中后2個最為重要。
畫筆樣式對畫出的字是有影響的,當畫筆樣式為Paint.Style.STROKE時,畫出來的字是鏤空的(不信你可以試試),我們需要的是實心的字,所以需要修改畫筆的樣式為Paint.Style.FILL。
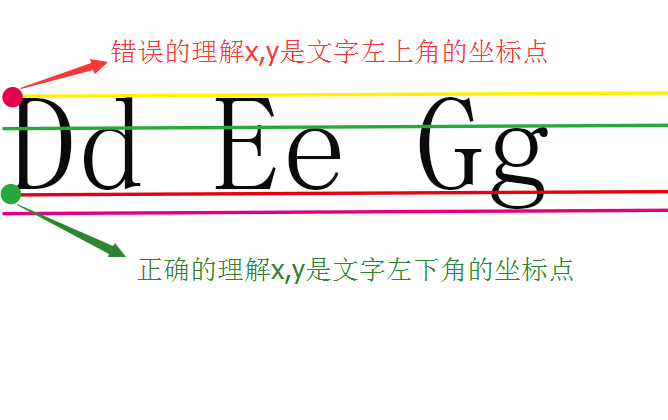
在安卓中,文字的繪制跟其它繪制是不同的,例如,圓角矩形和旋轉圖標的繪制起點是左上角,而文字則是按文字左下字為起點,也就是按基線(Baseline)來繪制,故需要得到基線起點的坐標。

如上圖中,現在要獲得的就是文字左下角的點,這要怎么求呢?
先說x,一般需要讓文字居中顯示(跟文字的對齊方式也有關系,這里以默認的左對齊為例),所以計算公式一般為: x = 控件寬度/2 - 文字長度/2。但我們這個控件有點不同,它還需要考慮到旋轉圖標的位置問題,所以x應該這么求: x = 控件寬度/2 - (文字長度+空隙+旋轉圖標寬度)/2。
// 得到文字長度
float measureText = mPaint.measureText(text);
// 得到 文字長度+空隙+旋轉圖標寬度
float measureAndIcon = measureText + space4TextAndIcon + iconSize;
// 得到文字繪制起點
float textStartX = getWidth() / 2 - measureAndIcon / 2;
再說y,如圖所示:

如果直接用控件的高度的一半作為文字繪制的基線,那么繪制出來的文字肯定偏上,這是因為Ascent的高度比Descent的高度要高的多,我們在計算Baseline時,需要在Ascent中減去Descent的高度得到兩者高度差,再讓控件中心y坐標加上(下降)這個高度差的一半。故:
float textBaseY = getHeight() / 2 + (Math.abs(mPaint.ascent()) - mPaint.descent()) / 2;
3)畫刷新圖標
最后就是畫刷新圖標了,它是以左上角為起點的,通過canvas的drawBitmap()方法進行繪制即可。
但是,有一點需要注意,iconSize是我自己定的一個大小,并不是圖標的實際大小,所以在往后做旋轉動畫時獲取到的旋轉中心會有誤差,將導致圖標旋轉時不是按中心進行旋轉。所以,這里需要對圖標大小進行調整:
public class LQRRefreshButton extends View {
  ...
  public LQRRefreshButton(Context context, @Nullable AttributeSet attrs, int defStyleAttr) {
    super(context, attrs, defStyleAttr);
    // icon
    iconBitmap = BitmapFactory.decodeResource(getResources(), iconSrc);
    iconBitmap = zoomImg(iconBitmap, iconSize, iconSize);
  }
  public Bitmap zoomImg(Bitmap bm, float newWidth, float newHeight) {
    // 獲得圖片的寬高
    int width = bm.getWidth();
    int height = bm.getHeight();
    // 計算縮放比例
    float scaleWidth = ((float) newWidth) / width;
    float scaleHeight = ((float) newHeight) / height;
    // 取得想要縮放的matrix參數
    Matrix matrix = new Matrix();
    matrix.postScale(scaleWidth, scaleHeight);
    // 得到新的圖片
    Bitmap newbm = Bitmap.createBitmap(bm, 0, 0, width, height, matrix, true);
    return newbm;
  }
  ...
}
3、動畫
現在,要實現旋轉圖標的旋轉功能了。原理就是在canvas繪制圖標時,將canvas進行旋轉,canvas旋轉著繪制圖標也很簡單,只需要4步:
canvas.save();
canvas.rotate(degress, centerX, centerY);
canvas.drawBitmap(iconBitmap, iconStartX, getHeight() / 2 - iconSize / 2, mPaint);
canvas.restore();
接下來要做的,就是計算出旋轉中心,旋轉角度,并不停止的去調用onDraw()編制圖標,可以使用ValueAnimator或ObjectAnimator實現這個功能,這里選用ObjectAnimator。實現如下:
public class LQRRefreshButton extends View {
  ...
  private float degress = 0;
  private ObjectAnimator mAnimator;
  public LQRRefreshButton(Context context, @Nullable AttributeSet attrs, int defStyleAttr) {
    super(context, attrs, defStyleAttr);
    // 旋轉動畫
    mAnimator = ObjectAnimator.ofObject(this, "degress", new FloatEvaluator(), 360, 0);
    mAnimator.setDuration(2000);
    mAnimator.setRepeatMode(ObjectAnimator.RESTART);
    mAnimator.setInterpolator(new LinearInterpolator());
    mAnimator.setRepeatCount(ObjectAnimator.INFINITE);
  }
  @Override
  protected void onDraw(Canvas canvas) {
    super.onDraw(canvas);
    ...
    // 3、畫刷新圖標
    float iconStartX = textStartX + measureText + space4TextAndIcon;
    canvas.save();
    float centerX = iconStartX + iconSize / 2;
    int centerY = getHeight() / 2;
    canvas.rotate(degress, centerX, centerY);
    canvas.drawBitmap(iconBitmap, iconStartX, getHeight() / 2 - iconSize / 2, mPaint);
    canvas.restore();
  }
  public void start() {
    mAnimator.start();
  }
  public void stop() {
    mAnimator.cancel();
    setDegress(0);
  }
  public float getDegress() {
    return degress;
  }
  public void setDegress(float degress) {
    this.degress = degress;
    invalidate();
  }
}
使用ObjectAnimator可以對任意屬性值進行修改,所以需要在該控件中聲明一個旋轉角度變量(degress),并編寫getter和setter方法,還需要在setter方法中調用invalidate(),這樣才能在角度值發生變換時,讓控件回調onDraw()進行圖標的旋轉繪制。ObjectAnimator的使用也不復雜,這里就不詳細介紹了。來看下動畫效果吧:

4、自定義屬性
一個自定義控件,是不能把屬性值寫死在控件里的,所以我們需要自定義屬性,從外界獲取這些屬性值。
1)屬性文件編寫
在attrs.xml中編寫如下代碼:
<?xml version="1.0" encoding="utf-8"?>
<resources>
  <declare-styleable name="LQRRefreshButton">
    <attr name="refresh_btn_borderColor" format="color"/>
    <attr name="refresh_btn_borderWidth" format="dimension"/>
    <attr name="refresh_btn_borderRadius" format="dimension"/>
    <attr name="refresh_btn_text" format="string"/>
    <attr name="refresh_btn_textColor" format="color"/>
    <attr name="refresh_btn_textSize" format="dimension"/>
    <attr name="refresh_btn_iconSrc" format="reference"/>
    <attr name="refresh_btn_iconSize" format="dimension"/>
    <attr name="refresh_btn_space4TextAndIcon" format="dimension"/>
  </declare-styleable>
</resources>
2)屬性值獲取
在控件的第三個構造函數中獲取這些屬性值:
public class LQRRefreshButton extends View {
  public LQRRefreshButton(Context context, @Nullable AttributeSet attrs, int defStyleAttr) {
    super(context, attrs, defStyleAttr);
    // 獲取自定義屬性值
    TypedArray ta = context.obtainStyledAttributes(attrs, R.styleable.LQRRefreshButton);
    borderColor = ta.getColor(R.styleable.LQRRefreshButton_refresh_btn_borderColor, Color.parseColor("#fb7299"));
    borderWidth = ta.getDimension(R.styleable.LQRRefreshButton_refresh_btn_borderWidth, dipToPx(0));
    borderRadius = ta.getDimension(R.styleable.LQRRefreshButton_refresh_btn_borderRadius, dipToPx(60));
    text = ta.getString(R.styleable.LQRRefreshButton_refresh_btn_text);
    if (text == null)
      text = "";
    textColor = ta.getColor(R.styleable.LQRRefreshButton_refresh_btn_textColor, Color.parseColor("#fb7299"));
    textSize = ta.getDimension(R.styleable.LQRRefreshButton_refresh_btn_textSize, spToPx(14));
    iconSrc = ta.getResourceId(R.styleable.LQRRefreshButton_refresh_btn_iconSrc, R.mipmap.tag_center_refresh_icon);
    iconSize = ta.getDimension(R.styleable.LQRRefreshButton_refresh_btn_iconSize, dipToPx(14));
    space4TextAndIcon = ta.getDimension(R.styleable.LQRRefreshButton_refresh_btn_space4TextAndIcon, dipToPx(10));
    ta.recycle();
    ...
  }
}
這里有一點需要留意:
ta.getDimension(屬性id, 默認值)
1
2
通過TypedArray對象可以從外界到的的值會根據單位(如:dp、sp)的不同自動轉換成px,但默認值的單位是一定的,為px,所以為了符合安卓規范,不要直接使用px,所以需要手動做個轉換。最后還需要調用recycle()方法回收TypedArray。
3)在布局文件中應用
<com.lqr.biliblili.mvp.ui.widget.LQRRefreshButton
  android:id="@+id/btn_refresh"
  android:layout_width="118dp"
  android:layout_height="32dp"
  android:layout_gravity="center"
  android:layout_marginBottom="3dp"
  android:layout_marginTop="8dp"
  app:refresh_btn_borderRadius="25dp"
  app:refresh_btn_borderWidth="1dp"
  app:refresh_btn_iconSize="16dp"
  app:refresh_btn_text="點擊換一批"
  app:refresh_btn_textColor="@color/bottom_text_live"
  app:refresh_btn_textSize="14sp"/>
看完上述內容,你們掌握Android中怎么實現一個bilibili刷新按鈕的方法了嗎?如果還想學到更多技能或想了解更多相關內容,歡迎關注億速云行業資訊頻道,感謝各位的閱讀!
免責聲明:本站發布的內容(圖片、視頻和文字)以原創、轉載和分享為主,文章觀點不代表本網站立場,如果涉及侵權請聯系站長郵箱:is@yisu.com進行舉報,并提供相關證據,一經查實,將立刻刪除涉嫌侵權內容。