您好,登錄后才能下訂單哦!
您好,登錄后才能下訂單哦!
怎么在Android中使用TextInputLayout創建一個登陸頁面?針對這個問題,這篇文章詳細介紹了相對應的分析和解答,希望可以幫助更多想解決這個問題的小伙伴找到更簡單易行的方法。
1. 實現 TextInputLayout
第一步: 創建一個新的項目
在Android Studio中 選擇New > New project 。填入所需的信息然后創建項目。我的例子的target api是17,這是Design Support Library支持的最小api版本。這個級別的api基本上已經支持絕大多數設備了。我把主activity命名為LoginActivity,它的布局文件命名為activity_login.xml。
創建完項目之后,在主activity中把Android Studio自動產生的onCreateOptionsMenu 和onOptionsItemSelected方法刪掉。我們要創建的登陸界面不需要菜單所以刪掉這些方法是ok的。記得也刪掉res/menu目錄中的XML 菜單文件。
第二步:導入Support Library
要使用TextInputLayout控件,你需要導入兩個Library。第一個是appcompat-v7,它確保material style可以向后兼容。第二個是Design Support Library。在你的build.gradle文件中,添加如下依賴:
  dependencies {
    compile fileTree(dir: 'libs', include: ['*.jar'])

    compile 'com.android.support:design:22.2.0'
    compile 'com.android.support:appcompat-v7:22.2.0'
  }
如果Gradle沒有自動詢問同步項目,選擇build菜單中的Make module ‘app' ,或者按F9。這樣Android Studio 編譯系統會自動獲取必要的資源,然后你就能夠使用需要的類了。
第三步:設計用戶界面
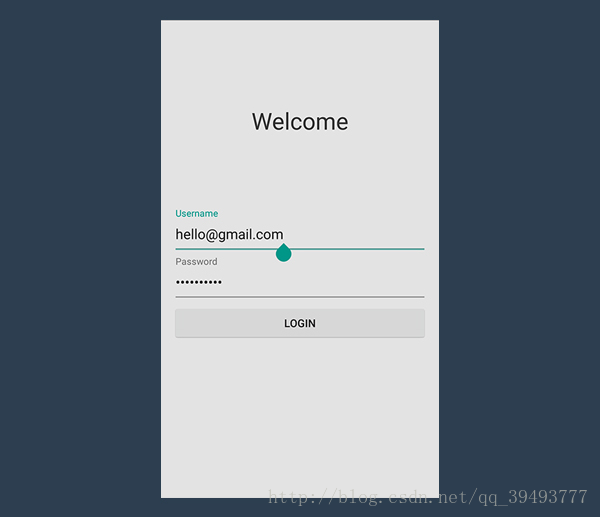
這個項目的用戶界面非常簡單。它顯示了一個“歡迎”文字(可以很容易替換成logo什么的)與兩個EditText元素,一個是為用戶名準備的,一個是為密碼準備的。布局中還包含了一個觸發登陸流程的按鈕。背景顏色是扁平風格的灰色。
另一個重要的細節是記得正確設置EditText的inputType屬性。第一個EditText的inputType應該設置成textEmail,而第二個應該設置成textPassword。下面是布局的樣子:
<LinearLayout xmlns:android="http://schemas.android.com/apk/res/android"
    xmlns:tools="http://schemas.android.com/tools"
    android:background="#e3e3e3"
    android:layout_width="match_parent"
    android:layout_height="match_parent"
    android:padding="@dimen/activity_horizontal_margin"
    tools:context=".LoginActivity"
    android:orientation="vertical">

    <RelativeLayout
      android:layout_width="match_parent"
      android:layout_height="wrap_content"
      android:layout_weight="0.5"
      android:orientation="vertical">

      <TextView
        android:layout_width="match_parent"
        android:layout_height="wrap_content"
        android:layout_centerInParent="true"
        android:gravity="center"
        android:text="Welcome"
        android:textSize="30sp"
        android:textColor="#333333"/>

    </RelativeLayout>


    <LinearLayout
      android:layout_width="match_parent"
      android:layout_height="wrap_content"
      android:layout_weight="0.5"
      android:orientation="vertical">

      <EditText
        android:id="@+id/username"
        android:layout_width="match_parent"
        android:layout_height="wrap_content"
        android:inputType="textEmailAddress"/>

      <EditText
          android:id="@+id/password"
          android:layout_width="match_parent"
          android:layout_height="wrap_content"
          android:inputType="textPassword"/>

      <Button
        android:id="@+id/btn"
        android:layout_marginTop="4dp"
        android:layout_width="match_parent"
        android:layout_height="wrap_content"
        android:text="Login"/>

    </LinearLayout>

  </LinearLayout>
你可能還想去掉app bar,也就是過去說的actionbar,編輯style.xml文件:
<style name="AppTheme" parent="Theme.AppCompat.Light.NoActionBar">
 </style>
第四步: 使用TextInputLayout
我們總算到了本教程最有趣的部分。TextInputLayout控件和LinearLayout完全一樣,它只是一個容器。跟ScrollView一樣,TextInputLayout只接受一個子元素。子元素需要是一個EditText元素。
  <android.support.design.widget.TextInputLayout
    android:id="@+id/usernameWrapper"
    android:layout_width="match_parent"
    android:layout_height="wrap_content">

    <EditText
      android:id="@+id/username"
      android:layout_width="match_parent"
      android:layout_height="wrap_content"
      android:inputType="textEmailAddress"
      android:hint="Username"/>

  </android.support.design.widget.TextInputLayout>
注意這里我在EditText中指定了另一個參數,hint。就如你知道的,這個屬性允許你在EditText的內容為空的時候顯示一個自定義的提示。一旦用戶開始輸入,hint會消失。這并不理想,因為用戶丟失了他們輸入信息的上下文提示。
有了TextInputLayout,這將不再是問題。一個單一的EditText 在輸入文字的時候會隱藏hint,而被包含在TextInputLayout中的EditText則會讓hint變成一個在EditText上方的浮動標簽。同時還包括一個漂亮的material動畫。
接下來,我們對password輸入框做同樣的事情。
  <android.support.design.widget.TextInputLayout
    android:id="@+id/passwordWrapper"
    android:layout_width="match_parent"
    android:layout_height="wrap_content"
    android:layout_below="@id/usernameWrapper"
    android:layout_marginTop="4dp">

    <EditText
      android:id="@+id/password"
      android:layout_width="match_parent"
      android:layout_height="wrap_content"
      android:inputType="textPassword"
      android:hint="Password"/>

  </android.support.design.widget.TextInputLayout>
現在如果你運行應用,什么也不會發生。當然,EditText的hint會表現的跟預期一致。但是沒有material動畫也沒有浮動標簽。為什么會這樣?我們還缺少一些代碼。
第五步: 設置 Hints
下面是setContentView方法,初始化對theTextInputLayout視圖的引用。
final TextInputLayout usernameWrapper = (TextInputLayout) findViewById(R.id.usernameWrapper);
final TextInputLayout passwordWrapper = (TextInputLayout) findViewById(R.id.passwordWrapper);
要讓浮動標簽動起來,你只需設置一個hint,使用setHint方法:
usernameWrapper.setHint("Username");
passwordWrapper.setHint("Password");
然后你就完成了。你的登陸界面現在很好的遵循了material設計規范。運行項目查看你的登陸界面。

2. 處理錯誤
TextInputLayout的另一個特色是它可以處理錯誤。通過驗證輸入,你可以防止用戶輸入無效的郵箱地址或者是太短的密碼。如果沒有驗證,后臺可能反饋回不正確的結果呈現給用戶。對于用戶來說既浪費了時間又體驗不好。在發送到后臺之前你應該先檢查輸入的正確性。
第一步: 實現 onClick 方法
首先你需要處理按鈕的點擊。有許多方法處理按鈕的點擊。其中一種就是寫一個自定義的方法然后在xml中通過onClick屬性指定,我喜歡setOnClickListener的方式,但這只是個人喜好。
  btn.setOnClickListener(new View.OnClickListener() {
    @Override
    public void onClick(View v) {
      // STUB
    }
  });
我們知道當這個方法調用之后,用戶不再需要鍵盤。不幸的是,如果你不告訴它,安卓不會自動的隱藏虛擬鍵盤。在onClick方法體中調用hideKeyboard。
  private void hideKeyboard() {
    View view = getCurrentFocus();
    if (view != null) {
      ((InputMethodManager) getSystemService(Context.INPUT_METHOD_SERVICE)).
        hideSoftInputFromWindow(view.getWindowToken(), InputMethodManager.HIDE_NOT_ALWAYS);
    }
  }
第二步: 輸入驗證
在設置錯誤標簽之前,我們需要定義什么是錯誤,什么不是。我們假設用戶名必須是一個郵箱地址并且我們想阻止用戶輸入無效的郵箱地址。
驗證郵箱地址有點復雜。我們必須依賴正則表達式。如果你想也可以使用Apache Commons library。
我使用了Wikipedia 上關于郵箱驗證的指導,寫了如下的正則表達式。
/^[a-zA-Z0-9#_~!$&'()*+,;=:."(),:;<>@\[\]\\]+@[a-zA-Z0-9-]+(\.[a-zA-Z0-9-]+)*$/
注:這個正則表達式的意思我就不翻譯了,如果你不熟悉正則表達式看了也沒啥用。
因為我們想驗證字符串,我必須依賴Pattern和Matcher兩個類。includeava.util.regex 包。實現如下的方法:
  private static final String EMAIL_PATTERN = "^[a-zA-Z0-9#_~!$&'()*+,;=:.\"(),:;<>@\\[\\]\\\\]+@[a-zA-Z0-9-]+(\\.[a-zA-Z0-9-]+)*$";
  private Pattern pattern = Pattern.compile(EMAIL_PATTERN);
  private Matcher matcher;

  public boolean validateEmail(String email) {
    matcher = pattern.matcher(email);
    return matcher.matches();
  }
密碼的驗證簡單的多。很多組織為密碼的驗證采用了不同的策略,但是所有人都會限制最短長度。合理的密碼應該不低于6個字符。
public boolean validatePassword(String password) {
    return password.length() > 5;
  }
第三步: 獲取數據
就如我說的,TextInputLayout只是一個容器,但是和LinearLayout和ScrollView不同,你可以使用一個特殊的方法獲得子元素,getEditText,不需要使用findViewById。
public void onClick(View v) {
    hideKeyboard();

    String username = usernameWrapper.getEditText().getText().toString();
    String password = passwordWrapper.getEditText().getText().toString();

    // TODO: Checks

    // TODO: Login
  }
第四步: 顯示錯誤
TextInputLayout的錯誤處理簡單快速。需要的方法是setErrorEnabled和setError。
setError設置一個紅色的錯誤消息,顯示在EditText的下面。如果傳入的參數為null,錯誤消息將清空。并且它會改變整個EditText控件為紅色。
setErrorEnabled開啟錯誤提醒功能。這直接影響到布局的大小,增加底部padding為錯誤標簽讓出空間。在setError設置錯誤消息之前開啟這個功能意味著在顯示錯誤的時候布局不會變化。你可以把這兩個方法結合起來驗證下我所說的。
另一個有趣的事實是如果錯誤功能未開啟但是你調用了傳入非null參數的setError,那么setErrorEnabled(true)將自動被調用。
現在我們定義了什么是錯誤的什么是正確的,也知道了如何獲取EditText中的數據以及顯示可能的錯誤,onClick方法的實現就很簡單了。
public void onClick(View v) {
    hideKeyboard();

    String username = usernameWrapper.getEditText().getText().toString();
    String password = usernameWrapper.getEditText().getText().toString();
    if (!validateEmail(username)) {
      usernameWrapper.setError("Not a valid email address!");
    } else if (!validatePassword(password)) {
      passwordWrapper.setError("Not a valid password!");
    } else {
      usernameWrapper.setErrorEnabled(false);
      passwordWrapper.setErrorEnabled(false);
      doLogin();
    }
  }
我添加了一個doLogin方法,但是目前它是空的因為這超出了本教程的范圍。
public void doLogin() {
    Toast.makeText(getApplicationContext(), "OK! I'm performing login.", Toast.LENGTH_SHORT).show();
    // TODO: login procedure; not within the scope of this tutorial.
  }
3. 樣式
你可能還想做最后一件事,改變TextInputLayout控件的顏色。默認AppCompact會把它設置成綠色的,但是很有可能這個顏色會和你的顏色主題(color palette)沖突。
谷歌把Design Support Library寫的很好。每一個控件的顏色都是直接通過主題顏色繪制的,在 style.xml 中指定。打開它添加colorAccent 到主題以改變表單的顏色。
 <style name="AppTheme" parent="Theme.A
  <style name="AppTheme" parent="Theme.AppCompat.Light.NoActionBar">
    <item name="colorAccent">#3498db</item>
  </style>
關于怎么在Android中使用TextInputLayout創建一個登陸頁面問題的解答就分享到這里了,希望以上內容可以對大家有一定的幫助,如果你還有很多疑惑沒有解開,可以關注億速云行業資訊頻道了解更多相關知識。
免責聲明:本站發布的內容(圖片、視頻和文字)以原創、轉載和分享為主,文章觀點不代表本網站立場,如果涉及侵權請聯系站長郵箱:is@yisu.com進行舉報,并提供相關證據,一經查實,將立刻刪除涉嫌侵權內容。