您好,登錄后才能下訂單哦!
您好,登錄后才能下訂單哦!
這篇文章將為大家詳細講解有關Spring AOP實現原理的示例分析,小編覺得挺實用的,因此分享給大家做個參考,希望大家閱讀完這篇文章后可以有所收獲。
什么是AOP
AOP(Aspect-OrientedProgramming,面向方面編程),可以說是OOP(Object-Oriented Programing,面向對象編程)的補充和完善。OOP引入封裝、繼承和多態性等概念來建立一種對象層次結構,用以模擬公共行為的一個集合。當我們需要為分散的對象引入公共行為的時候,OOP則顯得無能為力。也就是說,OOP允許你定義從上到下的關系,但并不適合定義從左到右的關系。例如日志功能。日志代碼往往水平地散布在所有對象層次中,而與它所散布到的對象的核心功能毫無關系。對于其他類型的代碼,如安全性、異常處理和透明的持續性也是如此。這種散布在各處的無關的代碼被稱為橫切(cross-cutting)代碼,在OOP設計中,它導致了大量代碼的重復,而不利于各個模塊的重用。
而AOP技術則恰恰相反,它利用一種稱為“橫切”的技術,剖解開封裝的對象內部,并將那些影響了多個類的公共行為封裝到一個可重用模塊,并將其名為“Aspect”,即方面。所謂“方面”,簡單地說,就是將那些與業務無關,卻為業務模塊所共同調用的邏輯或責任封裝起來,便于減少系統的重復代碼,降低模塊間的耦合度,并有利于未來的可操作性和可維護性。AOP代表的是一個橫向的關系,如果說“對象”是一個空心的圓柱體,其中封裝的是對象的屬性和行為;那么面向方面編程的方法,就仿佛一把利刃,將這些空心圓柱體剖開,以獲得其內部的消息。而剖開的切面,也就是所謂的“方面”了。然后它又以巧奪天功的妙手將這些剖開的切面復原,不留痕跡。
使用“橫切”技術,AOP把軟件系統分為兩個部分:核心關注點和橫切關注點。業務處理的主要流程是核心關注點,與之關系不大的部分是橫切關注點。橫切關注點的一個特點是,他們經常發生在核心關注點的多處,而各處都基本相似。比如權限認證、日志、事務處理。Aop 的作用在于分離系統中的各種關注點,將核心關注點和橫切關注點分離開來。正如Avanade公司的高級方案構架師Adam Magee所說,AOP的核心思想就是“將應用程序中的商業邏輯同對其提供支持的通用服務進行分離。”
實現AOP的技術,主要分為兩大類:一是采用動態代理技術,利用截取消息的方式,對該消息進行裝飾,以取代原有對象行為的執行;二是采用靜態織入的方式,引入特定的語法創建“方面”,從而使得編譯器可以在編譯期間織入有關“方面”的代碼。
AOP使用場景
AOP用來封裝橫切關注點,具體可以在下面的場景中使用:
Authentication 權限
Caching 緩存
Context passing 內容傳遞
Error handling 錯誤處理
Lazy loading 懶加載
Debugging 調試
logging, tracing, profiling and monitoring 記錄跟蹤 優化 校準
Performance optimization 性能優化
Persistence 持久化
Resource pooling 資源池
Synchronization 同步
Transactions 事務
AOP相關概念
方面(Aspect):一個關注點的模塊化,這個關注點實現可能另外橫切多個對象。事務管理是J2EE應用中一個很好的橫切關注點例子。方面用Spring的 Advisor或攔截器實現。
連接點(Joinpoint): 程序執行過程中明確的點,如方法的調用或特定的異常被拋出。
通知(Advice): 在特定的連接點,AOP框架執行的動作。各種類型的通知包括“around”、“before”和“throws”通知。通知類型將在下面討論。許多AOP框架包括Spring都是以攔截器做通知模型,維護一個“圍繞”連接點的攔截器鏈。Spring中定義了四個advice: BeforeAdvice, AfterAdvice, ThrowAdvice和DynamicIntroductionAdvice
切入點(Pointcut): 指定一個通知將被引發的一系列連接點的集合。AOP框架必須允許開發者指定切入點:例如,使用正則表達式。 Spring定義了Pointcut接口,用來組合MethodMatcher和ClassFilter,可以通過名字很清楚的理解, MethodMatcher是用來檢查目標類的方法是否可以被應用此通知,而ClassFilter是用來檢查Pointcut是否應該應用到目標類上
引入(Introduction): 添加方法或字段到被通知的類。 Spring允許引入新的接口到任何被通知的對象。例如,你可以使用一個引入使任何對象實現 IsModified接口,來簡化緩存。Spring中要使用Introduction, 可有通過DelegatingIntroductionInterceptor來實現通知,通過DefaultIntroductionAdvisor來配置Advice和代理類要實現的接口
目標對象(Target Object): 包含連接點的對象。也被稱作被通知或被代理對象。POJO
AOP代理(AOP Proxy): AOP框架創建的對象,包含通知。 在Spring中,AOP代理可以是JDK動態代理或者CGLIB代理。
織入(Weaving): 組裝方面來創建一個被通知對象。這可以在編譯時完成(例如使用AspectJ編譯器),也可以在運行時完成。Spring和其他純Java AOP框架一樣,在運行時完成織入。
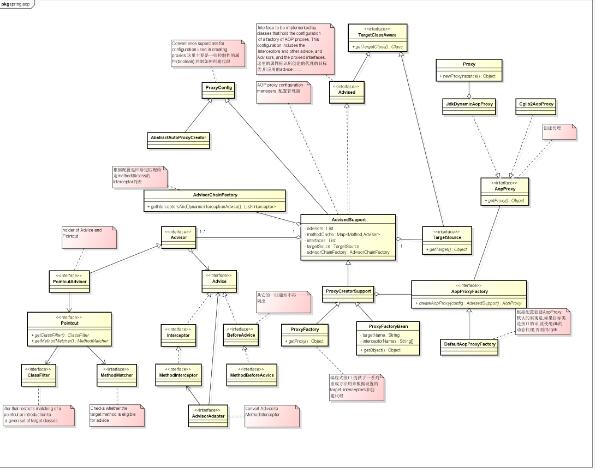
Spring AOP組件
下面這種類圖列出了Spring中主要的AOP組件

如何使用Spring AOP
可以通過配置文件或者編程的方式來使用Spring AOP。
配置可以通過xml文件來進行,大概有四種方式:
1. 配置ProxyFactoryBean,顯式地設置advisors, advice, target等
2. 配置AutoProxyCreator,這種方式下,還是如以前一樣使用定義的bean,但是從容器中獲得的其實已經是代理對象
3. 通過<aop:config>來配置
4. 通過<aop: aspectj-autoproxy>來配置,使用AspectJ的注解來標識通知及切入點
也可以直接使用ProxyFactory來以編程的方式使用Spring AOP,通過ProxyFactory提供的方法可以設置target對象, advisor等相關配置,最終通過 getProxy()方法來獲取代理對象
具體使用的示例可以google. 這里略去
Spring AOP代理對象的生成
Spring提供了兩種方式來生成代理對象: JDKProxy和Cglib,具體使用哪種方式生成由AopProxyFactory根據AdvisedSupport對象的配置來決定。默認的策略是如果目標類是接口,則使用JDK動態代理技術,否則使用Cglib來生成代理。下面我們來研究一下Spring如何使用JDK來生成代理對象,具體的生成代碼放在JdkDynamicAopProxy這個類中,直接上相關代碼:
/**
  * <ol>
  * <li>獲取代理類要實現的接口,除了Advised對象中配置的,還會加上SpringProxy, Advised(opaque=false)
  * <li>檢查上面得到的接口中有沒有定義 equals或者hashcode的接口
  * <li>調用Proxy.newProxyInstance創建代理對象
  * </ol>
  */
  public Object getProxy(ClassLoader classLoader) {
    if (logger.isDebugEnabled()) {
      logger.debug("Creating JDK dynamic proxy: target source is " +this.advised.getTargetSource());
    }
    Class[] proxiedInterfaces =AopProxyUtils.completeProxiedInterfaces(this.advised);
    findDefinedEqualsAndHashCodeMethods(proxiedInterfaces);
    return Proxy.newProxyInstance(classLoader, proxiedInterfaces, this);
}
那這個其實很明了,注釋上我也已經寫清楚了,不再贅述。
下面的問題是,代理對象生成了,那切面是如何織入的?
我們知道InvocationHandler是JDK動態代理的核心,生成的代理對象的方法調用都會委托到InvocationHandler.invoke()方法。而通過JdkDynamicAopProxy的簽名我們可以看到這個類其實也實現了InvocationHandler,下面我們就通過分析這個類中實現的invoke()方法來具體看下Spring AOP是如何織入切面的。
publicObject invoke(Object proxy, Method method, Object[] args) throwsThrowable {
    MethodInvocation invocation = null;
    Object oldProxy = null;
    boolean setProxyContext = false;

    TargetSource targetSource = this.advised.targetSource;
    Class targetClass = null;
    Object target = null;

    try {
      //eqauls()方法,具目標對象未實現此方法
      if (!this.equalsDefined && AopUtils.isEqualsMethod(method)){
        return (equals(args[0])? Boolean.TRUE : Boolean.FALSE);
      }

      //hashCode()方法,具目標對象未實現此方法
      if (!this.hashCodeDefined && AopUtils.isHashCodeMethod(method)){
        return newInteger(hashCode());
      }

      //Advised接口或者其父接口中定義的方法,直接反射調用,不應用通知
      if (!this.advised.opaque &&method.getDeclaringClass().isInterface()
          &&method.getDeclaringClass().isAssignableFrom(Advised.class)) {
        // Service invocations onProxyConfig with the proxy config...
        return AopUtils.invokeJoinpointUsingReflection(this.advised,method, args);
      }

      Object retVal = null;

      if (this.advised.exposeProxy) {
        // Make invocation available ifnecessary.
        oldProxy = AopContext.setCurrentProxy(proxy);
        setProxyContext = true;
      }

      //獲得目標對象的類
      target = targetSource.getTarget();
      if (target != null) {
        targetClass = target.getClass();
      }

      //獲取可以應用到此方法上的Interceptor列表
      List chain = this.advised.getInterceptorsAndDynamicInterceptionAdvice(method,targetClass);

      //如果沒有可以應用到此方法的通知(Interceptor),此直接反射調用 method.invoke(target, args)
      if (chain.isEmpty()) {
        retVal = AopUtils.invokeJoinpointUsingReflection(target,method, args);
      } else {
        //創建MethodInvocation
        invocation = newReflectiveMethodInvocation(proxy, target, method, args, targetClass, chain);
        retVal = invocation.proceed();
      }

      // Massage return value if necessary.
      if (retVal != null && retVal == target &&method.getReturnType().isInstance(proxy)
          &&!RawTargetAccess.class.isAssignableFrom(method.getDeclaringClass())) {
        // Special case: it returned"this" and the return type of the method
        // is type-compatible. Notethat we can't help if the target sets
        // a reference to itself inanother returned object.
        retVal = proxy;
      }
      return retVal;
    } finally {
      if (target != null && !targetSource.isStatic()) {
        // Must have come fromTargetSource.
        targetSource.releaseTarget(target);
      }
      if (setProxyContext) {
        // Restore old proxy.
        AopContext.setCurrentProxy(oldProxy);
      }
    }
  }
主流程可以簡述為:獲取可以應用到此方法上的通知鏈(Interceptor Chain),如果有,則應用通知,并執行joinpoint; 如果沒有,則直接反射執行joinpoint。而這里的關鍵是通知鏈是如何獲取的以及它又是如何執行的,下面逐一分析下。
首先,從上面的代碼可以看到,通知鏈是通過Advised.getInterceptorsAndDynamicInterceptionAdvice()這個方法來獲取的,我們來看下這個方法的實現:
public List<Object>getInterceptorsAndDynamicInterceptionAdvice(Method method, Class targetClass) {
          MethodCacheKeycacheKey = new MethodCacheKey(method);
          List<Object>cached = this.methodCache.get(cacheKey);
          if(cached == null) {
              cached= this.advisorChainFactory.getInterceptorsAndDynamicInterceptionAdvice(
                        this,method, targetClass);
              this.methodCache.put(cacheKey,cached);
          }
          returncached;
     }
可以看到實際的獲取工作其實是由AdvisorChainFactory. getInterceptorsAndDynamicInterceptionAdvice()這個方法來完成的,獲取到的結果會被緩存。
下面來分析下這個方法的實現:
/**
  * 從提供的配置實例config中獲取advisor列表,遍歷處理這些advisor.如果是IntroductionAdvisor,
  * 則判斷此Advisor能否應用到目標類targetClass上.如果是PointcutAdvisor,則判斷
  * 此Advisor能否應用到目標方法method上.將滿足條件的Advisor通過AdvisorAdaptor轉化成Interceptor列表返回.
  */
  publicList getInterceptorsAndDynamicInterceptionAdvice(Advised config, Methodmethod, Class targetClass) {
    // This is somewhat tricky... we have to process introductions first,
    // but we need to preserve order in the ultimate list.
    List interceptorList = new ArrayList(config.getAdvisors().length);

    //查看是否包含IntroductionAdvisor
    boolean hasIntroductions = hasMatchingIntroductions(config,targetClass);

    //這里實際上注冊一系列AdvisorAdapter,用于將Advisor轉化成MethodInterceptor
    AdvisorAdapterRegistry registry = GlobalAdvisorAdapterRegistry.getInstance();

    Advisor[] advisors = config.getAdvisors();
    for (int i = 0; i <advisors.length; i++) {
      Advisor advisor = advisors[i];
      if (advisor instanceof PointcutAdvisor) {
        // Add it conditionally.
        PointcutAdvisor pointcutAdvisor= (PointcutAdvisor) advisor;
        if(config.isPreFiltered() ||pointcutAdvisor.getPointcut().getClassFilter().matches(targetClass)) {
          //TODO: 這個地方這兩個方法的位置可以互換下
          //將Advisor轉化成Interceptor
          MethodInterceptor[]interceptors = registry.getInterceptors(advisor);

          //檢查當前advisor的pointcut是否可以匹配當前方法
          MethodMatcher mm =pointcutAdvisor.getPointcut().getMethodMatcher();

          if (MethodMatchers.matches(mm,method, targetClass, hasIntroductions)) {
            if(mm.isRuntime()) {
              // Creating a newobject instance in the getInterceptors() method
              // isn't a problemas we normally cache created chains.
              for (intj = 0; j < interceptors.length; j++) {
                interceptorList.add(new InterceptorAndDynamicMethodMatcher(interceptors[j],mm));
              }
            } else {
              interceptorList.addAll(Arrays.asList(interceptors));
            }
          }
        }
      } else if (advisor instanceof IntroductionAdvisor){
        IntroductionAdvisor ia =(IntroductionAdvisor) advisor;
        if(config.isPreFiltered() || ia.getClassFilter().matches(targetClass)) {
          Interceptor[] interceptors= registry.getInterceptors(advisor);
          interceptorList.addAll(Arrays.asList(interceptors));
        }
      } else {
        Interceptor[] interceptors =registry.getInterceptors(advisor);
        interceptorList.addAll(Arrays.asList(interceptors));
      }
    }
    return interceptorList;
}
這個方法執行完成后,Advised中配置能夠應用到連接點或者目標類的Advisor全部被轉化成了MethodInterceptor.
接下來我們再看下得到的攔截器鏈是怎么起作用的。
 if (chain.isEmpty()) {
        retVal = AopUtils.invokeJoinpointUsingReflection(target,method, args);
      } else {
        //創建MethodInvocation
        invocation = newReflectiveMethodInvocation(proxy, target, method, args, targetClass, chain);
        retVal = invocation.proceed();
      }
從這段代碼可以看出,如果得到的攔截器鏈為空,則直接反射調用目標方法,否則創建MethodInvocation,調用其proceed方法,觸發攔截器鏈的執行,來看下具體代碼
public Object proceed() throws Throwable {
    // We start with an index of -1and increment early.
    if (this.currentInterceptorIndex == this.interceptorsAndDynamicMethodMatchers.size()- 1) {
      //如果Interceptor執行完了,則執行joinPoint
      return invokeJoinpoint();
    }

    Object interceptorOrInterceptionAdvice =
      this.interceptorsAndDynamicMethodMatchers.get(++this.currentInterceptorIndex);

    //如果要動態匹配joinPoint
    if (interceptorOrInterceptionAdvice instanceof InterceptorAndDynamicMethodMatcher){
      // Evaluate dynamic method matcher here: static part will already have
      // been evaluated and found to match.
      InterceptorAndDynamicMethodMatcher dm =
        (InterceptorAndDynamicMethodMatcher)interceptorOrInterceptionAdvice;
      //動態匹配:運行時參數是否滿足匹配條件
      if (dm.methodMatcher.matches(this.method, this.targetClass,this.arguments)) {
        //執行當前Intercetpor
        returndm.interceptor.invoke(this);
      }
      else {
        //動態匹配失敗時,略過當前Intercetpor,調用下一個Interceptor
        return proceed();
      }
    }
    else {
      // It's an interceptor, so we just invoke it: The pointcutwill have
      // been evaluated statically before this object was constructed.
      //執行當前Intercetpor
      return ((MethodInterceptor) interceptorOrInterceptionAdvice).invoke(this);
    }
}
代碼也比較簡單,這里不再贅述。
關于“Spring AOP實現原理的示例分析”這篇文章就分享到這里了,希望以上內容可以對大家有一定的幫助,使各位可以學到更多知識,如果覺得文章不錯,請把它分享出去讓更多的人看到。
免責聲明:本站發布的內容(圖片、視頻和文字)以原創、轉載和分享為主,文章觀點不代表本網站立場,如果涉及侵權請聯系站長郵箱:is@yisu.com進行舉報,并提供相關證據,一經查實,將立刻刪除涉嫌侵權內容。