您好,登錄后才能下訂單哦!
您好,登錄后才能下訂單哦!
1. 背景
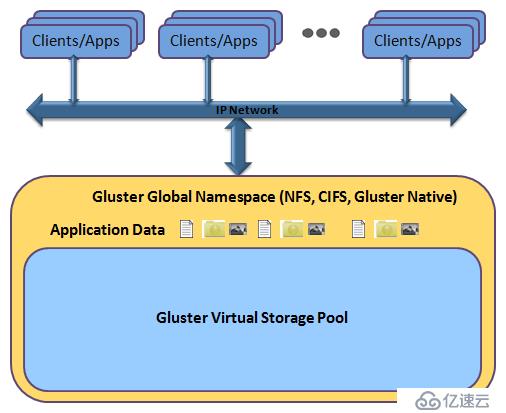
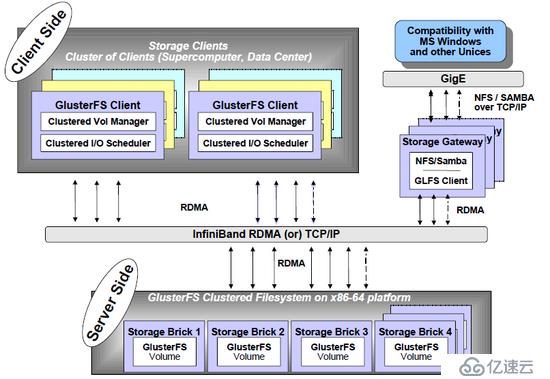
GlusterFS 是一個開源的分布式文件系統,具有強大的橫向擴展能力,通過擴展能夠支持數PB存儲容量和處理數千客戶端。GlusterFS借助TCP/IP或InfiniBand RDMA(一種支持多并發鏈接的“轉換線纜”技術)網絡將物理分布的存儲資源聚集在一起,使用單一全局命名空間來管理數據。GlusterFS基于可堆疊的用戶空間設計,可為各種不同的數據負載提供優異的性能。
GlusterFS支持運行在任何標準IP網絡上標準應用程序的標準客戶端

2. 優勢
* 線性橫向擴展和高性能
* 高可用性
* 全局統一命名空間
* 彈性哈希算法和彈性卷管理
* 基于標準協議
* 完全軟件實現(Software Only)
* 用戶空間實現(User Space)
* 模塊化堆棧式架構(Modular Stackable Architecture)
* 原始數據格式存儲(Data Stored in Native Formats)
* 無元數據服務設計(No Metadata with the Elastic Hash Algorithm)

3. 環境
server_1 CentOS 7.2.1511 (Core) 192.168.60.201
server_2 CentOS 7.2.1511 (Core) 192.168.60.202
4. 安裝
* server_1 安裝centos-release-gluster
[root@server_1 ~]# yum install centos-release-gluster -y
* server_1 安裝 glusterfs-server
[root@server_1 ~]# yum install glusterfs-server -y
* server_1 啟動 glusterfs-server 服務
[root@server_1 ~]# systemctl start glusterd
* server_2 安裝centos-release-gluster
[root@server_2 ~]# yum install centos-release-gluster -y
* server_2 安裝 glusterfs-server
[root@server_2 ~]# yum install glusterfs-server -y
* server_2 啟動 glusterfs-server 服務
[root@server_2 ~]# systemctl start glusterd
5. 建立信任池 [ 信任單向建立即可 ]
* server_1 對 server_2 建立信任
[root@server_1 ~]# gluster peer probe 192.168.60.202
peer probe: success.
* 查看信任池建立情況
[root@server_1 ~]# gluster peer status
Number of Peers: 1

Hostname: 192.168.60.202
Uuid: 84d98fd8-4500-46d3-9d67-8bafacb5898b
State: Peer in Cluster (Connected)

[root@server_2 ~]# gluster peer status
Number of Peers: 1

Hostname: 192.168.60.201
Uuid: 20722daf-35c4-422c-99ff-6b0a41d07eb4
State: Peer in Cluster (Connected)
6. 創建分布式卷
* server_1 和 server_2 創建數據存放目錄
[root@server_1 ~]# mkdir -p /data/exp1
[root@server_2 ~]# mkdir -p /data/exp2
* 使用命令創建分布式卷,命名為test-volume
[root@server_1 ~]# gluster volume create test-volume 192.168.60.201:/data/exp1 192.168.60.202:/data/exp2 force
volume create: test-volume: success: please start the volume to access data
* 查看卷信息
[root@server_1 ~]# gluster volume info test-volume

Volume Name: test-volume
Type: Distribute
Volume ID: 457ca1ff-ac55-4d59-b827-fb80fc0f4184
Status: Created
Snapshot Count: 0
Number of Bricks: 2
Transport-type: tcp
Bricks:
Brick1: 192.168.60.201:/data/exp1
Brick2: 192.168.60.202:/data/exp2
Options Reconfigured:
transport.address-family: inet
nfs.disable: on

[root@server_2 ~]# gluster volume info test-volume

Volume Name: test-volume
Type: Distribute
Volume ID: 457ca1ff-ac55-4d59-b827-fb80fc0f4184
Status: Created
Snapshot Count: 0
Number of Bricks: 2
Transport-type: tcp
Bricks:
Brick1: 192.168.60.201:/data/exp1
Brick2: 192.168.60.202:/data/exp2
Options Reconfigured:
transport.address-family: inet
nfs.disable: on
* 啟動卷
[root@server_1 ~]# gluster volume start test-volume
volume start: test-volume: success
7. 創建復制卷 [ 對比Raid 1 ]
* server_1 和 server_2 創建數據存放目錄
[root@server_1 ~]# mkdir -p /data/exp3
[root@server_2 ~]# mkdir -p /data/exp4
* 使用命令創建復制卷,命名為repl-volume
[root@server_1 ~]# gluster volume create repl-volume replica 2 transport tcp 192.168.60.201:/data/exp3 192.168.60.202:/data/exp4 force
volume create: repl-volume: success: please start the volume to access data
* 查看卷信息
[root@server_1 ~]# gluster volume info repl-volume

Volume Name: repl-volume
Type: Replicate
Volume ID: 1924ed7b-73d4-45a9-af6d-fd19abb384cd
Status: Created
Snapshot Count: 0
Number of Bricks: 1 x 2 = 2
Transport-type: tcp
Bricks:
Brick1: 192.168.60.201:/data/exp3
Brick2: 192.168.60.202:/data/exp4
Options Reconfigured:
transport.address-family: inet
nfs.disable: on

[root@server_2 ~]# gluster volume info repl-volume

Volume Name: repl-volume
Type: Replicate
Volume ID: 1924ed7b-73d4-45a9-af6d-fd19abb384cd
Status: Created
Snapshot Count: 0
Number of Bricks: 1 x 2 = 2
Transport-type: tcp
Bricks:
Brick1: 192.168.60.201:/data/exp3
Brick2: 192.168.60.202:/data/exp4
Options Reconfigured:
transport.address-family: inet
nfs.disable: on
* 啟動卷
[root@server_1 ~]# gluster volume start repl-volume
volume start: repl-volume: success
8. 創建條帶卷 [ 對比Raid 0 ]
* server_1 和 server_2 創建數據存放目錄
[root@server_1 ~]# mkdir -p /data/exp5
[root@server_2 ~]# mkdir -p /data/exp6
* 使用命令創建復制卷,命名為raid0-volume
[root@server_1 ~]# gluster volume create raid0-volume stripe 2 transport tcp 192.168.60.201:/data/exp5 192.168.60.202:/data/exp6 force
volume create: raid0-volume: success: please start the volume to access data
* 查看卷信息
[root@server_1 ~]# gluster volume info raid0-volume

Volume Name: raid0-volume
Type: Stripe
Volume ID: 13b36adb-7e8b-46e2-8949-f54eab5356f6
Status: Created
Snapshot Count: 0
Number of Bricks: 1 x 2 = 2
Transport-type: tcp
Bricks:
Brick1: 192.168.60.201:/data/exp5
Brick2: 192.168.60.202:/data/exp6
Options Reconfigured:
transport.address-family: inet
nfs.disable: on

[root@server_2 ~]# gluster volume info raid0-volume

Volume Name: raid0-volume
Type: Stripe
Volume ID: 13b36adb-7e8b-46e2-8949-f54eab5356f6
Status: Created
Snapshot Count: 0
Number of Bricks: 1 x 2 = 2
Transport-type: tcp
Bricks:
Brick1: 192.168.60.201:/data/exp5
Brick2: 192.168.60.202:/data/exp6
Options Reconfigured:
transport.address-family: inet
nfs.disable: on
* 啟動卷
[root@server_1 ~]# gluster volume start raid0-volume
volume start: raid0-volume: success
9. 客戶端應用
* 安裝glusterfs-cli
[root@client ~]# yum install glusterfs-cli -y
* 創建掛載目錄
[root@client ~]# mkdir /mnt/g1 /mnt/g2 /mnt/g3
* 掛載卷
[root@server_1 ~]# mount.glusterfs 192.168.60.201:/test-volume /mnt/g1
[root@server_1 ~]# mount.glusterfs 192.168.60.202:/repl-volume /mnt/g2
[root@server_1 ~]# mount.glusterfs 192.168.60.201:/raid0-volume /mnt/g3
10. 擴展卷
* 創建存放目錄
[root@server_1 ~]# mkdir -p /data/exp9
* 擴展卷
[root@server_1 ~]# gluster volume add-brick test-volume 192.168.60.201:/data/exp9 force
volume add-brick: success
* 重新均衡
[root@server_1 ~]# gluster volume rebalance test-volume start
volume rebalance: test-volume: success: Rebalance on test-volume has been started successfully. Use rebalance status command to check status of the rebalance process.
ID: 008c3f28-d8a1-4f05-b63c-4543c51050ec
11. 總結
以需求驅動技術,技術本身沒有優略之分,只有業務之分。
免責聲明:本站發布的內容(圖片、視頻和文字)以原創、轉載和分享為主,文章觀點不代表本網站立場,如果涉及侵權請聯系站長郵箱:is@yisu.com進行舉報,并提供相關證據,一經查實,將立刻刪除涉嫌侵權內容。