您好,登錄后才能下訂單哦!
您好,登錄后才能下訂單哦!
這篇文章將為大家詳細講解有關Android版如何實現學生管理系統,小編覺得挺實用的,因此分享給大家做個參考,希望大家閱讀完這篇文章后可以有所收獲。
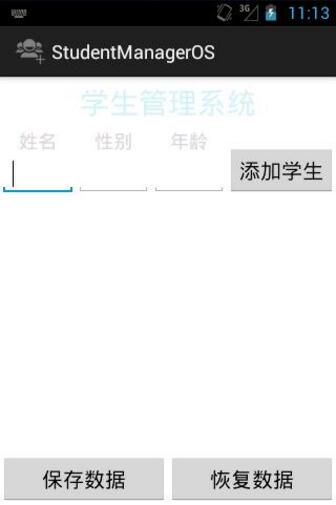
用戶可以輸入姓名、性別、年齡三個字段,通過點擊添加學生按鈕,將學生信息展示到開始為空的ScrollView控件中,ScrollView控件只能包裹一個控件,我這里包裹的是LinearLayout。點擊保存數據按鈕將數據通過XmlSerializer對象將數據保存到sd卡中,當點擊恢復數據按鈕時將sd卡文件中的數據讀取出來回顯到ScrollView中。
因為要讀寫文件,所以要在清單文件中添加兩個權限:
<uses-permission android:name="android.permission.READ_EXTERNAL_STORAGE"/>
<uses-permission android:name="android.permission.WRITE_EXTERNAL_STORAGE"/>
首先,我們畫出UI界面,具體代碼和效果如下:
<LinearLayout xmlns:android="http://schemas.android.com/apk/res/android"
 xmlns:tools="http://schemas.android.com/tools"
 android:layout_width="match_parent"
 android:layout_height="match_parent"
 android:orientation="vertical" >

 <TextView
  android:id="@+id/title"
  android:layout_width="wrap_content"
  android:layout_height="wrap_content"
  android:layout_gravity="center_horizontal"
  android:layout_marginTop="5dip"
  android:textSize="28sp"
  android:textColor="#D5F2F4"
  android:text="學生管理系統" />

 <LinearLayout
  android:layout_width="fill_parent"
  android:layout_height="wrap_content"
  android:layout_marginTop="5dip"
  android:orientation="horizontal">

  <LinearLayout
   android:layout_height="wrap_content"
   android:layout_width="0dip"
   android:layout_weight="1"
   android:orientation="vertical">

   <TextView
    android:layout_width="wrap_content"
    android:layout_height="wrap_content"
    android:layout_gravity="center_horizontal"
    android:textSize="18sp"
    android:textColor="#DAD5D9"
    android:text="姓名"/>

   <EditText
    android:id="@+id/et_name"
    android:layout_width="fill_parent"
    android:layout_height="wrap_content"
    android:singleLine="true"/>
  </LinearLayout>

  <LinearLayout
   android:layout_height="wrap_content"
   android:layout_width="0dip"
   android:layout_weight="1"
   android:orientation="vertical">

   <TextView
    android:layout_width="wrap_content"
    android:layout_height="wrap_content"
    android:layout_gravity="center_horizontal"
    android:textSize="18sp"
    android:textColor="#DAD5D9"
    android:text="性別"/>

   <EditText
    android:id="@+id/et_sex"
    android:layout_width="fill_parent"
    android:layout_height="wrap_content"
    android:singleLine="true"/>
  </LinearLayout>

  <LinearLayout
   android:layout_height="wrap_content"
   android:layout_width="0dip"
   android:layout_weight="1"
   android:orientation="vertical">

   <TextView
    android:layout_width="wrap_content"
    android:layout_height="wrap_content"
    android:layout_gravity="center_horizontal"
    android:textSize="18sp"
    android:textColor="#DAD5D9"
    android:text="年齡"/>

   <EditText
    android:id="@+id/et_age"
    android:layout_width="fill_parent"
    android:layout_height="wrap_content"
    android:inputType="number"
    android:singleLine="true"/>
  </LinearLayout>

  <Button
   android:id="@+id/btn_add"
   android:layout_width="wrap_content"
   android:layout_height="wrap_content"
   android:layout_gravity="bottom"
   android:textColor="@android:color/black"
   android:textSize="20sp"
   android:text="添加學生"/>

 </LinearLayout>

 <!-- ScrollView只可以包裹一個控件 -->
 <ScrollView
  android:layout_width="fill_parent"
  android:layout_height="0dip"
  android:layout_weight="1"
  android:layout_marginTop="5dip">

  <LinearLayout
   android:id="@+id/ll_student_group"
   android:layout_width="fill_parent"
   android:layout_height="fill_parent"
   android:orientation="vertical">

  </LinearLayout>

 </ScrollView>

 <LinearLayout
  android:orientation="horizontal"
  android:layout_width="fill_parent"
  android:layout_height="wrap_content"
  android:layout_marginTop="5dip">

  <Button
   android:id="@+id/btn_save"
   android:layout_width="0dip"
   android:layout_height="fill_parent"
   android:layout_weight="1"
   android:textSize="20sp"
   android:textColor="@android:color/black"
   android:text="保存數據"/>

  <Button
   android:id="@+id/btn_restore"
   android:layout_width="0dip"
   android:layout_height="fill_parent"
   android:layout_weight="1"
   android:textSize="20sp"
   android:textColor="@android:color/black"
   android:text="恢復數據"/>
 </LinearLayout>

</LinearLayout>
效果圖:

之后我們要建立一個student的domain,就包括了三個字段,name、age、sex,為了方便觀看,我也將Student代碼也全部貼出來:
package cn.yzx.studentmanageros.domain;

public class Student {
 private String name;
 private String sex;
 private Integer age;

 public Student() {
  super();
  // TODO Auto-generated constructor stub
 }
 public Student(String name, String sex, Integer age) {
  super();
  this.name = name;
  this.sex = sex;
  this.age = age;
 }
 @Override
 public String toString() {
  return "Student [name=" + name + ", sex=" + sex + ", age=" + age + "]";
 }
 public String getName() {
  return name;
 }
 public void setName(String name) {
  this.name = name;
 }
 public String getSex() {
  return sex;
 }
 public void setSex(String sex) {
  this.sex = sex;
 }
 public Integer getAge() {
  return age;
 }
 public void setAge(Integer age) {
  this.age = age;
 }

}
之后,也是最主要的,activity的實現文件,我這里直接將代碼貼出來,因為注釋的很清楚:
package cn.yzx.studentmanageros;

import java.io.File;
import java.io.FileInputStream;
import java.io.FileNotFoundException;
import java.io.FileOutputStream;
import java.io.IOException;
import java.text.Format;
import java.util.ArrayList;
import java.util.List;

import org.xmlpull.v1.XmlPullParser;
import org.xmlpull.v1.XmlPullParserException;
import org.xmlpull.v1.XmlSerializer;

import android.app.Activity;
import android.graphics.Color;
import android.os.Bundle;
import android.os.Environment;
import android.text.TextUtils;
import android.util.Log;
import android.util.Xml;
import android.view.View;
import android.view.View.OnClickListener;
import android.widget.EditText;
import android.widget.LinearLayout;
import android.widget.TextView;
import android.widget.Toast;
import cn.yzx.studentmanageros.domain.Student;


public class MainActivity extends Activity implements OnClickListener {

 private static final String TAG = "MainActivity";

 private EditText et_name;
 private EditText et_sex;
 private EditText et_age;
 private LinearLayout llStudentGroup; //學生列表控件
 private List<Student> studentList;

 private File cacheFile = new File(Environment.getExternalStorageDirectory(), "student.xml");

 @Override
 protected void onCreate(Bundle savedInstanceState) {
  super.onCreate(savedInstanceState);
  setContentView(R.layout.activity_main);
  init();
 }

 private void init() {
  studentList = new ArrayList<Student>();

  et_name = (EditText) findViewById(R.id.et_name);
  et_sex = (EditText) findViewById(R.id.et_sex);
  et_age = (EditText) findViewById(R.id.et_age);

  llStudentGroup = (LinearLayout) findViewById(R.id.ll_student_group);

  findViewById(R.id.btn_add).setOnClickListener(this);
  findViewById(R.id.btn_save).setOnClickListener(this);
  findViewById(R.id.btn_restore).setOnClickListener(this);

 }

 @Override
 public void onClick(View v) {
  switch (v.getId()) {
  case R.id.btn_add: //添加學生
   //取出數據
   String name = et_name.getText().toString();
   String sex = et_sex.getText().toString();
   String age = et_age.getText().toString();

   //控制臺打印數據
   Log.e(TAG, "name="+name+",sex="+sex+",age="+age);

   //判斷是否有數據為空
   if(TextUtils.isEmpty(name) || TextUtils.isEmpty(sex) || TextUtils.isEmpty(age)){
    Toast.makeText(this, "請重新輸入", 0).show();
    break;
   }

   //封裝成Student實體
   Student student = new Student(name, sex, Integer.valueOf(age));

   //添加到學生列表中
   addToStudentList(student);

   break;

  case R.id.btn_save: //保存數據
   boolean isSuccess = saveStudentList();
   if(isSuccess){
    Toast.makeText(this, "保存成功", 0).show();
   }else {
    Toast.makeText(this, "保存失敗", 0).show();
   }
   break;

  case R.id.btn_restore: //恢復數據
   // 恢復數據之前, 需要把集合中和LinearLayout中的數據全部清空
   studentList.clear();

   // 把線性布局中所有的控件全部移除
   llStudentGroup.removeAllViews();

   //從文件中讀取數據
   List<Student> readStudentList = readStudentList();

   // 把取出回來的數據, 一條一條的添加到學生列表中
   for (Student stu : readStudentList) {
    addToStudentList(stu);
   }

   break;

  default:
   break;
  }
 }

 private List<Student> readStudentList() {
  List<Student> studentList = null;

  // 構建一個XmlPullParser解析器對象
  XmlPullParser parser = Xml.newPullParser();

  // 指定要解析的文件
  try {
   parser.setInput(new FileInputStream(cacheFile), "utf-8");

   // 開始解析: 獲取EventType解析事件, 循環去判斷事件
   int eventType = parser.getEventType();

   Student student = null;
   while(eventType!=XmlPullParser.END_DOCUMENT){
    // 當前的事件類型不等于結束的document, 繼續循環
    String tagName = parser.getName();

    switch (eventType) {
    case XmlPullParser.START_TAG:
     if("students".equals(tagName)){//<students>
      studentList = new ArrayList<Student>();
     }else if ("student".equals(tagName)) {//<student>
      student = new Student();
     }else if ("name".equals(tagName)) {
      student.setName(parser.nextText());
     }else if ("sex".equals(tagName)) {
      student.setSex(parser.nextText());
     }else if("age".equals(tagName)){
      student.setAge(Integer.valueOf(parser.nextText()));
     }
     break;

    case XmlPullParser.END_TAG:
     if("student".equals(tagName)){
      studentList.add(student);
     }
     break;

    default:
     break;
    }
    eventType = parser.next(); // 取下一個事件類型
   }

   return studentList;
  } catch (Exception e) {
   // TODO Auto-generated catch block
   e.printStackTrace();
  }
  return null;
 }

 private boolean saveStudentList() {
  String path = cacheFile.getPath();
  Log.e(TAG, "保存文件的路徑:"+path);

  //得到一個序列化對象
  XmlSerializer serializer = Xml.newSerializer();

  try {
   //指定輸出流
   serializer.setOutput(new FileOutputStream(cacheFile), "utf-8");

   //寫start_document
   serializer.startDocument("utf-8", true);

   // 寫<students>
   serializer.startTag(null, "students");

   for (Student student : studentList) {
    Log.e(TAG, student.toString());
    // 寫<student>
    serializer.startTag(null, "student");

     // 寫<name>
     serializer.startTag(null, "name");

     serializer.text(student.getName());

     // 寫</name>
     serializer.endTag(null, "name");

     // 寫<sex>
     serializer.startTag(null, "sex");

     serializer.text(student.getSex());

     // 寫</sex>
     serializer.endTag(null, "sex");

     // 寫<age>
     serializer.startTag(null, "age");

     serializer.text(String.valueOf(student.getAge()));

     // 寫</age>
     serializer.endTag(null, "age");

    // 寫</student>
    serializer.endTag(null, "student");
   }

   // 寫</students>
   serializer.endTag(null, "students");

   //寫end_document
   serializer.endDocument();


   return true;
  } catch(Exception e) {
   e.printStackTrace();
  }

  return false;
 }

 /**
  * 把給定的學生添加到學生列表中
  * @param student
  */
 private void addToStudentList(Student student) {
  // 把學生信息添加到集合中, 為了方便呆會去保存
  studentList.add(student);

  //創建一個TextView對象,并設置其內容
  TextView tv = new TextView(this);
  String text = "  "+student.getName()+" "+student.getSex()+"  "+student.getAge();
  tv.setText(text);
  tv.setTextSize(18);
  tv.setTextColor(Color.BLACK);

  // 把TextView添加到學生列表中
  llStudentGroup.addView(tv);
 }
}
關于“Android版如何實現學生管理系統”這篇文章就分享到這里了,希望以上內容可以對大家有一定的幫助,使各位可以學到更多知識,如果覺得文章不錯,請把它分享出去讓更多的人看到。
免責聲明:本站發布的內容(圖片、視頻和文字)以原創、轉載和分享為主,文章觀點不代表本網站立場,如果涉及侵權請聯系站長郵箱:is@yisu.com進行舉報,并提供相關證據,一經查實,將立刻刪除涉嫌侵權內容。