您好,登錄后才能下訂單哦!
您好,登錄后才能下訂單哦!
這篇文章給大家介紹Android中怎么實現音量控制功能,內容非常詳細,感興趣的小伙伴們可以參考借鑒,希望對大家能有所幫助。
音量定義
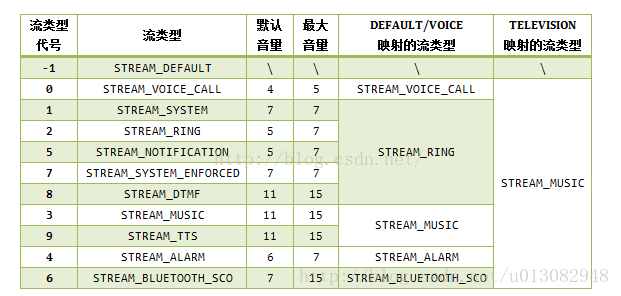
Andorid5.1在AudioSystem.java定義了有10種流類型。每種流類型的音量都是相互獨立的,Android也在AudioService.java定義了幾個數組:MAX_STREAM_VOLUME(最大音量),DEFAULT_STREAM_VOLUME(默認音量大小),STREAM_VOLUME_ALIAS_VOICE(映射的流類型)。
雖然Android5.1中擁有10種流類型,但是為了便于使用,android通過判斷設備的類型,去映射具體流類型。Android5.1在AudioSystem.java中提供了3個設備(DEFAULT,VOICE,TELEVISION)作為可選擇項,分別去映射我們具體的音頻流類型。其中,DEFAULT和VOICE類型的音頻映射是一致的。

所以,從上表中可以看出,在手機設備當中,我們當前可調控的流類型音量其實只有5個,當你想調節STREAM_SYSTEM,STREAM_NOTIFICATION等流類型的音量時,實際上是調節了STREAM_RING的音量。當前可控的流類型可以通過下表更直觀地顯示:

音量鍵處理流程

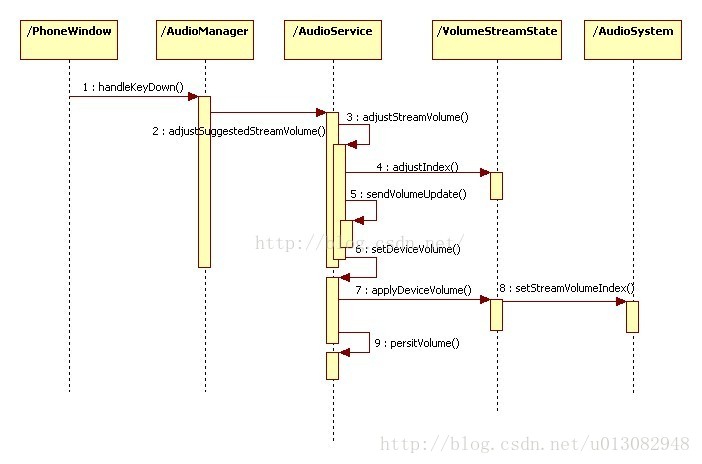
音量鍵處理流程的發起者是PhoneWindow。
AudioManager僅僅起到代理的作用。
AudioService接受AudioManager的調用請求,操作VolumeStreamState的實例進行音量的設置。
VolumeStreamState負責保存音量設置,并且提供了將音量設置到底層的方法。
AudioService負責將設置結果以廣播的形式通知外界。
先看到AudioService的adjustSuggestedStreamVolume()方法。
第一個參數direction指示了音量的調整方向,1為增大,-1為減小;第二個參數suggestedStreamType表示要求調整音量的流類型;第三個參數flags,其實是在AudioManager在handleKeyDown()中設置了兩個flags,分別是FLAG_SHOW_UI和FLAG_VIBRATE。前者告訴AudioService需要彈出一個音量控制面板。而在handleKeyUp()里設置了FLAG_PLAY_SOUND,這是為什么在松開音量鍵后”有時候“(在特定的流類型下,且沒有處于鎖屏狀態)會有一個提示音。
  // 1.確定要調整音量的流類型 2.在某些情況下屏蔽FLAG_PLAY_SOUND 3.調用adjustStreamVolume()
  private void adjustSuggestedStreamVolume(int direction, int suggestedStreamType, int flags, String callingPackage, int uid) {
    ......
    //從這一小段代碼中可以看出,在AudioService中還有地方可以強行改變音量鍵控制的流類型。
    //mVolumeControlStream是VolumePanel通過forceVolumeControlStream()設置的,
    //VolumePanel顯示時會調用forceVolumeControlStream強制后續的音量鍵操作固定為促使它顯示的那個流類型,
    //并在它關閉時取消這個強制設置,設值為-1
    if (mVolumeControlStream != -1) {
      streamType = mVolumeControlStream;
    } else {
      //通過getActiveStreamType()函數獲取要控制的流類型,這里根據建議的流類型與AudioService的實際情況,返回一個值
      streamType = getActiveStreamType(suggestedStreamType);
    }
    final int resolvedStream = mStreamVolumeAlias[streamType];
    ......
    adjustStreamVolume(streamType, direction, flags, callingPackage, uid);
}接著看看adjustStreamVolume()
  private void adjustStreamVolume(int streamType, int direction, int flags,
      String callingPackage, int uid) {
    ......
    ensureValidDirection(direction); //確認一下調整的音量方向
    ensureValidStreamType(streamType); //確認一下調整的流類型
    int streamTypeAlias = mStreamVolumeAlias[streamType];//獲取streamType映射到的流類型
    //VolumeStreamState類,保存與一個流類型所有音量相關的信息
    VolumeStreamState streamState = mStreamStates[streamTypeAlias];
    final int device = getDeviceForStream(streamTypeAlias);
    int aliasIndex = streamState.getIndex(device);//獲取當前音量
    ......

      //rescaleIndex用于將音量值的變化量從源流類型變換到目標流類型下,
      //由于不同的流類型的音量調節范圍不同,所以這個轉換是必需的
      step = rescaleIndex(10, streamType, streamTypeAlias);
    }
    ......

      final int result = checkForRingerModeChange(aliasIndex, direction, step);
      adjustVolume = (result & FLAG_ADJUST_VOLUME) != 0; //布爾變量,用來表示是否有必要繼續設置音量值
    ......

    int oldIndex = mStreamStates[streamType].getIndex(device);//取出調整前的音量值。這個值會在sendVolumeUpdate()調用

    if (adjustVolume && (direction != AudioManager.ADJUST_SAME)) {
    ......

      if ((direction == AudioManager.ADJUST_RAISE) &&
          !checkSafeMediaVolume(streamTypeAlias, aliasIndex + step, device)) {
        Log.e(TAG, "adjustStreamVolume() safe volume index = "+oldIndex);
        mVolumeController.postDisplaySafeVolumeWarning(flags);
       //判斷streamState.adjustIndex返回值,如果音量值在調整之后并沒有發生變化,比如到了最大值,就不需要繼續后面的操作了
      } else if (streamState.adjustIndex(direction * step, device)) {
        //這個消息將把音量設置到底層去,并將其存儲到Settingsprovider中
        sendMsg(mAudioHandler,
            MSG_SET_DEVICE_VOLUME,
            SENDMSG_QUEUE,
            device,
            0,
            streamState,
            0);
      }
    ......

    int index = mStreamStates[streamType].getIndex(device);
    sendVolumeUpdate(streamType, oldIndex, index, flags);// 通知外界音量值發生了變化
  }
總結一下這個函數:
計算按下音量鍵的音量步進值。這個步進值是10而不是1。在VolumeStreamState中保存的音量值是其實際值的10倍,這是為了在不同流類型之間進行音量轉化時能夠保證一定精度的一種實現。可以理解為在轉化過程中保留了小數點后一位的精度。
檢查是否需要改變情景模式。checkForRingerModeChange()和情景模式有關。
調用adjustIndex()更改VolumeStreamState對象中保存的音量值。
通過sendMsg()發送消息MSG_SET_DEVICE_VOLUME到mAudioHandler。
調用sendVolumeUpdate()函數,通知外界音量值發生了變化。
下面將分析adjustIndex()、MSG_SET_DEVICE_VOLUME消息的處理和sendVolumeUpdate()。
先看到VolumeStreamState類的adjustIndex()
//更改VolumeStreamState對象中保存的音量值
    public boolean adjustIndex(int deltaIndex, int device) {
      return setIndex(getIndex(device) + deltaIndex, device);// 將現有的音量值加上變化量,然后調用setIndex進行設置
    }

    public boolean setIndex(int index, int device) {
    ......

        mIndex.put(device, index);//保存設置的音量值

        if (oldIndex != index) {
          //同時設置所有映射到當前流類型的其他流的音量
          boolean currentDevice = (device == getDeviceForStream(mStreamType));
          int numStreamTypes = AudioSystem.getNumStreamTypes();
          for (int streamType = numStreamTypes - 1; streamType >= 0; streamType--) {
            if (streamType != mStreamType &&
                mStreamVolumeAlias[streamType] == mStreamType) {
              int scaledIndex = rescaleIndex(index, mStreamType, streamType);
              mStreamStates[streamType].setIndex(scaledIndex,
                                device);
              if (currentDevice) {
                mStreamStates[streamType].setIndex(scaledIndex,
                                  getDeviceForStream(streamType));
              }
            }
          }
          return true;
        } else {
          return false;
        }
      }
}可以看出,VolumeStreamState.adjustIndex()除了更新自己所保存的音量值外,沒有做其他的事情。接下來看看MSG_SET_DEVICE_VOLUME消息處理做了什么。
case MSG_SET_DEVICE_VOLUME:
   setDeviceVolume((VolumeStreamState) msg.obj, msg.arg1);
   break;
private void setDeviceVolume(VolumeStreamState streamState, int device) {
      synchronized (VolumeStreamState.class) {
        streamState.applyDeviceVolume_syncVSS(device);//這個函數會調用AudioSystem.setStreamVolumeIndex(),
        //到這,音量就被設置到底層的AudioFlinger中

        // 對所有流應用更改,使用此別名作為別名。處理流音量映射的情況
        int numStreamTypes = AudioSystem.getNumStreamTypes();
        for (int streamType = numStreamTypes - 1; streamType >= 0; streamType--) {
          ......

      }
      //發送消息,其處理函數將會調用persitVolume()函數,這將會把音量的設置信息存儲到SettingsProvide中。
      //Audioservice在初始化時,將會從SettingsProvide中將音量設置讀取出來并進行設置
      sendMsg(mAudioHandler,
          MSG_PERSIST_VOLUME,
          SENDMSG_QUEUE,
          device,
          0,
          streamState,
          PERSIST_DELAY);

}最后看到sendVolumeUpdate()
  // UI update and Broadcast Intent
  private void sendVolumeUpdate(int streamType, int oldIndex, int index, int flags) {
    //判斷設備是否擁有通話功能。對沒有通話能力的設備來說,RING流類型自然也就沒有意義了。這句話應該算是一種從語義操作上進行的保護
    if (!isPlatformVoice() && (streamType == AudioSystem.STREAM_RING)) {
      streamType = AudioSystem.STREAM_NOTIFICATION;
    }

    if (streamType == AudioSystem.STREAM_MUSIC) {
      flags = updateFlagsForSystemAudio(flags);
    }
    mVolumeController.postVolumeChanged(streamType, flags);//最后將顯示系統音量條的提示框

    if ((flags & AudioManager.FLAG_FIXED_VOLUME) == 0) {
      oldIndex = (oldIndex + 5) / 10; //+5的意義是實現四舍五入;除以10是因為存儲時先乘了10,轉換過程中保留小數點后一位的精度
      index = (index + 5) / 10;
      Intent intent = new Intent(AudioManager.VOLUME_CHANGED_ACTION);
      intent.putExtra(AudioManager.EXTRA_VOLUME_STREAM_TYPE, streamType);
      intent.putExtra(AudioManager.EXTRA_VOLUME_STREAM_VALUE, index);
      intent.putExtra(AudioManager.EXTRA_PREV_VOLUME_STREAM_VALUE, oldIndex);
      sendBroadcastToAll(intent);
    }
}mVolumeController.postVolumeChanged()方法將會調用到mController.volumeChanged()方法,通過AIDL將調用到VolumeUI.java文件中的VolumeController.volumeChanged()方法,最后將會調用mPanel.postVolumeChanged更新系統音量條的UI,這里就是VolumePanel的內容啦,具體可看上一篇文章系統音量條
通過音量設置函數setStreamVolume()
除了音量鍵調節音量以外,還可以通過系統設置中進行調節。
控件會根據當初的音量和模式去調用AudioManager的adjustStreamVolume(靜音或震動模式)或setStreamVolume(普通模式)去調整相對應的音量。
AudioManager.setStreamVolume()是系統設置界面中調整音量所使用的接口。
  private void setStreamVolume(int streamType, int index, int flags, String callingPackage,
      int uid) {
    ......

    ensureValidStreamType(streamType);//先判斷一下流類型這個參數的有效性
    int streamTypeAlias = mStreamVolumeAlias[streamType];//對這個數組進行流類型的轉換
    VolumeStreamState streamState = mStreamStates[streamTypeAlias];

    final int device = getDeviceForStream(streamType);//獲取當前流將使用哪一個音頻設備進行播放。最終會被調用到AudioPolicyService中
    ......

      oldIndex = streamState.getIndex(device);//獲取當前流的音量

      index = rescaleIndex(index * 10, streamType, streamTypeAlias);//將原流類型下的音量值映射到目標流類型下的音量值
      ......

      if (!checkSafeMediaVolume(streamTypeAlias, index, device)) {
        mVolumeController.postDisplaySafeVolumeWarning(flags);
        mPendingVolumeCommand = new StreamVolumeCommand(
                          streamType, index, flags, device);
      } else {
        onSetStreamVolume(streamType, index, flags, device);//將調用setStreamVolumeInt()方法
        index = mStreamStates[streamType].getIndex(device);//獲取設置結果
      }
    }
    sendVolumeUpdate(streamType, oldIndex, index, flags);//通知外界音量發生了變化
}onSetStreamVolume()方法主要就是調用了setStreamVolumeInt()方法,下面看下setStreamVolumeInt()
  private void setStreamVolumeInt(int streamType, int index, int device, boolean force) {
    VolumeStreamState streamState = mStreamStates[streamType];

    if (streamState.setIndex(index, device) || force) { //調用streamState.setIndex(),更改VolumeStreamState對象中保存的音量值
      //這個消息將把音量設置到底層去,并將其存儲到Settingsprovider中
      sendMsg(mAudioHandler,
          MSG_SET_DEVICE_VOLUME,
          SENDMSG_QUEUE,
          device,
          0,
          streamState,
          0);
    }
  }
關于Android中怎么實現音量控制功能就分享到這里了,希望以上內容可以對大家有一定的幫助,可以學到更多知識。如果覺得文章不錯,可以把它分享出去讓更多的人看到。
免責聲明:本站發布的內容(圖片、視頻和文字)以原創、轉載和分享為主,文章觀點不代表本網站立場,如果涉及侵權請聯系站長郵箱:is@yisu.com進行舉報,并提供相關證據,一經查實,將立刻刪除涉嫌侵權內容。