您好,登錄后才能下訂單哦!
您好,登錄后才能下訂單哦!
小編給大家分享一下如何解決android軟鍵盤擋住輸入框方法,相信大部分人都還不怎么了解,因此分享這篇文章給大家參考一下,希望大家閱讀完這篇文章后大有收獲,下面讓我們一起去了解一下吧!
在開發中,經常會遇到鍵盤擋住輸入框的情況,比如登錄界面或注冊界面,彈出的軟鍵盤把登錄或注冊按鈕擋住了,用戶必須把軟鍵盤收起,才能點擊相應按鈕,這樣的用戶體驗非常不好。像微信則直接把登錄按鈕做在輸入框的上面,但有很多情況下,這經常滿足不了需求。同時如果輸入框特別多的情況下,點擊輸入時,當前輸入框沒被擋住,但是當前輸入框下面的輸入框卻無法獲取焦點,必須先把鍵盤收起,再去獲取下面輸入框焦點,這樣用戶體驗也非常不好,那有什么辦法呢?
系統的adjustResize和adjustPan有什么區別,他們使用時的注意事項,有什么系統要求及蔽端呢?
下面對幾種在開發中常用的方法進行總結:
主要實現方法:
在AndroidManifest.xml對應的Activity里添加 android:windowSoftInputMode=”adjustPan”或是android:windowSoftInputMode=”adjustResize”屬性
這兩種屬性的區別,官方的解釋是: 
這兩個屬性作用都是為了調整界面使鍵盤不擋住輸入框 ,我這里對這兩種屬性使用場景、優缺點、注意事項進行了全方面總結,不知大家平時使用時是否注意到了。
| 屬性 | 注意事項 | 優缺點 | 失效情況 | 適用情況 |
|---|---|---|---|---|
| adjustResize | 需要界面本身可調整尺寸, 如在布局添加ScrollView,或輸入控件屬于RecycleView/ListView某一項 | 優點:1.不會把標題欄頂出當前布局; 2.有多項輸入時,當前輸入框下面的輸入框可上下滑動輸入 缺點:1.需要界面本身可調整尺寸; 2. 全屏時失效 | 1.Activity主窗口尺寸無法調整; 2.Activity全屏 3.android5.0以上通過style設置沉浸式狀態欄模式而不設置fitSystemWindow為true | 非全屏或是非沉浸式狀態欄輸入界面,輸入框比較多 |
| adjustPan | 頁面不會重新布局,當前輸入框和鍵盤會直接將當前輸入框以上界面整體向上平移,這樣即使界面包含標題欄,也會被頂上去 | 優點: 使用簡單,不需要界面本身可調整尺寸,不會有失效情況 缺點: 會把標題欄頂出當前布局;有多項輸入時,當前輸入框下面的輸入框無法輸入,必須收起鍵盤顯示輸入框再輸入 | 無 | 有少量輸入項,且輸入量居界面上方 |
| fitsSystemWindows | 如果多個View設置了fitsSystemWindows=”true”,只有初始的view起作用,都是從第一個設置了fitsSystemWindows的view開始計算padding | 優點:使用簡單,需要沉浸式狀態欄的界面,不需要自己計算padding狀態欄的高度 缺點:使用有限制 | 1.View 的其他 padding 值被重新改寫了 2.手機系統版本>=android 4.4 | 1.界面全屏 2.設置界面主題為沉浸式狀態欄 |
adjustResize失效情況:activity設置了全屏屬性指Theme.Light.NotittleBar.Fullscreen(鍵盤彈起時會將標題欄也推上去)或者設置了activity對應的主題中android:windowTranslucentStatus屬性,設置方式為:android:windowTranslucentStatus=true,這時如果對應的頁面上含有輸入框,將會導致點擊輸入框時軟鍵盤彈出后鍵盤覆蓋輸入框,導致輸入框看不見。
fitsSystemWindows=”true”只有初始的view起作用:如果在布局中不是最外層控件設置fitsSystemWindows=”true”那么設置的那個控件高度會多出一個狀態欄高度。若有多個view設置了,因第一個view已經消耗掉insect,其他view設置了也會被系統忽略。
假設原始界面是一個LinearLayout包含若干EditText,如下圖所示,在分別使用兩種屬性時的表現。
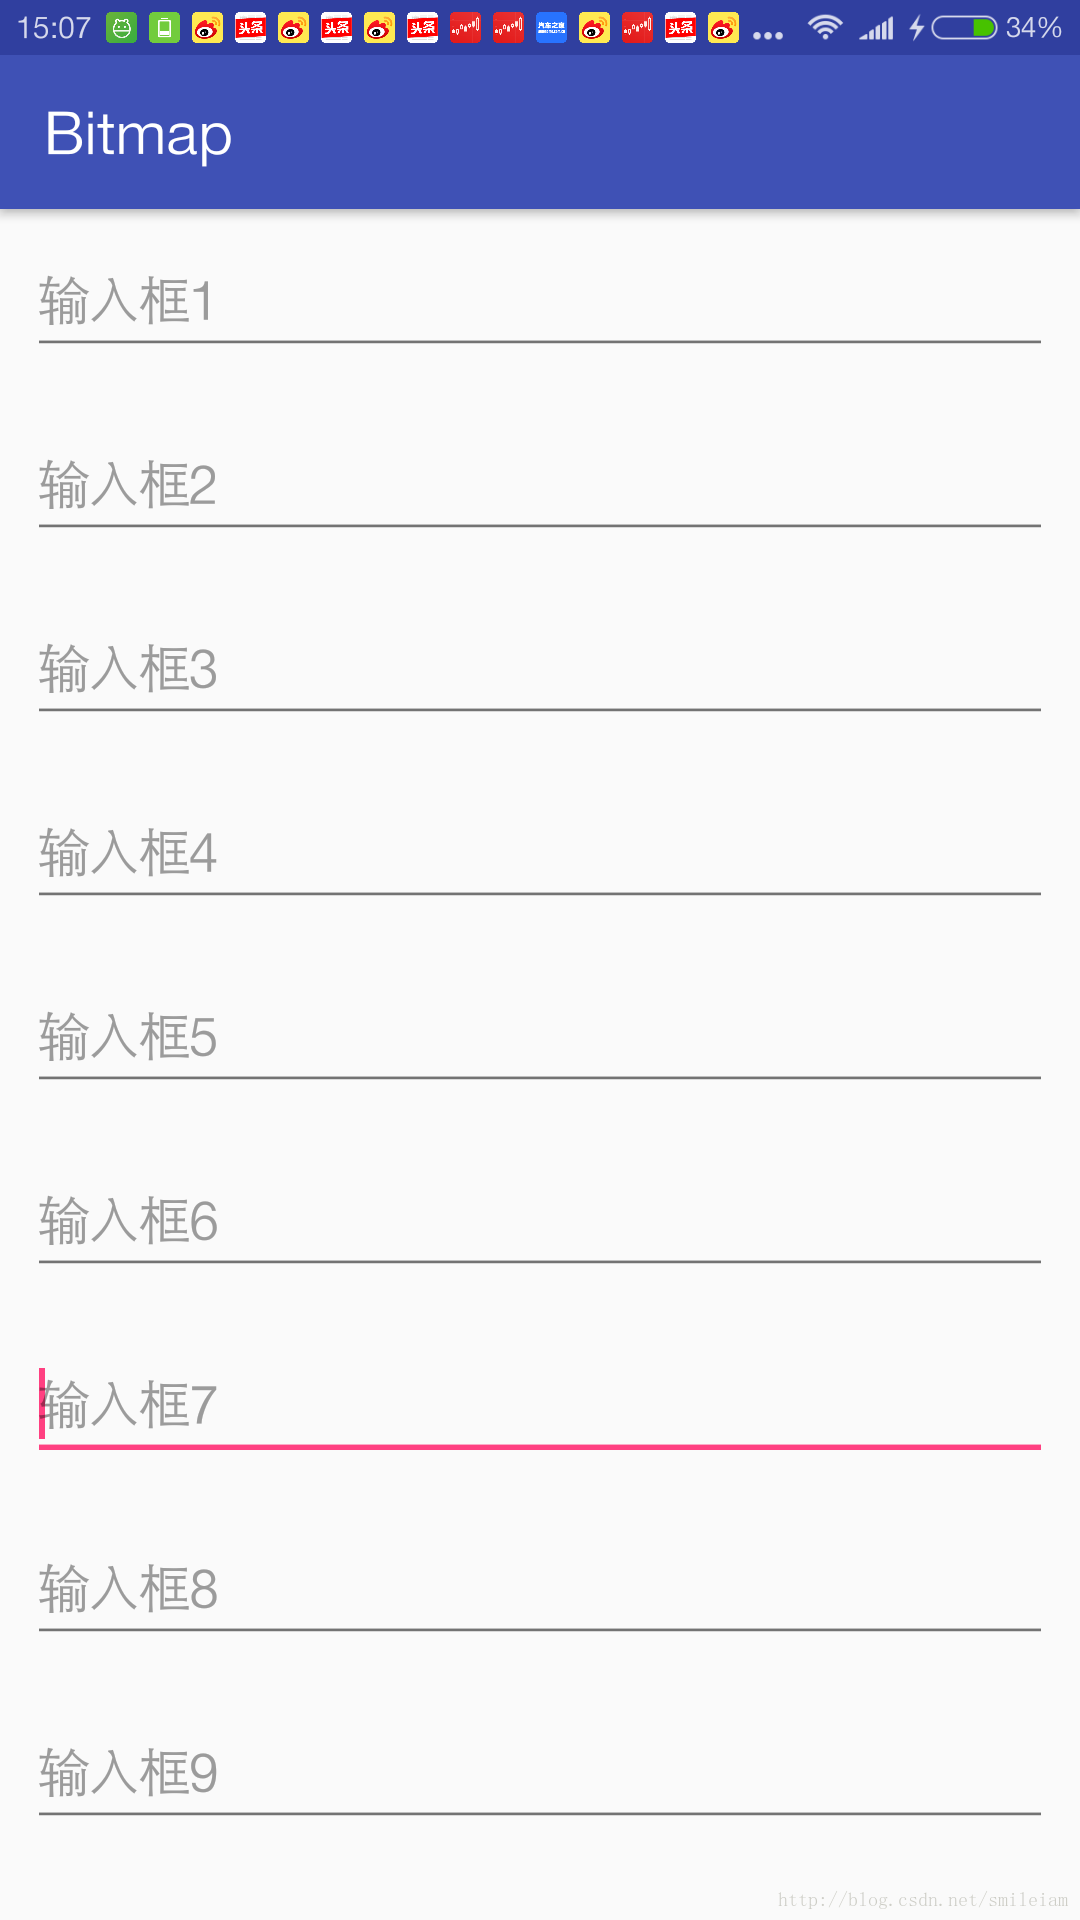
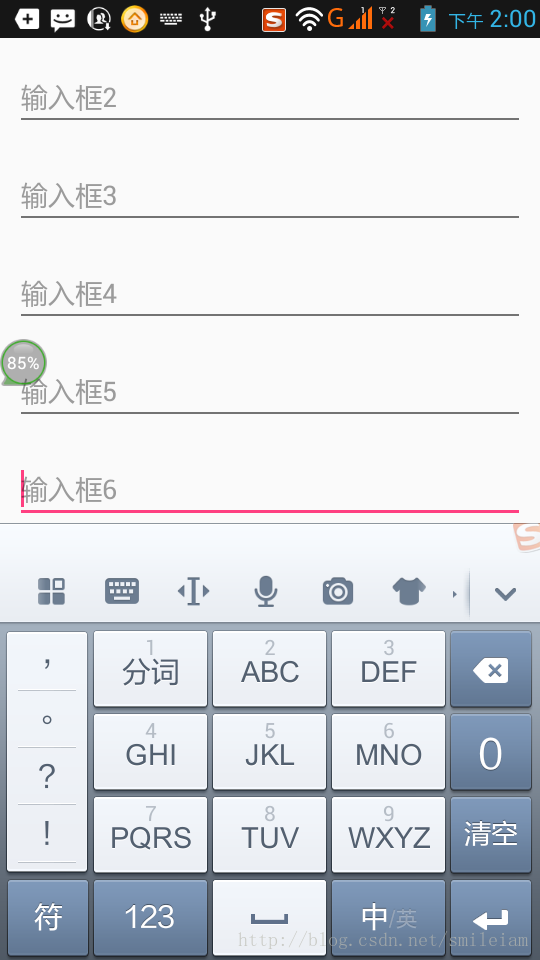
整個界面向上平移,使輸入框露出,它不會改變界面的布局;界面整體可用高度還是屏幕高度,這個可以通過下面的截圖看出,如點擊輸入框6,輸入框會被推到鍵盤上方,但輸入框1被頂出去了,如果界面包含標題欄,也會被頂出去。
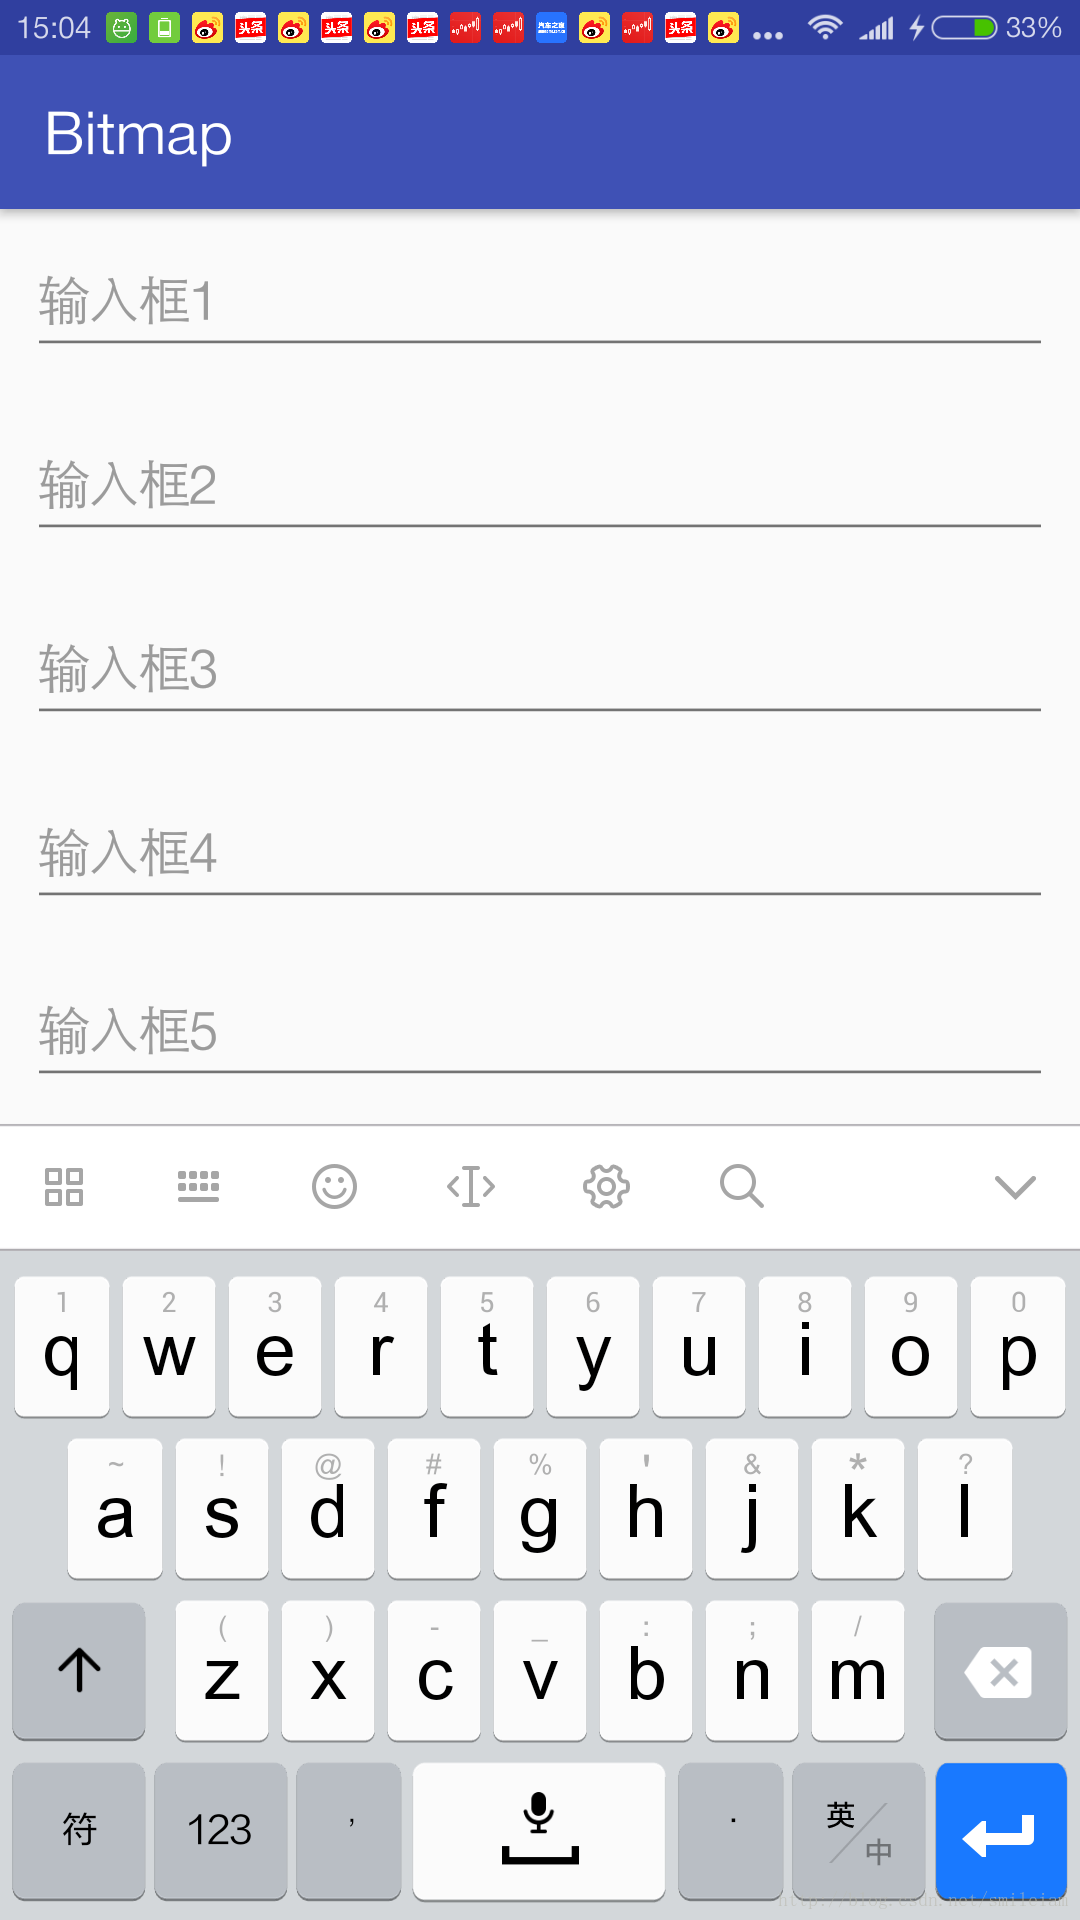
需要界面的高度是可變的,或者說Activity主窗口的尺寸是可以調整的,如果不能調整,則不會起作用。
例如:Activity的xml布局中只有一個LinearLayout包含若干EditText,在Activity的AndroidMainfest.xml中設置android:windowSoftInputMode=”adjustResize”屬性,點擊輸入框6, 發現軟鍵盤擋住了輸入框6,并沒有調整,如下圖所示:
但使用這兩種屬性,我們可以總結以下幾點:
1) 使用adjustPan, 如果需要輸入的項比較多時,點擊輸入框,當前輸入項會被頂到軟鍵盤上方,但若當前輸入框下面還有輸入項時,卻需要先收起鍵盤,再點擊相應的輸入項才能輸入。這樣操作太繁瑣了,對于用戶體驗不大好;
2) adjustResize的使用,需要界面本身可顯示的窗口內容能調整,可結合scrollview使用;
在相應界面的xml布局中,最外層添加一個ScrollView,不在AndroidMainfest.xml中設置任何android:windowSoftInputMode屬性,此時點擊輸入框,輸入框均不會被軟鍵盤檔住。即使當前輸入框下方也有輸入框,在鍵盤顯示的情況下,也可以通過上下滑動界面來輸入,而不用先隱藏鍵盤,點擊下方輸入框,再顯示鍵盤輸入。
我們可以根據Android Studio的Inspect Layout工具來查看界面真正占用的布局高度,工具在
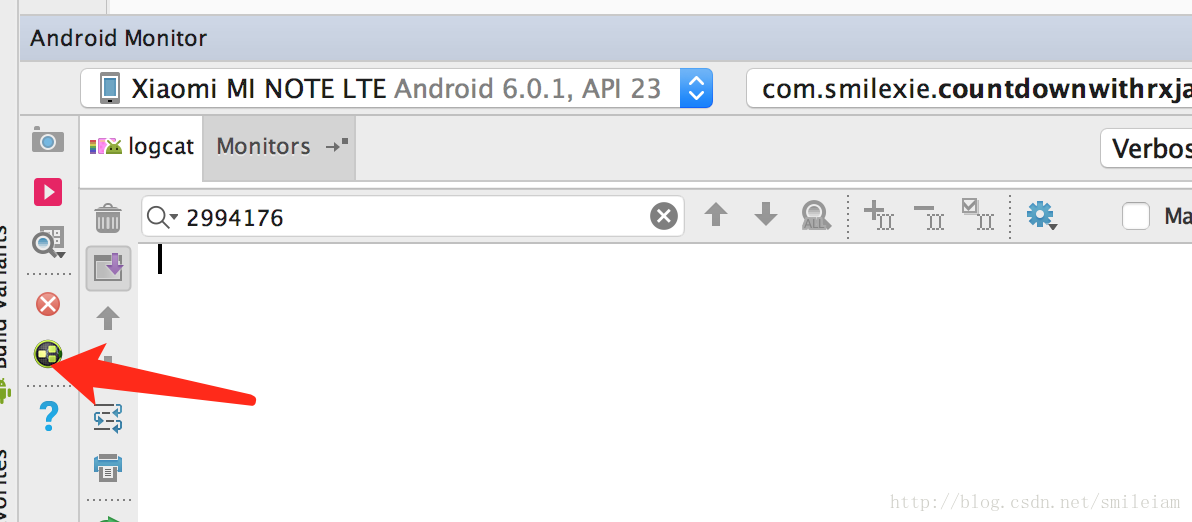
通過該工具,我們看到:
界面真正能用的高度=屏幕高度-狀態欄高度-軟鍵盤高度
界面中藍框是真正界面所用的高度:
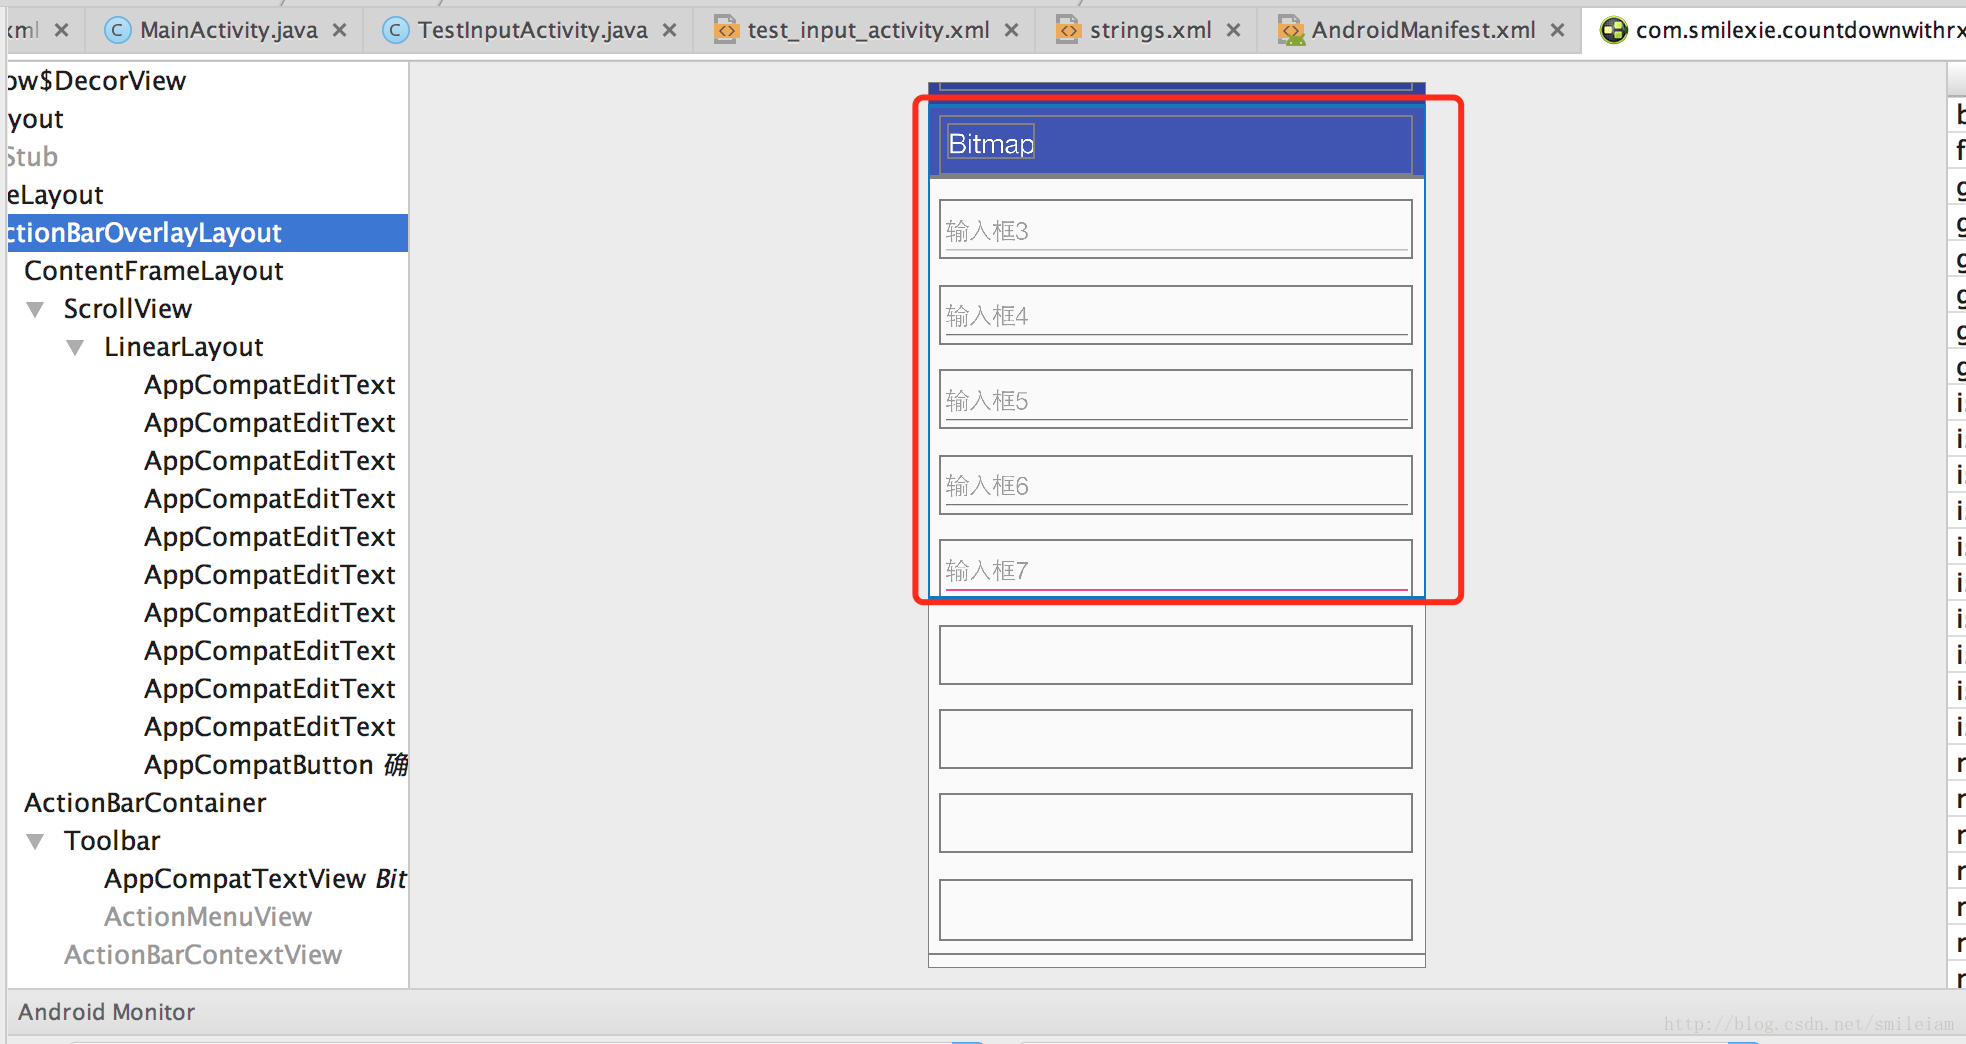
我們再在該類的AndroidMainfest.xml中設置windowSoftInputMode屬性為adjustPan,
 <activity android:name=".TestInputActivity"
  android:windowSoftInputMode="adjustPan">
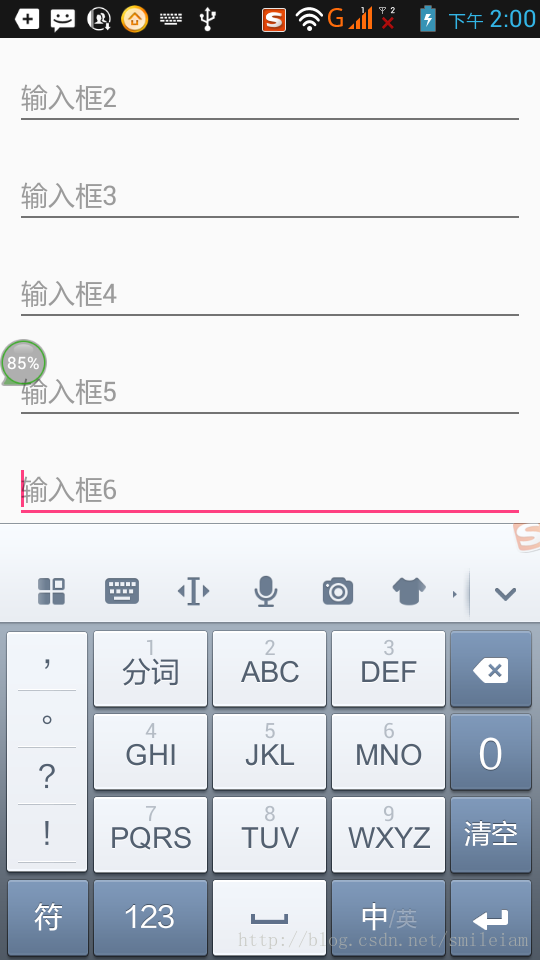
發現當前輸入框不會被擋住,但是輸入框比較多時,在有鍵盤顯示時,界面上下滑動,但只能滑動部分,且如果輸入框在界面靠下方時,點擊輸入框,標題欄也會被頂出去,如下圖所示:
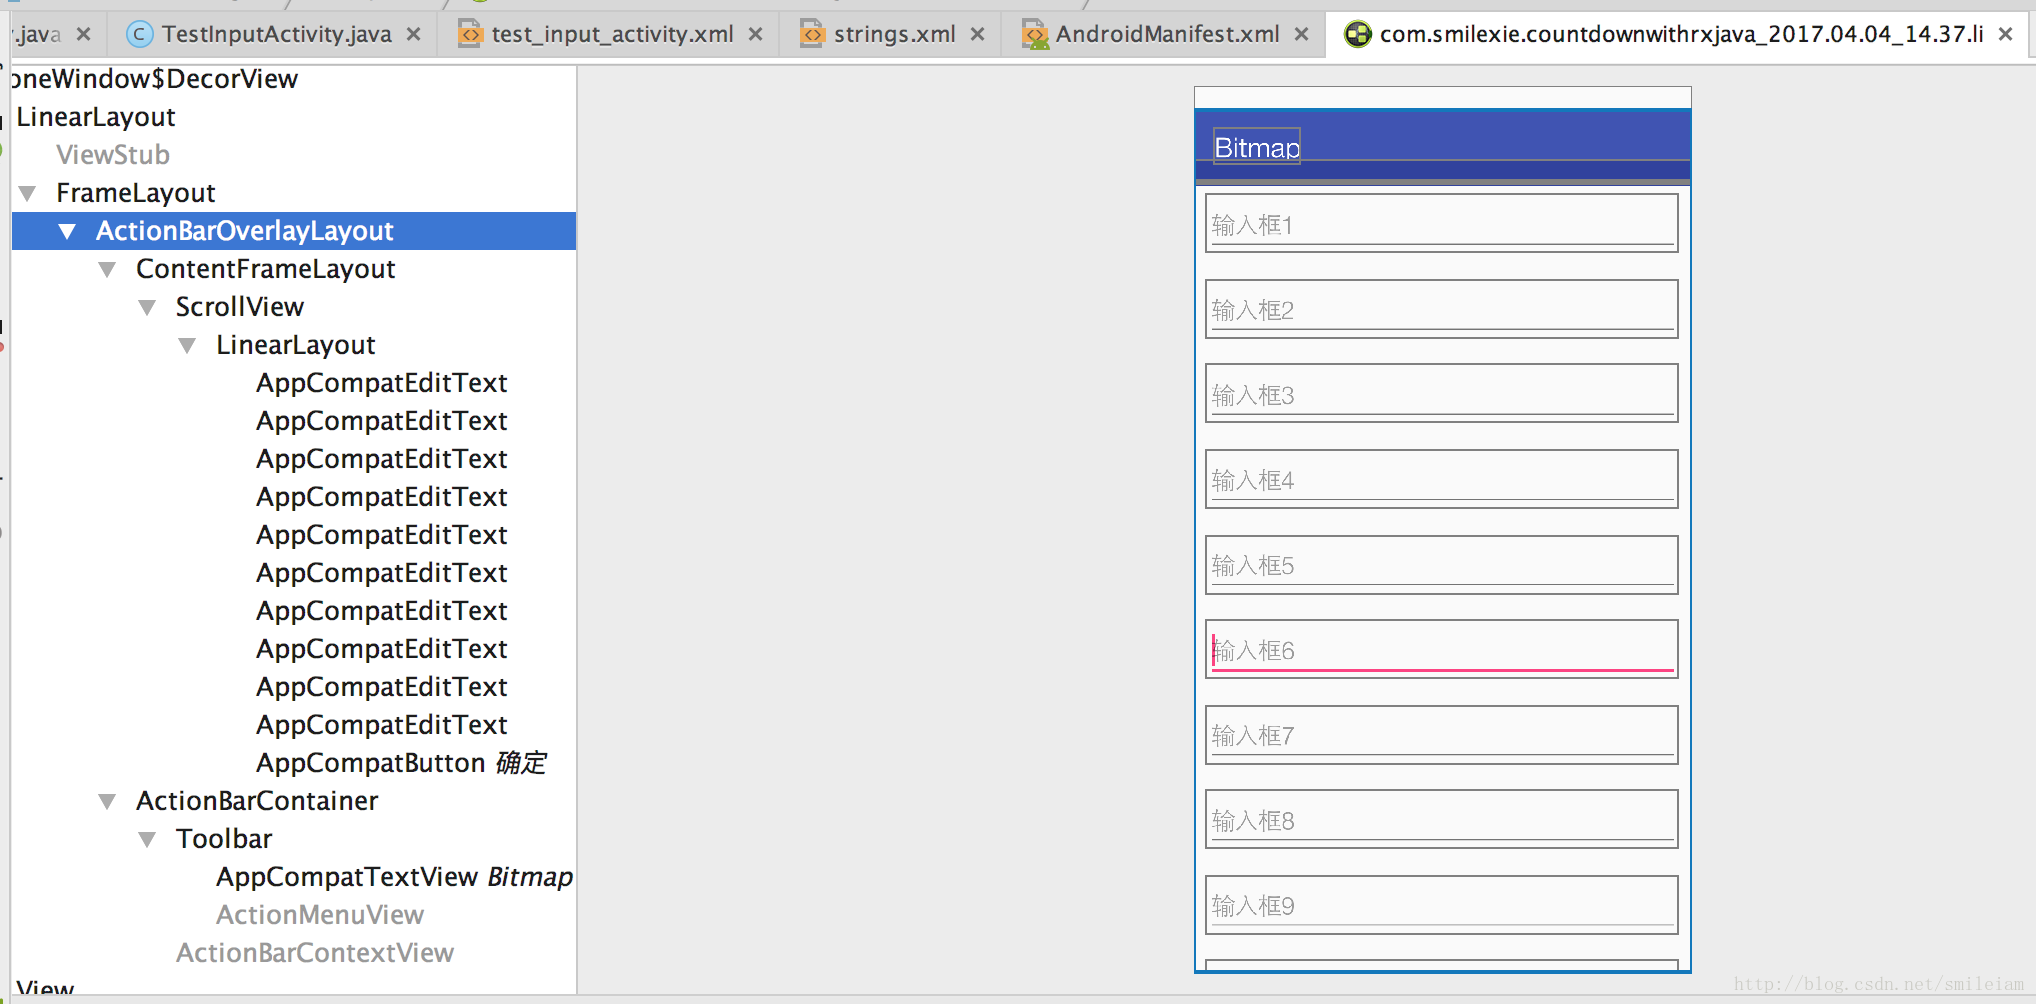
我們借助Inspect Layout工具查看此設置布局可用高度,從下圖可以看出,此時布局可用高度是屏幕的高度,上下滑動也只是此屏的高度,在輸入框9以下的輸入框滑不出來,向上滑動,也只能滑到輸入框1。
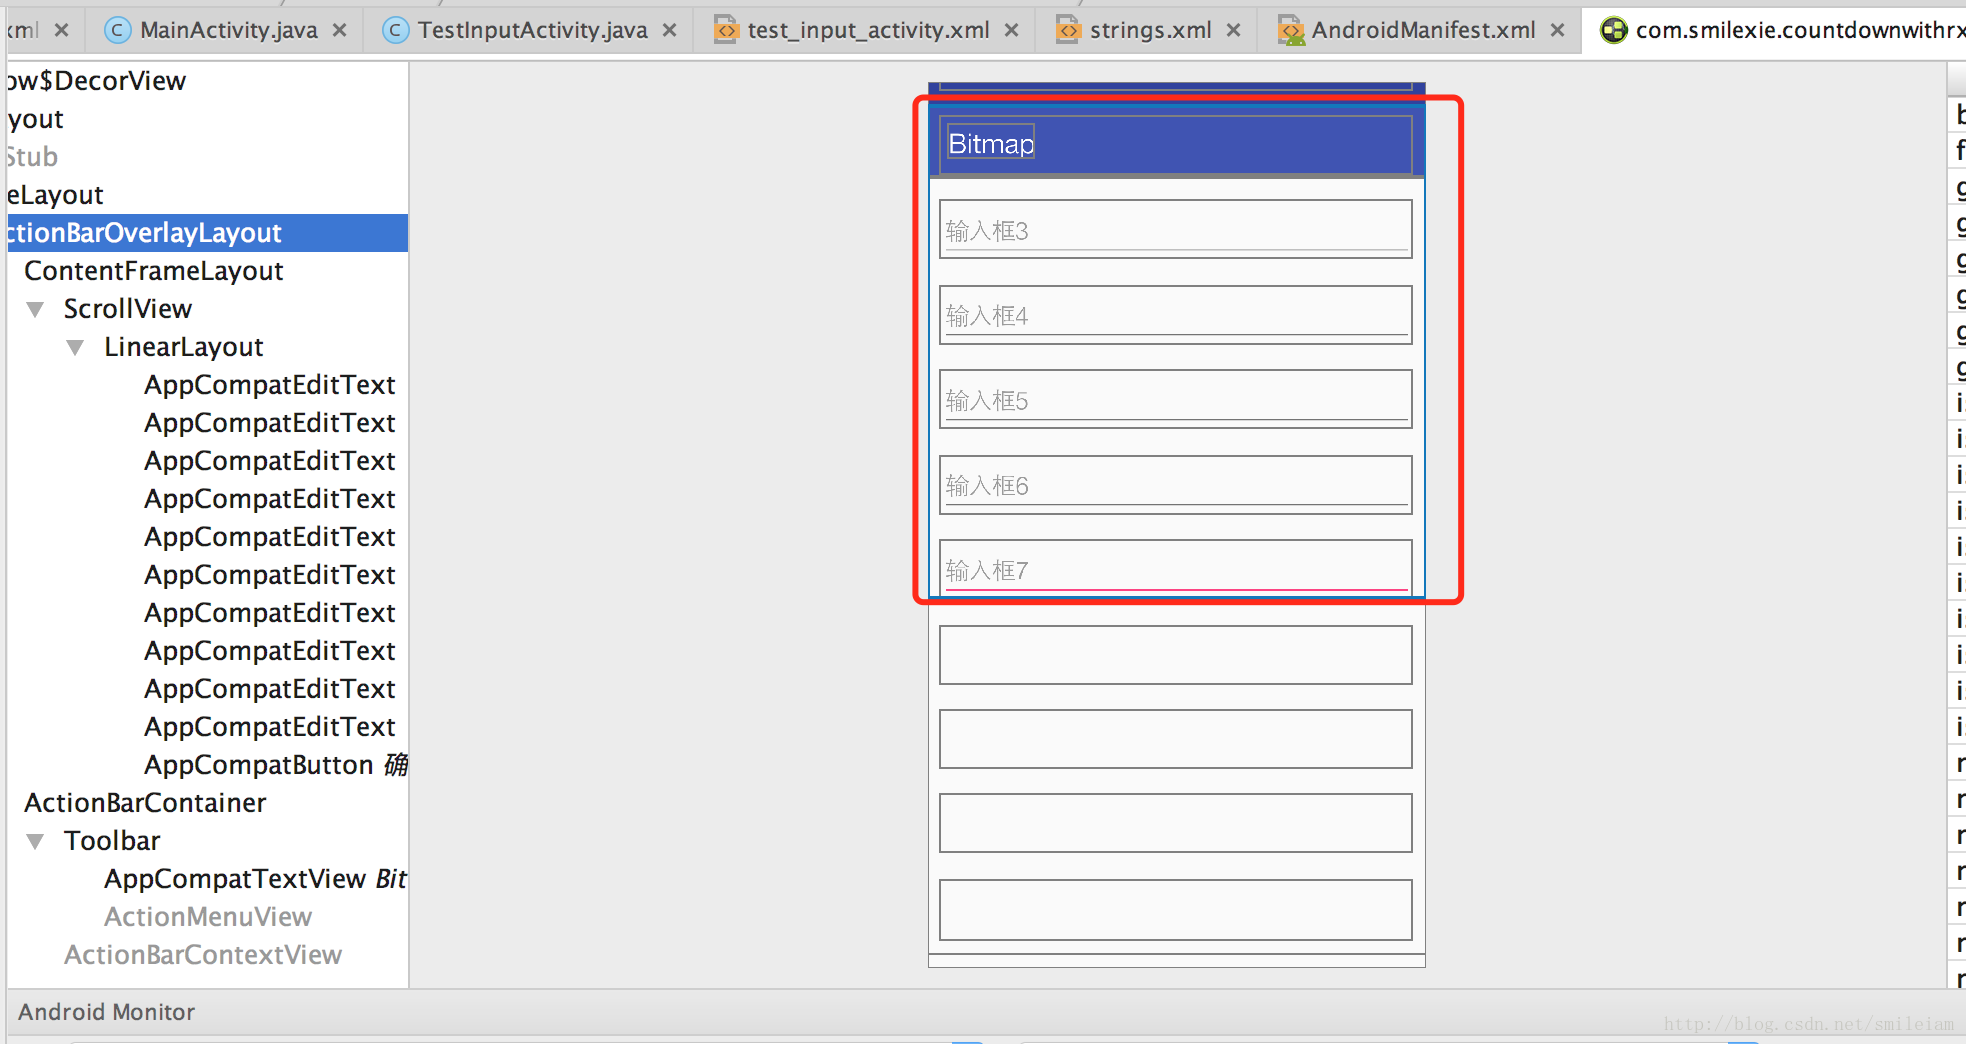
我們前面說過adjustResize的使用必須界面布局高度是可變的,如最外層套個ScrollView或是界面可收縮的,才起作用。這里在該類的AndroidMainfest.xml中設置windowSoftInputMode屬性為adjustResize,
 <activity android:name=".TestInputActivity"
  android:windowSoftInputMode="adjustResize">
發現效果和1不設置任何windowSoftInputMode屬性類似,其使用高度也是:屏幕高度-狀態欄高度-軟鍵盤高度
我們再來看看windowSoftInputMode默認屬性值stateUnspecified:

可以看出,系統將選擇合適的狀態,也就是在界面最外層包含一層ScrollView時,設置默認屬性值stateUnspecified其實就是adjustResize屬性。
但以下兩方面無法滿足需求:
1) 當Activity設置成全屏fullscreen模式時或是使用沉浸式狀態欄時,界面最外層包裹 ScrollView,當輸入框超過一屏,當前輸入框下面的輸入框并不能上下滑動來輸入,情況類似于ScrollView+adjustPan,只能滑動部分,通過Inspect Layout也可以看到,界面可用高度是整個屏幕高度,并不會進行調整高度。即使設置adjustResize,也不起作用。
2) 如果是類似于注冊界面或是登錄界面,鍵盤會擋住輸入框下面的登錄按鈕。
自android系統4.4(API>=19)就開始支持沉浸式狀態欄,當使用覺System windows(系統窗口),顯示系統一些屬性和操作區域,如 最上方的狀態及沒有實體按鍵的最下方的虛擬導航欄。 android:fitsSystemWindows=“true”會使得屏幕上的可布局空間位于狀態欄下方與導航欄上方
使用場景:針對界面全屏或是沉浸式狀態欄,輸入框不會被鍵盤遮擋。主要用于一些登錄界面,或是需要把界面整體都頂上去的場景。
(1) 獲取Activity布局xml的最外層控件,如xml文件如下:
<RelativeLayout xmlns:android="http://schemas.android.com/apk/res/android"
 xmlns:tools="http://schemas.android.com/tools"
 android:layout_width="match_parent"
 android:layout_height="match_parent"
 android:id="@+id/main"
 tools:context="com.example.liubin1.softkeyboardhelper.MainActivity">
 <EditText
 android:id="@+id/name"
 android:hint="請輸入用戶名:"
 android:layout_centerInParent="true"
 android:layout_width="match_parent"
 android:layout_height="50dp"
 />
 <EditText
 android:id="@+id/pas"
 android:layout_below="@id/name"
 android:hint="請輸入密碼:"
 android:layout_centerInParent="true"
 android:layout_width="match_parent"
 android:layout_height="50dp"
 />
 <Button
 android:id="@+id/login_btn"
 android:layout_below="@id/rpas"
 android:layout_centerHorizontal="true"
 android:text="登錄"
 android:layout_width="180dp"
 android:layout_height="50dp" />
</RelativeLayout>
先獲取到最外層控件
RelativeLayout main = (RelativeLayout) findViewById(R.id.main);
(2) 獲取到最后一個控件,如上面的xml文件,最后一個控件是Button
Button login_btn = (Button) findViewById(R.id.login_btn);
(3) 給最外層控件和最后一個控件添加監聽事件
//在Activity的onCreate里添加如下方法addLayoutListener(main,login_btn);/**
 * addLayoutListener方法如下
 * @param main 根布局
 * @param scroll 需要顯示的最下方View
 */
 public void addLayoutListener(final View main, final View scroll) {
 main.getViewTreeObserver().addOnGlobalLayoutListener(new ViewTreeObserver.OnGlobalLayoutListener() {  @Override
  public void onGlobalLayout() {
  Rect rect = new Rect();  //1、獲取main在窗體的可視區域
  main.getWindowVisibleDisplayFrame(rect);  //2、獲取main在窗體的不可視區域高度,在鍵盤沒有彈起時,main.getRootView().getHeight()調節度應該和rect.bottom高度一樣
  int mainInvisibleHeight = main.getRootView().getHeight() - rect.bottom;  int screenHeight = main.getRootView().getHeight();//屏幕高度
  //3、不可見區域大于屏幕本身高度的1/4:說明鍵盤彈起了
  if (mainInvisibleHeight > screenHeight / 4) {   int[] location = new int[2];
   scroll.getLocationInWindow(location);   // 4?獲取Scroll的窗體坐標,算出main需要滾動的高度
   int srollHeight = (location[1] + scroll.getHeight()) - rect.bottom;   //5?讓界面整體上移鍵盤的高度
   main.scrollTo(0, srollHeight);
  } else {  //3、不可見區域小于屏幕高度1/4時,說明鍵盤隱藏了,把界面下移,移回到原有高度
   main.scrollTo(0, 0);
  }
  }
 });
 }
}此方法通過監聽Activity最外層布局控件來檢測軟鍵盤是否彈出,然后去手動調用控件的scrollTo方法達到調整布局目的。
此種方法需要在當前界面寫比較多的代碼,在某些手機上,若輸入時,軟鍵盤高度是可變的,如中英文切換,高度變化時,會發現適配的不大好。如下圖:
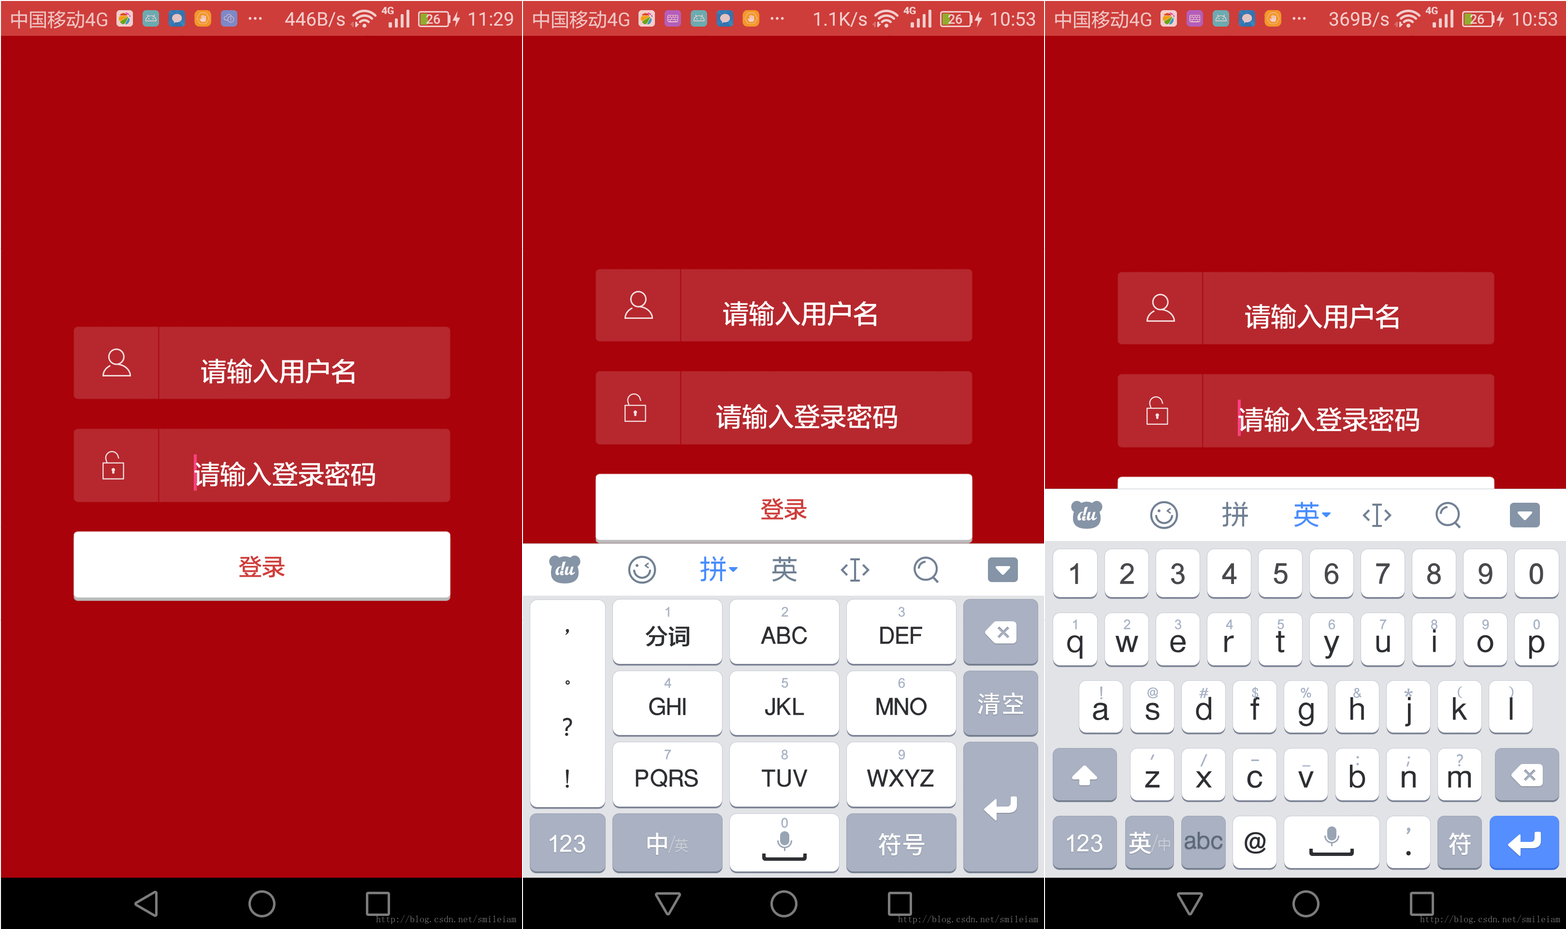
從上圖可以看出,如果鍵盤高度變化,鍵盤還是會擋住登錄按鈕。
此方法主要是通過在需要移動的控件外套一層scrollView,同時最布局最外層使用自定義view監聽鍵盤彈出狀態,計算鍵盤高度,再進行計算需要移動的位置,這個和方法三有點類似,但能適配鍵盤高度變化情況。
(1) 先寫自定義View,實時臨聽界面鍵盤彈起狀態,計算鍵盤高度
public class KeyboardLayout extends FrameLayout {
 private KeyboardLayoutListener mListener; private boolean mIsKeyboardActive = false; //輸入法是否激活
 private int mKeyboardHeight = 0; // 輸入法高度
 public KeyboardLayout(Context context) { this(context, null, 0);
 } public KeyboardLayout(Context context, AttributeSet attrs) { this(context, attrs, 0);
 } public KeyboardLayout(Context context, AttributeSet attrs, int defStyleAttr) { super(context, attrs, defStyleAttr); // 監聽布局變化
 getViewTreeObserver().addOnGlobalLayoutListener(new KeyboardOnGlobalChangeListener());
 } public void setKeyboardListener(KeyboardLayoutListener listener) {
 mListener = listener;
 } public KeyboardLayoutListener getKeyboardListener() { return mListener;
 } public boolean isKeyboardActive() { return mIsKeyboardActive;
 } /**
 * 獲取輸入法高度
 *
 * @return
 */
 public int getKeyboardHeight() { return mKeyboardHeight;
 } public interface KeyboardLayoutListener {
 /**
  * @param isActive 輸入法是否激活
  * @param keyboardHeight 輸入法面板高度
  */
 void onKeyboardStateChanged(boolean isActive, int keyboardHeight);
 } private class KeyboardOnGlobalChangeListener implements ViewTreeObserver.OnGlobalLayoutListener {
 int mScreenHeight = 0; private int getScreenHeight() {  if (mScreenHeight > 0) {  return mScreenHeight;
  }
  mScreenHeight = ((WindowManager) getContext().getSystemService(Context.WINDOW_SERVICE))
   .getDefaultDisplay().getHeight();  return mScreenHeight;
 } @Override
 public void onGlobalLayout() {
  Rect rect = new Rect();  // 獲取當前頁面窗口的顯示范圍
  ((Activity) getContext()).getWindow().getDecorView().getWindowVisibleDisplayFrame(rect);  int screenHeight = getScreenHeight();  int keyboardHeight = screenHeight - rect.bottom; // 輸入法的高度
  boolean isActive = false;  if (Math.abs(keyboardHeight) > screenHeight / 4) {
  isActive = true; // 超過屏幕五分之一則表示彈出了輸入法
  mKeyboardHeight = keyboardHeight;
  }
  mIsKeyboardActive = isActive;  if (mListener != null) {
  mListener.onKeyboardStateChanged(isActive, keyboardHeight);
  }
 }
 }
}
(2) xml文件編寫,在界面最外層套上自定義view,在需要滾動的控件外層添加scrollView
public class KeyboardLayout extends FrameLayout {
 private KeyboardLayoutListener mListener; private boolean mIsKeyboardActive = false; //輸入法是否激活
 private int mKeyboardHeight = 0; // 輸入法高度
 public KeyboardLayout(Context context) { this(context, null, 0);
 } public KeyboardLayout(Context context, AttributeSet attrs) { this(context, attrs, 0);
 } public KeyboardLayout(Context context, AttributeSet attrs, int defStyleAttr) { super(context, attrs, defStyleAttr); // 監聽布局變化
 getViewTreeObserver().addOnGlobalLayoutListener(new KeyboardOnGlobalChangeListener());
 } public void setKeyboardListener(KeyboardLayoutListener listener) {
 mListener = listener;
 } public KeyboardLayoutListener getKeyboardListener() { return mListener;
 } public boolean isKeyboardActive() { return mIsKeyboardActive;
 } /**
 * 獲取輸入法高度
 *
 * @return
 */
 public int getKeyboardHeight() { return mKeyboardHeight;
 } public interface KeyboardLayoutListener {
 /**
  * @param isActive 輸入法是否激活
  * @param keyboardHeight 輸入法面板高度
  */
 void onKeyboardStateChanged(boolean isActive, int keyboardHeight);
 } private class KeyboardOnGlobalChangeListener implements ViewTreeObserver.OnGlobalLayoutListener {
 int mScreenHeight = 0; private int getScreenHeight() {  if (mScreenHeight > 0) {  return mScreenHeight;
  }
  mScreenHeight = ((WindowManager) getContext().getSystemService(Context.WINDOW_SERVICE))
   .getDefaultDisplay().getHeight();  return mScreenHeight;
 } @Override
 public void onGlobalLayout() {
  Rect rect = new Rect();  // 獲取當前頁面窗口的顯示范圍
  ((Activity) getContext()).getWindow().getDecorView().getWindowVisibleDisplayFrame(rect);  int screenHeight = getScreenHeight();  int keyboardHeight = screenHeight - rect.bottom; // 輸入法的高度
  boolean isActive = false;  if (Math.abs(keyboardHeight) > screenHeight / 4) {
  isActive = true; // 超過屏幕五分之一則表示彈出了輸入法
  mKeyboardHeight = keyboardHeight;
  }
  mIsKeyboardActive = isActive;  if (mListener != null) {
  mListener.onKeyboardStateChanged(isActive, keyboardHeight);
  }
 }
 }
}
(3) Activity調用,自定義view控件添加鍵盤響應,在鍵盤變化時調用scrollView的smoothScrollTo去滾動界面
 /**
 * 監聽鍵盤狀態,布局有變化時,靠scrollView去滾動界面
 */
 public void addLayoutListener() {
 bindingView.mainLl.setKeyboardListener(new KeyboardLayout.KeyboardLayoutListener() {  @Override
  public void onKeyboardStateChanged(boolean isActive, int keyboardHeight) {
  Log.e("onKeyboardStateChanged", "isActive:" + isActive + " keyboardHeight:" + keyboardHeight);  if (isActive) {
   scrollToBottom();
  }
  }
 });
 } /**
 * 彈出軟鍵盤時將SVContainer滑到底
 */
 private void scrollToBottom() {
 bindingView.loginLl.postDelayed(new Runnable() {  @Override
  public void run() {
  bindingView.loginLl.smoothScrollTo(0, bindingView.loginLl.getBottom() + SoftKeyInputHidWidget.getStatusBarHeight(LoginActivityForDiffkeyboardHeight.this));
  }
 }, 100);
 }
實現效果如下:
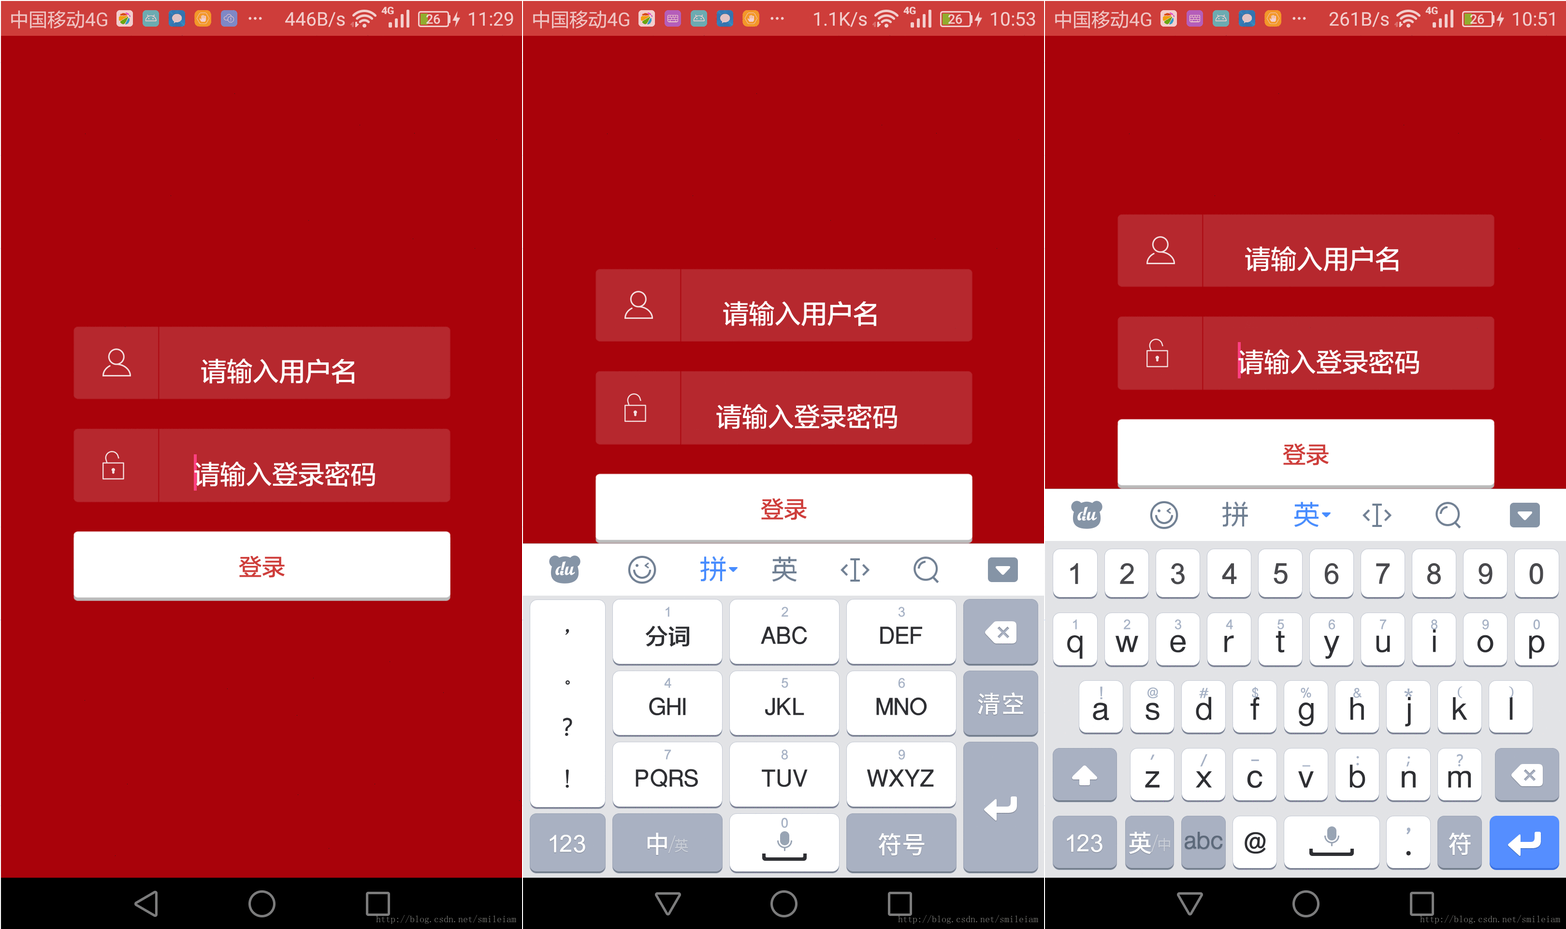
可以看到鍵盤高度變化了,也不會影響界面布局
此方法的實現來自android中提出的issue 5497 https://code.google.com/p/android/issues/detail?id=5497
使用場景:針對界面全屏或是沉浸式狀態欄,界面包含比較多輸入框,界面即使包裹了一層ScrollView,在鍵盤顯示時,當前輸入框下面的輸入不能通過上下滑動界面來輸入。
感謝下面提出評論的同學,指出此方法的不適配問題,之前寫的博文在華為小米手機上確實有不適配情況,在輸入時,鍵盤有時會錯亂,現在已加入適配。
1?把SoftHideKeyBoardUtil類復制到項目中;
2?在需要使用的Activity的onCreate方法中添加:SoftHideKeyBoardUtil.assistActivity(this);即可。
SoftHideKeyBoardUtil類具體代碼如下:
/**
 * 解決鍵盤檔住輸入框
 * Created by SmileXie on 2017/4/3.
 */public class SoftHideKeyBoardUtil {
 public static void assistActivity (Activity activity) { new SoftHideKeyBoardUtil(activity);
 } private View mChildOfContent; private int usableHeightPrevious; private FrameLayout.LayoutParams frameLayoutParams; //為適應華為小米等手機鍵盤上方出現黑條或不適配
 private int contentHeight;//獲取setContentView本來view的高度
 private boolean isfirst = true;//只用獲取一次
 private int statusBarHeight;//狀態欄高度
 private SoftHideKeyBoardUtil(Activity activity) { //1?找到Activity的最外層布局控件,它其實是一個DecorView,它所用的控件就是FrameLayout
 FrameLayout content = (FrameLayout) activity.findViewById(android.R.id.content); //2?獲取到setContentView放進去的View
 mChildOfContent = content.getChildAt(0); //3?給Activity的xml布局設置View樹監聽,當布局有變化,如鍵盤彈出或收起時,都會回調此監聽
  mChildOfContent.getViewTreeObserver().addOnGlobalLayoutListener(new ViewTreeObserver.OnGlobalLayoutListener() { //4?軟鍵盤彈起會使GlobalLayout發生變化
  public void onGlobalLayout() {  if (isfirst) {
   contentHeight = mChildOfContent.getHeight();//兼容華為等機型
   isfirst = false;
  }  //5?當前布局發生變化時,對Activity的xml布局進行重繪
  possiblyResizeChildOfContent();
  }
 }); //6?獲取到Activity的xml布局的放置參數
 frameLayoutParams = (FrameLayout.LayoutParams) mChildOfContent.getLayoutParams();
 } // 獲取界面可用高度,如果軟鍵盤彈起后,Activity的xml布局可用高度需要減去鍵盤高度
 private void possiblyResizeChildOfContent() { //1?獲取當前界面可用高度,鍵盤彈起后,當前界面可用布局會減少鍵盤的高度
 int usableHeightNow = computeUsableHeight(); //2?如果當前可用高度和原始值不一樣
 if (usableHeightNow != usableHeightPrevious) {  //3?獲取Activity中xml中布局在當前界面顯示的高度
  int usableHeightSansKeyboard = mChildOfContent.getRootView().getHeight();  //4?Activity中xml布局的高度-當前可用高度
  int heightDifference = usableHeightSansKeyboard - usableHeightNow;  //5?高度差大于屏幕1/4時,說明鍵盤彈出
  if (heightDifference > (usableHeightSansKeyboard/4)) {  // 6?鍵盤彈出了,Activity的xml布局高度應當減去鍵盤高度
  if (Build.VERSION.SDK_INT >= Build.VERSION_CODES.KITKAT){
   frameLayoutParams.height = usableHeightSansKeyboard - heightDifference + statusBarHeight;
  } else {
   frameLayoutParams.height = usableHeightSansKeyboard - heightDifference;
  }
  } else {
  frameLayoutParams.height = contentHeight;
  }  //7? 重繪Activity的xml布局
  mChildOfContent.requestLayout();
  usableHeightPrevious = usableHeightNow;
 }
 } private int computeUsableHeight() {
 Rect r = new Rect();
 mChildOfContent.getWindowVisibleDisplayFrame(r); // 全屏模式下:直接返回r.bottom,r.top其實是狀態欄的高度
 return (r.bottom - r.top);
 }
}
它的實現原理主要是:
(1) 找到Activity的最外層布局控件,我們知道所有的Activity都是DecorView,它就是一個FrameLayout控件,該控件id是系統寫死叫R.id.content,就是我們setContentView時,把相應的View放在此FrameLayout控件里
FrameLayout content = (FrameLayout) activity.findViewById(android.R.id.content);
所以content.getChildAt(0)獲取到的mChildOfContent,也就是我們用setContentView放進去的View。
(2) 給我們的Activity的xml布局View設置一個Listener監聽
mChildOfContent.getViewTreeObserver().addOnGlobalLayoutListener({
 possiblyResizeChildOfContent();
});View.getViewTreeObserver()可以獲取一個ViewTreeObserver對象——它是一個觀察者,用以監聽當前View樹所發生的變化。這里所注冊的addOnGlobalLayoutListener,就是會在當前的View樹的全局布局(GlobalLayout)發生變化、或者其中的View可視狀態有變化時,進行通知回調。『軟鍵盤彈出/隱 』都能監聽到。
(3) 獲取當前界面可用高度
private int computeUsableHeight() {
 Rect rect = new Rect();
 mChildOfContent.getWindowVisibleDisplayFrame(rect); // rect.top其實是狀態欄的高度,如果是全屏主題,直接 return rect.bottom就可以了
 return (rect.bottom - rect.top);
}
如下圖所示:
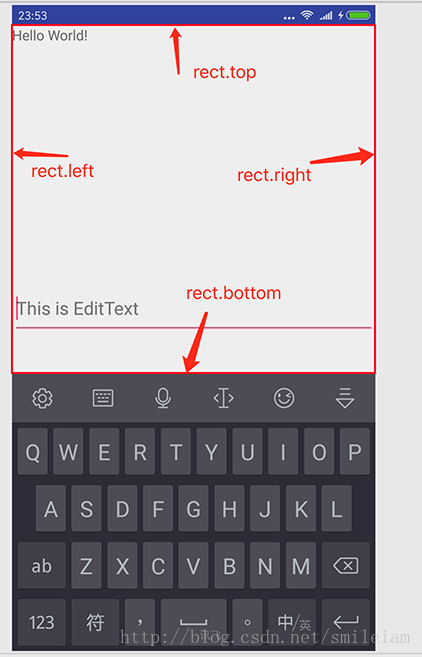
(4) 重設高度, 我們計算出的可用高度,是目前在視覺效果上能看到的界面高度。但當前界面的實際高度是比可用高度要多出一個軟鍵盤的距離的。
注意:如果既使用了沉浸式狀態欄,又加了fitSystetemWindow=true屬性,就需要在AndroidMainfest.xml注冊Activity的地方添加上以下屬性。因為你兩種都用,系統不知道用哪種了。fitSystetemWindow已經有resize屏幕的作用。
android:windowSoftInputMode="stateHidden|adjustPan"
通過上面的這種方法,一般布局輸入鍵盤擋住輸入框的問題基本都能解決。即使界面全屏或是沉浸式狀態欄情況。
下面對上面幾種方法進行對比:
方法一:優點:使用簡單,只需在Activity的AndroidMainfest.xml中設置windowSoftInput屬性即可。
注意點:adjustResize屬性必須要界面大小可以自身改變;
缺點:當輸入框比較多時,當前輸入框下方的輸入框會初鍵盤擋住,須收起鍵盤再進入輸入;使用adjustPan,輸入框較多時,因它是把界面當成一個整體,只會顯示一屏的高度,會把ActionBar頂上去。
方法二:優點:使用簡單,只需在Activity的最外層布局包裹一個ScrollView即可。
注意點:不可使用adjustPan屬性,否則ScrollView失效;
缺點:對于全屏時,在鍵盤顯示時,無法上下滑動界面達到輸入的目的;
方法三:優點:可以解決全屏時,鍵盤擋入按鈕問題。
缺點:只要有此需求的Activity均需要獲取到最外層控件和最后一個控件,監測鍵盤是否彈出,再調用控件的scrollTo方法對界面整體上移或是下移。代碼冗余。對于鍵盤高度變化時,適配不好。
方法四:優點:可以解決全屏時,鍵盤擋入按鈕問題。
缺點:只要有此需求的Activity均需要獲取到最外層控件和最后一個控件,布局多出一層。
方法五:優點:可以解決全屏時,鍵盤擋入輸入框問題。只需要寫一個全局類,其他有需求的界面直接在onCreate方法里調用此類的全局方法,即可。
缺點:多用了一個類。
綜上所述:
1) 當輸入框比較少時,界面只有一個輸入框時,可以通過方法一設置adjustPan;
2) 如果對于非全屏/非沉浸式狀態欄需求,只需要使用方法二ScrollView+adjustResize;
3) 如果對于使用沉浸式狀態欄,使用fitSystemWindow=true屬性,按道理android系統已經做好適配,鍵盤不會擋住輸入框;
4) 如果全屏/沉浸式狀態欄界面,類似于登錄界面,有需要把登錄鍵鈕或是評論按鈕也頂起,如果鍵盤沒有變化需求,可以使用方法三,若需要適配鍵盤高度變化,則需要使用方法四;
5) 如果界面使用全屏或沉浸式狀態欄,沒有使用fitSystemWindow=true屬性,一般如需要用到抽屈而且狀態欄顏色也需要跟著變化,則選擇方法五更恰當。
以上是“如何解決android軟鍵盤擋住輸入框方法”這篇文章的所有內容,感謝各位的閱讀!相信大家都有了一定的了解,希望分享的內容對大家有所幫助,如果還想學習更多知識,歡迎關注億速云行業資訊頻道!
免責聲明:本站發布的內容(圖片、視頻和文字)以原創、轉載和分享為主,文章觀點不代表本網站立場,如果涉及侵權請聯系站長郵箱:is@yisu.com進行舉報,并提供相關證據,一經查實,將立刻刪除涉嫌侵權內容。