您好,登錄后才能下訂單哦!
您好,登錄后才能下訂單哦!
今天就跟大家聊聊有關Spring boot中怎么利用WebAsyncTask實現異步任務編程,可能很多人都不太了解,為了讓大家更加了解,小編給大家總結了以下內容,希望大家根據這篇文章可以有所收獲。
1、處理線程
處理線程屬于web服務器,負責處理用戶請求,采用線程池管理
2、異步線程
異步線程屬于用戶自定義的線程,可采用線程池管理
spring中提供了對異步任務的支持,采用 WebAsyncTask 類即可實現異步任務,同時我們也可以對異步任務設置相應的回調處理,如當任務超時、拋出異常怎么處理等。異步任務通常非常實用,比如我們想讓一個可能會處理很長時間的操作交給異步線程去處理,又或者當一筆訂單支付完成之后,開啟異步任務查詢訂單的支付結果。
一、正常異步任務
為了演示方便,異步任務的執行采用 Thread.sleep(long) 模擬,現在假設用戶請求以下接口 :
http://localhost:7000/demo/getUserWithNoThing.json
異步任務接口定義如下:
/**
 * 測試沒有發生任何異常的異步任務
 */
@RequestMapping(value = "getUserWithNoThing.json", method = RequestMethod.GET)
public WebAsyncTask<String> getUserWithNoThing() {
 // 打印處理線程名
 System.err.println("The main Thread name is " + Thread.currentThread().getName());

 // 此處模擬開啟一個異步任務,超時時間為10s
 WebAsyncTask<String> task1 = new WebAsyncTask<String>(10 * 1000L, () -> {
 	System.err.println("The first Thread name is " + Thread.currentThread().getName());
 	// 任務處理時間5s,不超時
 	Thread.sleep(5 * 1000L);
 	return "任務1順利執行成功!任何異常都沒有拋出!";
 });

 // 任務執行完成時調用該方法
 task1.onCompletion(() -> {
 	System.err.println("任務1執行完成啦!");
 });

 System.err.println("task1繼續處理其他事情!");
 return task1;
}
控制臺打印如下:
The main Thread name is http-nio-7000-exec-1
task1繼續處理其他事情!
The first Thread name is MvcAsync1
任務1執行完成啦!
瀏覽器結果如下:

二、拋異常異步任務
接口調用 : http://localhost:7000/demo/getUserWithError.json
/**
 * 測試發生error的異步任務
 * @return
 */
@RequestMapping(value = "getUserWithError.json", method = RequestMethod.GET)
public WebAsyncTask<String> getUserWithError() {
	System.err.println("The main Thread name is " + Thread.currentThread().getName());

	// 此處模擬開啟一個異步任務
	WebAsyncTask<String> task3 = new WebAsyncTask<String>(10 * 1000L, () -> {
		System.err.println("The second Thread name is " + Thread.currentThread().getName());
		// 此處拋出異常
		int num = 9 / 0;
		System.err.println(num);
		return "";
	});

	// 發生異常時調用該方法
	task3.onError(() -> {
		System.err.println("====================================" + Thread.currentThread().getName()
				+ "==============================");
		System.err.println("任務3發生error啦!");
		return "";
	});
	// 任務執行完成時調用該方法
	task3.onCompletion(() -> {
		System.err.println("任務3執行完成啦!");
	});

	System.err.println("task3繼續處理其他事情!");
	return task3;
}
控制臺輸出如下:
The main Thread name is http-nio-7000-exec-1
task3繼續處理其他事情!
The second Thread name is MvcAsync1
2018-06-15 09:40:13.538 ERROR 9168 --- [nio-7000-exec-2] o.a.c.c.C.[.[.[.[dispatcherServlet] : Servlet.service() for servlet [dispatcherServlet] threw exceptionjava.lang.ArithmeticException: / by zero
at com.example.demo.controller.GetUserInfoController.lambda$5(GetUserInfoController.java:93) ~[classes/:na]
at org.springframework.web.context.request.async.WebAsyncManager.lambda$startCallableProcessing$4(WebAsyncManager.java:317) ~[spring-web-5.0.6.RELEASE.jar:5.0.6.RELEASE]
at java.util.concurrent.Executors$RunnableAdapter.call(Executors.java:511) ~[na:1.8.0_161]
at java.util.concurrent.FutureTask.run(FutureTask.java:266) ~[na:1.8.0_161]
at java.lang.Thread.run(Thread.java:748) [na:1.8.0_161]2018-06-15 09:40:13.539 ERROR 9168 --- [nio-7000-exec-2] o.a.c.c.C.[.[.[.[dispatcherServlet] : Servlet.service() for servlet [dispatcherServlet] in context with path [/demo] threw exception [Request processing failed; nested exception is java.lang.ArithmeticException: / by zero] with root cause
java.lang.ArithmeticException: / by zero
at com.example.demo.controller.GetUserInfoController.lambda$5(GetUserInfoController.java:93) ~[classes/:na]
at org.springframework.web.context.request.async.WebAsyncManager.lambda$startCallableProcessing$4(WebAsyncManager.java:317) ~[spring-web-5.0.6.RELEASE.jar:5.0.6.RELEASE]
at java.util.concurrent.Executors$RunnableAdapter.call(Executors.java:511) ~[na:1.8.0_161]
at java.util.concurrent.FutureTask.run(FutureTask.java:266) ~[na:1.8.0_161]
at java.lang.Thread.run(Thread.java:748) [na:1.8.0_161]====================================http-nio-7000-exec-2==============================
任務3發生error啦!
任務3執行完成啦!
當然你也可以對上面做一些異常處理,不至于在用戶看來顯得不友好,關于異常處理,可以查看我的另一篇文章 Spring boot/Spring 統一錯誤處理方案的使用
瀏覽器輸出結果:

三、超時異步任務
接口調用 : http://localhost:7000/demo/getUserWithTimeOut.json
/**
 * 測試發生任務超時的異步任務
 * @return
 */
@RequestMapping(value = "getUserWithTimeOut.json", method = RequestMethod.GET)
public WebAsyncTask<String> getUserWithTimeOut() {
 System.err.println("The main Thread name is " + Thread.currentThread().getName());

 // 此處模擬開啟一個異步任務,超時10s
 WebAsyncTask<String> task2 = new WebAsyncTask<String>(10 * 1000L, () -> {
 	System.err.println("The second Thread name is " + Thread.currentThread().getName());
 	Thread.sleep(20 * 1000L);
 	return "任務2執行超時!";
 });

 // 任務超時調用該方法
 task2.onTimeout(() -> {
 	System.err.println("====================================" + Thread.currentThread().getName()
 			+ "==============================");
 	return "任務2發生超時啦!";
 });

 // 任務執行完成時調用該方法
 task2.onCompletion(() -> {
 	System.err.println("任務2執行完成啦!");
 });

 System.err.println("task2繼續處理其他事情!");
 return task2;
}
控制臺執行結果:
The main Thread name is http-nio-7000-exec-4
task2繼續處理其他事情!
The second Thread name is MvcAsync2
====================================http-nio-7000-exec-5==============================
任務2執行完成啦!
瀏覽器執行結果:

四、線程池異步任務
上面的三種情況中的異步任務默認不是采用線程池機制進行管理的,也就是說,一個請求進來,雖然釋放了處理線程,但是系統依舊會為每個請求創建一個異步任務線程,也就是上面我們看到的 MvcAsync 開頭的異步任務線程,那這樣不行啊,開銷特別大呀!所以我們可以采用線程池進行管理,直接在 WebAsyncTask 類構造器傳入一個 ThreadPoolTaskExecutor 對象實例即可。
下面我們先看看,當對上面第一種情況執行并發請求時會出現什么情況(此處模擬對 http://localhost:7000/demo/getUserWithNoThing.json 進行并發調用):
控制臺輸出如下:
The first Thread name is MvcAsync57
The first Thread name is MvcAsync58
The first Thread name is MvcAsync59
The first Thread name is MvcAsync60
The first Thread name is MvcAsync61
The first Thread name is MvcAsync62
The first Thread name is MvcAsync63
The first Thread name is MvcAsync64
The first Thread name is MvcAsync65
The first Thread name is MvcAsync66
The first Thread name is MvcAsync67
The first Thread name is MvcAsync68
The first Thread name is MvcAsync69
The first Thread name is MvcAsync70
The first Thread name is MvcAsync71
The first Thread name is MvcAsync72
The first Thread name is MvcAsync73
The first Thread name is MvcAsync74
The first Thread name is MvcAsync76
The first Thread name is MvcAsync75
The first Thread name is MvcAsync77
The first Thread name is MvcAsync78
The first Thread name is MvcAsync79
The first Thread name is MvcAsync80
由于沒有加入線程池,所以100個請求將開啟100個異步任務線程,開銷特別大,不推薦。
下面是采用線程池的實現 :
調用接口 : http://localhost:7000/demo/getUserWithExecutor.json
/**
 * 測試線程池
 * @return
 */
@RequestMapping(value = "getUserWithExecutor.json", method = RequestMethod.GET)
public WebAsyncTask<String> getUserWithExecutor() {
 System.err.println("The main Thread name is " + Thread.currentThread().getName());

 // 此處模擬開啟一個異步任務,此處傳入一個線程池
 WebAsyncTask<String> task1 = new WebAsyncTask<String>(10 * 1000L, executor, () -> {
 	System.err.println("The first Thread name is " + Thread.currentThread().getName());
 	Thread.sleep(5000L);
 	return "任務4順利執行成功!任何異常都沒有拋出!";
 });

 // 任務執行完成時調用該方法
 task1.onCompletion(() -> {
 	System.err.println("任務4執行完成啦!");
 });

 System.err.println("task4繼續處理其他事情!");
 return task1;
}
線程池定義如下:
@Configuration
public class MyExecutor {

 @Bean
 public static ThreadPoolTaskExecutor getExecutor() {
 	ThreadPoolTaskExecutor taskExecutor = new ThreadPoolTaskExecutor();
 	taskExecutor.setCorePoolSize(30);
 	taskExecutor.setMaxPoolSize(30);
 	taskExecutor.setQueueCapacity(50);
 	taskExecutor.setThreadNamePrefix("huang");// 異步任務線程名以 huang 為前綴
 	return taskExecutor;
 }
}
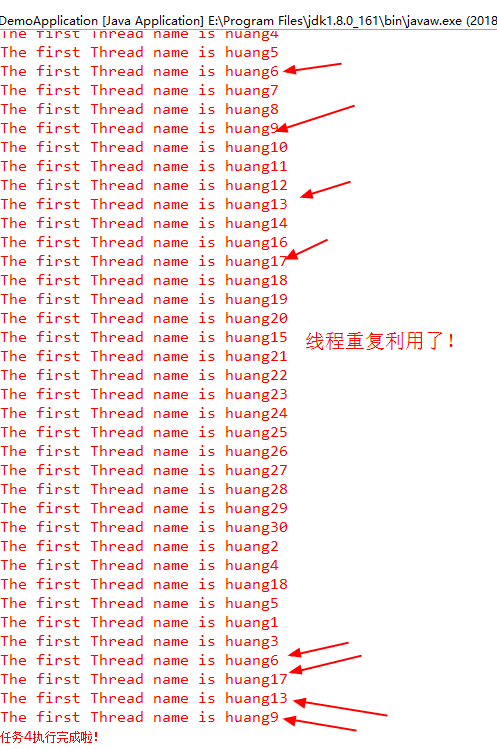
對上面進行并發測試,可以得出下面結果 :

看完上述內容,你們對Spring boot中怎么利用WebAsyncTask實現異步任務編程有進一步的了解嗎?如果還想了解更多知識或者相關內容,請關注億速云行業資訊頻道,感謝大家的支持。
免責聲明:本站發布的內容(圖片、視頻和文字)以原創、轉載和分享為主,文章觀點不代表本網站立場,如果涉及侵權請聯系站長郵箱:is@yisu.com進行舉報,并提供相關證據,一經查實,將立刻刪除涉嫌侵權內容。