您好,登錄后才能下訂單哦!
您好,登錄后才能下訂單哦!
動態數據源
在很多具體應用場景的時候,我們需要用到動態數據源的情況,比如多租戶的場景,系統登錄時需要根據用戶信息切換到用戶對應的數據庫。又比如業務A要訪問A數據庫,業務B要訪問B數據庫等,都可以使用動態數據源方案進行解決。接下來,我們就來講解如何實現動態數據源,以及在過程中剖析動態數據源背后的實現原理。
實現案例
本教程案例基于 Spring Boot + Mybatis + MySQL 實現。
數據庫設計
首先需要安裝好MySQL數據庫,新建數據庫 master,slave,分別創建用戶表,用來測試數據源,SQL腳本如下。
-- ----------------------------------------------------
-- 用戶
-- ----------------------------------------------------
-- Table structure for `sys_user`
-- ----------------------------------------------------
DROP TABLE IF EXISTS `sys_user`;
CREATE TABLE `sys_user` (
 `id` bigint NOT NULL AUTO_INCREMENT COMMENT '編號',
 `name` varchar(50) NOT NULL COMMENT '用戶名',
 `password` varchar(100) COMMENT '密碼',
 `salt` varchar(40) COMMENT '鹽',
 `email` varchar(100) COMMENT '郵箱',
 `mobile` varchar(100) COMMENT '手機號',
 `status` tinyint COMMENT '狀態 0:禁用 1:正常',
 `dept_id` bigint(20) COMMENT '機構ID',
 `create_by` varchar(50) COMMENT '創建人',
 `create_time` datetime COMMENT '創建時間',
 `last_update_by` varchar(50) COMMENT '更新人',
 `last_update_time` datetime COMMENT '更新時間',
 `del_flag` tinyint DEFAULT 0 COMMENT '是否刪除 -1:已刪除 0:正常',
 PRIMARY KEY (`id`),
 UNIQUE INDEX (`name`)
) ENGINE=InnoDB DEFAULT CHARSET=utf8 COMMENT='用戶';
新建工程
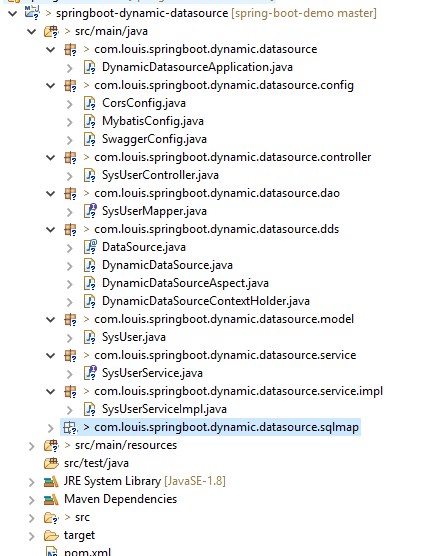
新建一個Spring Boot工程,最終代碼結構如下。

添加依賴
添加Spring Boot,Spring Aop,Mybatis,MySQL,Swagger相關依賴。Swagger方便用來測試接口。
pom.xml
<?xml version="1.0" encoding="UTF-8"?>
<project xmlns="http://maven.apache.org/POM/4.0.0" xmlns:xsi="http://www.w3.org/2001/XMLSchema-instance"
   xsi:schemaLocation="http://maven.apache.org/POM/4.0.0 http://maven.apache.org/xsd/maven-4.0.0.xsd">
 <modelVersion>4.0.0</modelVersion>

 <groupId>top.ivan.demo</groupId>
 <artifactId>springboot-dynamic-datasource</artifactId>
 <version>0.0.1-SNAPSHOT</version>
 <packaging>jar</packaging>

 <name>springboot-dynamic-datasource</name>
 <description>Demo project for Spring Boot</description>

 <parent>
  <groupId>org.springframework.boot</groupId>
  <artifactId>spring-boot-starter-parent</artifactId>
  <version>2.0.4.RELEASE</version>
  <relativePath/> <!-- lookup parent from repository -->
 </parent>

 <properties>
  <project.build.sourceEncoding>UTF-8</project.build.sourceEncoding>
  <project.reporting.outputEncoding>UTF-8</project.reporting.outputEncoding>
  <java.version>1.8</java.version>
  <mybatis.spring.version>1.3.2</mybatis.spring.version>
  <swagger.version>2.8.0</swagger.version>
 </properties>

 <dependencies>
   <!-- spring boot -->
  <dependency>
   <groupId>org.springframework.boot</groupId>
   <artifactId>spring-boot-starter-web</artifactId>
  </dependency>
  <dependency>
   <groupId>org.springframework.boot</groupId>
   <artifactId>spring-boot-starter-test</artifactId>
   <scope>test</scope>
  </dependency>
  <!-- spring aop -->
  <dependency>
   <groupId>org.springframework.boot</groupId>
   <artifactId>spring-boot-starter-aop</artifactId>
  </dependency>
  <!-- mybatis -->
  <dependency>
   <groupId>org.mybatis.spring.boot</groupId>
   <artifactId>mybatis-spring-boot-starter</artifactId>
   <version>${mybatis.spring.version}</version>
  </dependency>
  <!-- mysql -->
  <dependency>
   <groupId>mysql</groupId>
   <artifactId>mysql-connector-java</artifactId>
  </dependency>
  <!-- swagger -->
  <dependency>
   <groupId>io.springfox</groupId>
   <artifactId>springfox-swagger2</artifactId>
   <version>${swagger.version}</version>
  </dependency>
  <dependency>
   <groupId>io.springfox</groupId>
   <artifactId>springfox-swagger-ui</artifactId>
   <version>${swagger.version}</version>
  </dependency>
 </dependencies>

 <build>
  <plugins>
   <plugin>
    <groupId>org.springframework.boot</groupId>
    <artifactId>spring-boot-maven-plugin</artifactId>
   </plugin>
  </plugins>
 </build>

</project>
配置文件
修改配置文件,添加兩個數據源,可以是同一個主機地址的兩個數據庫master,slave,也可是兩個不同主機的地址,根據實際情況配置。
application.yml
spring:
 datasource:
 master:
  driver-class-name: com.mysql.jdbc.Driver
  type: com.zaxxer.hikari.HikariDataSource
  jdbcUrl: jdbc:mysql://127.0.0.1:3306/master?useUnicode=true&zeroDateTimeBehavior=convertToNull&autoReconnect=true&characterEncoding=utf-8
  username: root
  password: 123
 slave:
  driver-class-name: com.mysql.jdbc.Driver
  type: com.zaxxer.hikari.HikariDataSource
  jdbcUrl: jdbc:mysql://127.0.0.1:3306/slave?useUnicode=true&zeroDateTimeBehavior=convertToNull&autoReconnect=true&characterEncoding=utf-8
  username: root
  password: 123
啟動類
啟動類添加 exclude = {DataSourceAutoConfiguration.class}, 以禁用數據源默認自動配置。
數據源默認自動配置會讀取 spring.datasource.* 的屬性創建數據源,所以要禁用以進行定制。
@ComponentScan(basePackages = "com.louis.springboot") 是掃描范圍,都知道不用多說。
DynamicDatasourceApplication.java

package com.louis.springboot.dynamic.datasource;

import org.springframework.boot.SpringApplication;
import org.springframework.boot.autoconfigure.SpringBootApplication;
import org.springframework.boot.autoconfigure.jdbc.DataSourceAutoConfiguration;
import org.springframework.context.annotation.ComponentScan;

/**
 * 啟動器
 * @author Louis
 * @date Oct 31, 2018
 */
@SpringBootApplication(exclude = {DataSourceAutoConfiguration.class}) // 禁用數據源自動配置
@ComponentScan(basePackages = "com.louis.springboot")
public class DynamicDatasourceApplication {

 public static void main(String[] args) {
  SpringApplication.run(DynamicDatasourceApplication.class, args);
 }
}
數據源配置類
創建一個數據源配置類,主要做以下幾件事情:
1. 配置 dao,model,xml mapper文件的掃描路徑。
2. 注入數據源配置屬性,創建master、slave數據源。
3. 創建一個動態數據源,并裝入master、slave數據源。
4. 將動態數據源設置到SQL會話工廠和事務管理器。
如此,當進行數據庫操作時,就會通過我們創建的動態數據源去獲取要操作的數據源了。
package com.louis.springboot.dynamic.datasource.config;

import java.util.HashMap;
import java.util.Map;

import javax.sql.DataSource;

import org.mybatis.spring.SqlSessionFactoryBean;
import org.mybatis.spring.annotation.MapperScan;
import org.springframework.boot.context.properties.ConfigurationProperties;
import org.springframework.boot.jdbc.DataSourceBuilder;
import org.springframework.context.annotation.Bean;
import org.springframework.context.annotation.Configuration;
import org.springframework.context.annotation.Primary;
import org.springframework.core.io.support.PathMatchingResourcePatternResolver;
import org.springframework.jdbc.datasource.DataSourceTransactionManager;
import org.springframework.transaction.PlatformTransactionManager;

import com.louis.springboot.dynamic.datasource.dds.DynamicDataSource;

/**
 * Mybatis配置
 * @author Louis
 * @date Oct 31, 2018
 */
@Configuration
@MapperScan(basePackages = {"com.louis.**.dao"}) // 掃描DAO
public class MybatisConfig {

 @Bean("master")
 @Primary
 @ConfigurationProperties(prefix = "spring.datasource.master")
 public DataSource master() {
  return DataSourceBuilder.create().build();
 }

 @Bean("slave")
 @ConfigurationProperties(prefix = "spring.datasource.slave")
 public DataSource slave() {
  return DataSourceBuilder.create().build();
 }

 @Bean("dynamicDataSource")
 public DataSource dynamicDataSource() {
  DynamicDataSource dynamicDataSource = new DynamicDataSource();
  Map<Object, Object> dataSourceMap = new HashMap<>(2);
  dataSourceMap.put("master", master());
  dataSourceMap.put("slave", slave());
  // 將 master 數據源作為默認指定的數據源
  dynamicDataSource.setDefaultDataSource(master());
  // 將 master 和 slave 數據源作為指定的數據源
  dynamicDataSource.setDataSources(dataSourceMap);
  return dynamicDataSource;
 }

 @Bean
 public SqlSessionFactoryBean sqlSessionFactoryBean() throws Exception {
  SqlSessionFactoryBean sessionFactory = new SqlSessionFactoryBean();
  // 配置數據源,此處配置為關鍵配置,如果沒有將 dynamicDataSource作為數據源則不能實現切換
  sessionFactory.setDataSource(dynamicDataSource());
  sessionFactory.setTypeAliasesPackage("com.louis.**.model"); // 掃描Model
  PathMatchingResourcePatternResolver resolver = new PathMatchingResourcePatternResolver();
  sessionFactory.setMapperLocations(resolver.getResources("classpath*:**/sqlmap/*.xml")); // 掃描映射文件
  return sessionFactory;
 }

 @Bean
 public PlatformTransactionManager transactionManager() {
  // 配置事務管理, 使用事務時在方法頭部添加@Transactional注解即可
  return new DataSourceTransactionManager(dynamicDataSource());
 }
}
動態數據源類
我們上一步把這個動態數據源設置到了SQL會話工廠和事務管理器,這樣在操作數據庫時就會通過動態數據源類來獲取要操作的數據源了。
動態數據源類集成了Spring提供的AbstractRoutingDataSource類,AbstractRoutingDataSource 中 獲取數據源的方法就是 determineTargetDataSource,而此方法又通過 determineCurrentLookupKey 方法獲取查詢數據源的key。
所以如果我們需要動態切換數據源,就可以通過以下兩種方式定制:
1. 覆寫 determineCurrentLookupKey 方法
通過覆寫 determineCurrentLookupKey 方法,從一個自定義的 DynamicDataSourceContextHolder.getDataSourceKey() 獲取數據源key值,這樣在我們想動態切換數據源的時候,只要通過 DynamicDataSourceContextHolder.setDataSourceKey(key) 的方式就可以動態改變數據源了。這種方式要求在獲取數據源之前,要先初始化各個數據源到 DynamicDataSource 中,我們案例就是采用這種方式實現的,所以在 MybatisConfig 中把master和slave數據源都事先初始化到DynamicDataSource 中。
2. 可以通過覆寫 determineTargetDataSource,因為數據源就是在這個方法創建并返回的,所以這種方式就比較自由了,支持到任何你希望的地方讀取數據源信息,只要最終返回一個 DataSource 的實現類即可。比如你可以到數據庫、本地文件、網絡接口等方式讀取到數據源信息然后返回相應的數據源對象就可以了。
DynamicDataSource.java

package com.louis.springboot.dynamic.datasource.dds;

import java.util.Map;

import javax.sql.DataSource;

import org.springframework.jdbc.datasource.lookup.AbstractRoutingDataSource;

/**
 * 動態數據源實現類
 * @author Louis
 * @date Oct 31, 2018
 */
public class DynamicDataSource extends AbstractRoutingDataSource {


  /**
   * 如果不希望數據源在啟動配置時就加載好,可以定制這個方法,從任何你希望的地方讀取并返回數據源
   * 比如從數據庫、文件、外部接口等讀取數據源信息,并最終返回一個DataSource實現類對象即可
   */
  @Override
  protected DataSource determineTargetDataSource() {
    return super.determineTargetDataSource();
  }

  /**
   * 如果希望所有數據源在啟動配置時就加載好,這里通過設置數據源Key值來切換數據,定制這個方法
   */
  @Override
  protected Object determineCurrentLookupKey() {
    return DynamicDataSourceContextHolder.getDataSourceKey();
  }

  /**
   * 設置默認數據源
   * @param defaultDataSource
   */
  public void setDefaultDataSource(Object defaultDataSource) {
    super.setDefaultTargetDataSource(defaultDataSource);
  }

  /**
   * 設置數據源
   * @param dataSources
   */
  public void setDataSources(Map<Object, Object> dataSources) {
    super.setTargetDataSources(dataSources);
    // 將數據源的 key 放到數據源上下文的 key 集合中,用于切換時判斷數據源是否有效
    DynamicDataSourceContextHolder.addDataSourceKeys(dataSources.keySet());
  }
}
數據源上下文
動態數據源的切換主要是通過調用這個類的方法來完成的。在任何想要進行切換數據源的時候都可以通過調用這個類的方法實現切換。比如系統登錄時,根據用戶信息調用這個類的數據源切換方法切換到用戶對應的數據庫。
主要方法介紹:
1. 切換數據源
在任何想要進行切換數據源的時候都可以通過調用這個類的方法實現切換。
  /**
   * 切換數據源
   * @param key
   */
  public static void setDataSourceKey(String key) {
    contextHolder.set(key);
  }
2. 重置數據源
將數據源重置回默認的數據源。默認數據源通過 DynamicDataSource.setDefaultDataSource(ds) 進行設置。
  /**
   * 重置數據源
   */
  public static void clearDataSourceKey() {
    contextHolder.remove();
  }
3. 獲取當前數據源key
  /**
   * 獲取數據源
   * @return
   */
  public static String getDataSourceKey() {
    return contextHolder.get();
  }
完整代碼如下
DynamicDataSourceContextHolder.java

package com.louis.springboot.dynamic.datasource.dds;

import java.util.ArrayList;
import java.util.Collection;
import java.util.List;

/**
 * 動態數據源上下文
 * @author Louis
 * @date Oct 31, 2018
 */
public class DynamicDataSourceContextHolder {

  private static final ThreadLocal<String> contextHolder = new ThreadLocal<String>() {
    /**
     * 將 master 數據源的 key作為默認數據源的 key
     */
    @Override
    protected String initialValue() {
      return "master";
    }
  };


  /**
   * 數據源的 key集合,用于切換時判斷數據源是否存在
   */
  public static List<Object> dataSourceKeys = new ArrayList<>();

  /**
   * 切換數據源
   * @param key
   */
  public static void setDataSourceKey(String key) {
    contextHolder.set(key);
  }

  /**
   * 獲取數據源
   * @return
   */
  public static String getDataSourceKey() {
    return contextHolder.get();
  }

  /**
   * 重置數據源
   */
  public static void clearDataSourceKey() {
    contextHolder.remove();
  }

  /**
   * 判斷是否包含數據源
   * @param key 數據源key
   * @return
   */
  public static boolean containDataSourceKey(String key) {
    return dataSourceKeys.contains(key);
  }

  /**
   * 添加數據源keys
   * @param keys
   * @return
   */
  public static boolean addDataSourceKeys(Collection<? extends Object> keys) {
    return dataSourceKeys.addAll(keys);
  }
}
注解式數據源
到這里,在任何想要動態切換數據源的時候,只要調用 DynamicDataSourceContextHolder.setDataSourceKey(key) 就可以完成了。
接下來我們實現通過注解的方式來進行數據源的切換,原理就是添加注解(如@DataSource(value="master")),然后實現注解切面進行數據源切換。
創建一個動態數據源注解,擁有一個value值,用于標識要切換的數據源的key。
DataSource.java

package com.louis.springboot.dynamic.datasource.dds;

import java.lang.annotation.Documented;
import java.lang.annotation.ElementType;
import java.lang.annotation.Retention;
import java.lang.annotation.RetentionPolicy;
import java.lang.annotation.Target;

/**
 * 動態數據源注解
 * @author Louis
 * @date Oct 31, 2018
 */
@Target({ElementType.METHOD, ElementType.TYPE})
@Retention(RetentionPolicy.RUNTIME)
@Documented
public @interface DataSource {

  /**
   * 數據源key值
   * @return
   */
  String value();

}
創建一個AOP切面,攔截帶 @DataSource 注解的方法,在方法執行前切換至目標數據源,執行完成后恢復到默認數據源。
DynamicDataSourceAspect.java

package com.louis.springboot.dynamic.datasource.dds;

import org.aspectj.lang.JoinPoint;
import org.aspectj.lang.annotation.After;
import org.aspectj.lang.annotation.Aspect;
import org.aspectj.lang.annotation.Before;
import org.springframework.core.annotation.Order;
import org.springframework.stereotype.Component;

/**
 * 動態數據源切換處理器
 * @author Louis
 * @date Oct 31, 2018
 */
@Aspect
@Order(-1) // 該切面應當先于 @Transactional 執行
@Component
public class DynamicDataSourceAspect {

  /**
   * 切換數據源
   * @param point
   * @param dataSource
   */
  @Before("@annotation(dataSource))")
  public void switchDataSource(JoinPoint point, DataSource dataSource) {
    if (!DynamicDataSourceContextHolder.containDataSourceKey(dataSource.value())) {
      System.out.println("DataSource [{}] doesn't exist, use default DataSource [{}] " + dataSource.value());
    } else {
      // 切換數據源
      DynamicDataSourceContextHolder.setDataSourceKey(dataSource.value());
      System.out.println("Switch DataSource to [" + DynamicDataSourceContextHolder.getDataSourceKey()
        + "] in Method [" + point.getSignature() + "]");
    }
  }

  /**
   * 重置數據源
   * @param point
   * @param dataSource
   */
  @After("@annotation(dataSource))")
  public void restoreDataSource(JoinPoint point, DataSource dataSource) {
    // 將數據源置為默認數據源
    DynamicDataSourceContextHolder.clearDataSourceKey();
    System.out.println("Restore DataSource to [" + DynamicDataSourceContextHolder.getDataSourceKey()
      + "] in Method [" + point.getSignature() + "]");
  }
}
到這里,動態數據源相關的處理代碼就完成了。
編寫用戶業務代碼
接下來編寫用戶查詢業務代碼,用來進行測試,只需添加一個查詢接口即可。
編寫一個控制器,包含兩個查詢方法,分別注解 master 和 slave 數據源。
SysUserController.java
package com.louis.springboot.dynamic.datasource.controller;
import org.springframework.beans.factory.annotation.Autowired;
import org.springframework.web.bind.annotation.PostMapping;
import org.springframework.web.bind.annotation.RequestMapping;
import org.springframework.web.bind.annotation.RestController;
import com.louis.springboot.dynamic.datasource.dds.DataSource;
import com.louis.springboot.dynamic.datasource.service.SysUserService;
/**
 * 用戶控制器
 * @author Louis
 * @date Oct 31, 2018
 */
@RestController
@RequestMapping("user")
public class SysUserController {
  @Autowired
  private SysUserService sysUserService;
  @DataSource(value="master")
  @PostMapping(value="/findAll")
  public Object findAll() {
    return sysUserService.findAll();
  }
  @DataSource(value="slave")
  @PostMapping(value="/findAll2")
  public Object findAll2() {
    return sysUserService.findAll();
  }
}
下面是正常的業務代碼,沒有什么好說明的,直接貼代碼了。
SysUser.java
public class SysUser {
  private Long id;
  private String name;
  private String password;
  private String salt;
  private String email;
  private String mobile;
  private Byte status;
  private Long deptId;
  private String deptName;
  private Byte delFlag;
  private String createBy;
  private Date createTime;
  private String lastUpdateBy;
  private Date lastUpdateTime;
  ...setter and getter
}
SysUserMapper.java
package com.louis.springboot.dynamic.datasource.dao;
import java.util.List;
import com.louis.springboot.dynamic.datasource.model.SysUser;
public interface SysUserMapper {
  int deleteByPrimaryKey(Long id);
  int insert(SysUser record);
  int insertSelective(SysUser record);
  SysUser selectByPrimaryKey(Long id);
  int updateByPrimaryKeySelective(SysUser record);
  int updateByPrimaryKey(SysUser record);
  List<SysUser> findAll();
}
SysUserMapper.xml
<?xml version="1.0" encoding="UTF-8"?>
<!DOCTYPE mapper PUBLIC "-//mybatis.org//DTD Mapper 3.0//EN" "http://mybatis.org/dtd/mybatis-3-mapper.dtd">
<mapper namespace="com.louis.springboot.dynamic.datasource.dao.SysUserMapper">
 <resultMap id="BaseResultMap" type="com.louis.springboot.dynamic.datasource.model.SysUser">
  <id column="id" jdbcType="BIGINT" property="id" />
  <result column="name" jdbcType="VARCHAR" property="name" />
  <result column="password" jdbcType="VARCHAR" property="password" />
  <result column="salt" jdbcType="VARCHAR" property="salt" />
  <result column="email" jdbcType="VARCHAR" property="email" />
  <result column="mobile" jdbcType="VARCHAR" property="mobile" />
  <result column="status" jdbcType="TINYINT" property="status" />
  <result column="dept_id" jdbcType="BIGINT" property="deptId" />
  <result column="create_by" jdbcType="BIGINT" property="createBy" />
  <result column="create_time" jdbcType="TIMESTAMP" property="createTime" />
  <result column="last_update_by" jdbcType="BIGINT" property="lastUpdateBy" />
  <result column="last_update_time" jdbcType="TIMESTAMP" property="lastUpdateTime" />
  <result column="del_flag" jdbcType="TINYINT" property="delFlag" />
 </resultMap>
 <sql id="Base_Column_List">
  id, name, password, salt, email, mobile, status, dept_id, create_by, create_time,
  last_update_by, last_update_time, del_flag
 </sql>
 <select id="selectByPrimaryKey" parameterType="java.lang.Long" resultMap="BaseResultMap">
  select
  <include refid="Base_Column_List" />
  from sys_user
  where id = #{id,jdbcType=BIGINT}
 </select>
 <delete id="deleteByPrimaryKey" parameterType="java.lang.Long">
  delete from sys_user
  where id = #{id,jdbcType=BIGINT}
 </delete>
 <insert id="insert" parameterType="com.louis.springboot.dynamic.datasource.model.SysUser">
  insert into sys_user (id, name, password,
   salt, email, mobile,
   status, dept_id, create_by,
   create_time, last_update_by, last_update_time,
   del_flag)
  values (#{id,jdbcType=BIGINT}, #{name,jdbcType=VARCHAR}, #{password,jdbcType=VARCHAR},
   #{salt,jdbcType=VARCHAR}, #{email,jdbcType=VARCHAR}, #{mobile,jdbcType=VARCHAR},
   #{status,jdbcType=TINYINT}, #{deptId,jdbcType=BIGINT}, #{createBy,jdbcType=BIGINT},
   #{createTime,jdbcType=TIMESTAMP}, #{lastUpdateBy,jdbcType=BIGINT}, #{lastUpdateTime,jdbcType=TIMESTAMP},
   #{delFlag,jdbcType=TINYINT})
 </insert>
 <insert id="insertSelective" parameterType="com.louis.springboot.dynamic.datasource.model.SysUser">
  insert into sys_user
  <trim prefix="(" suffix=")" suffixOverrides=",">
   <if test="id != null">
    id,
   </if>
   <if test="name != null">
    name,
   </if>
   <if test="password != null">
    password,
   </if>
   <if test="salt != null">
    salt,
   </if>
   <if test="email != null">
    email,
   </if>
   <if test="mobile != null">
    mobile,
   </if>
   <if test="status != null">
    status,
   </if>
   <if test="deptId != null">
    dept_id,
   </if>
   <if test="createBy != null">
    create_by,
   </if>
   <if test="createTime != null">
    create_time,
   </if>
   <if test="lastUpdateBy != null">
    last_update_by,
   </if>
   <if test="lastUpdateTime != null">
    last_update_time,
   </if>
   <if test="delFlag != null">
    del_flag,
   </if>
  </trim>
  <trim prefix="values (" suffix=")" suffixOverrides=",">
   <if test="id != null">
    #{id,jdbcType=BIGINT},
   </if>
   <if test="name != null">
    #{name,jdbcType=VARCHAR},
   </if>
   <if test="password != null">
    #{password,jdbcType=VARCHAR},
   </if>
   <if test="salt != null">
    #{salt,jdbcType=VARCHAR},
   </if>
   <if test="email != null">
    #{email,jdbcType=VARCHAR},
   </if>
   <if test="mobile != null">
    #{mobile,jdbcType=VARCHAR},
   </if>
   <if test="status != null">
    #{status,jdbcType=TINYINT},
   </if>
   <if test="deptId != null">
    #{deptId,jdbcType=BIGINT},
   </if>
   <if test="createBy != null">
    #{createBy,jdbcType=BIGINT},
   </if>
   <if test="createTime != null">
    #{createTime,jdbcType=TIMESTAMP},
   </if>
   <if test="lastUpdateBy != null">
    #{lastUpdateBy,jdbcType=BIGINT},
   </if>
   <if test="lastUpdateTime != null">
    #{lastUpdateTime,jdbcType=TIMESTAMP},
   </if>
   <if test="delFlag != null">
    #{delFlag,jdbcType=TINYINT},
   </if>
  </trim>
 </insert>
 <update id="updateByPrimaryKeySelective" parameterType="com.louis.springboot.dynamic.datasource.model.SysUser">
  update sys_user
  <set>
   <if test="name != null">
    name = #{name,jdbcType=VARCHAR},
   </if>
   <if test="password != null">
    password = #{password,jdbcType=VARCHAR},
   </if>
   <if test="salt != null">
    salt = #{salt,jdbcType=VARCHAR},
   </if>
   <if test="email != null">
    email = #{email,jdbcType=VARCHAR},
   </if>
   <if test="mobile != null">
    mobile = #{mobile,jdbcType=VARCHAR},
   </if>
   <if test="status != null">
    status = #{status,jdbcType=TINYINT},
   </if>
   <if test="deptId != null">
    dept_id = #{deptId,jdbcType=BIGINT},
   </if>
   <if test="createBy != null">
    create_by = #{createBy,jdbcType=BIGINT},
   </if>
   <if test="createTime != null">
    create_time = #{createTime,jdbcType=TIMESTAMP},
   </if>
   <if test="lastUpdateBy != null">
    last_update_by = #{lastUpdateBy,jdbcType=BIGINT},
   </if>
   <if test="lastUpdateTime != null">
    last_update_time = #{lastUpdateTime,jdbcType=TIMESTAMP},
   </if>
   <if test="delFlag != null">
    del_flag = #{delFlag,jdbcType=TINYINT},
   </if>
  </set>
  where id = #{id,jdbcType=BIGINT}
 </update>
 <update id="updateByPrimaryKey" parameterType="com.louis.springboot.dynamic.datasource.model.SysUser">
  update sys_user
  set name = #{name,jdbcType=VARCHAR},
   password = #{password,jdbcType=VARCHAR},
   salt = #{salt,jdbcType=VARCHAR},
   email = #{email,jdbcType=VARCHAR},
   mobile = #{mobile,jdbcType=VARCHAR},
   status = #{status,jdbcType=TINYINT},
   dept_id = #{deptId,jdbcType=BIGINT},
   create_by = #{createBy,jdbcType=BIGINT},
   create_time = #{createTime,jdbcType=TIMESTAMP},
   last_update_by = #{lastUpdateBy,jdbcType=BIGINT},
   last_update_time = #{lastUpdateTime,jdbcType=TIMESTAMP},
   del_flag = #{delFlag,jdbcType=TINYINT}
  where id = #{id,jdbcType=BIGINT}
 </update>
 <select id="findAll" resultMap="BaseResultMap">
  select
  <include refid="Base_Column_List" />
  from sys_user
 </select>
</mapper>
SysUserService.java
package com.louis.springboot.dynamic.datasource.service;
import java.util.List;
import com.louis.springboot.dynamic.datasource.model.SysUser;
/**
 * 用戶管理
 * @author Louis
 * @date Oct 31, 2018
 */
public interface SysUserService {
  /**
   * 查找全部用戶信息
   * @return
   */
  List<SysUser> findAll();
}
SysUserServiceImpl.java
package com.louis.springboot.dynamic.datasource.service.impl;
import java.util.List;
import org.springframework.beans.factory.annotation.Autowired;
import org.springframework.stereotype.Service;
import com.louis.springboot.dynamic.datasource.dao.SysUserMapper;
import com.louis.springboot.dynamic.datasource.model.SysUser;
import com.louis.springboot.dynamic.datasource.service.SysUserService;
@Service
public class SysUserServiceImpl implements SysUserService {
  @Autowired
  private SysUserMapper sysUserMapper;
  /**
   * 查找全部用戶信息
   * @return
   */
  public List<SysUser> findAll() {
    return sysUserMapper.findAll();
  }
}
測試效果
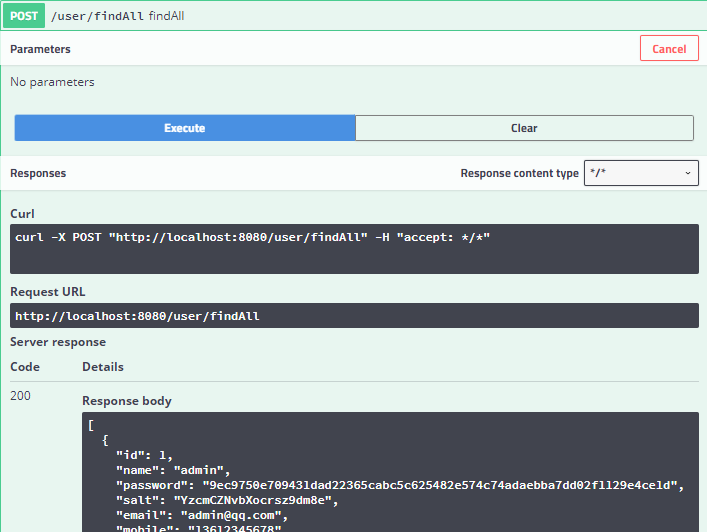
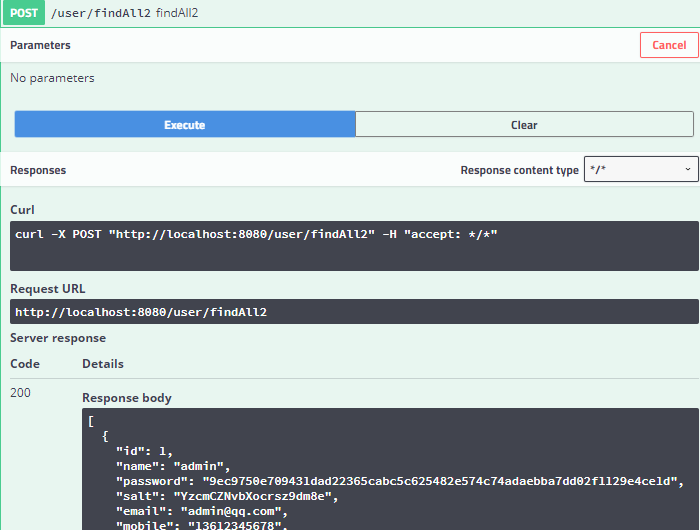
啟動系統,訪問 http://localhost:8080/swagger-ui.html ,分別測試兩個接口,成功返回數據。
user/findAll (master數據源)

user/findAll2 (slave數據源)

源碼下載
碼云:https://gitee.com/liuge1988/spring-boot-demo.git
總結
以上所述是小編給大家介紹的Spring Boot + Mybatis 實現動態數據源案例分析,希望對大家有所幫助,如果大家有任何疑問請給我留言,小編會及時回復大家的。在此也非常感謝大家對億速云網站的支持!
免責聲明:本站發布的內容(圖片、視頻和文字)以原創、轉載和分享為主,文章觀點不代表本網站立場,如果涉及侵權請聯系站長郵箱:is@yisu.com進行舉報,并提供相關證據,一經查實,將立刻刪除涉嫌侵權內容。