您好,登錄后才能下訂單哦!
您好,登錄后才能下訂單哦!
小編給大家分享一下Android如何實現懸浮窗全系統版本,相信大部分人都還不怎么了解,因此分享這篇文章給大家參考一下,希望大家閱讀完這篇文章后大有收獲,下面讓我們一起去了解一下吧!
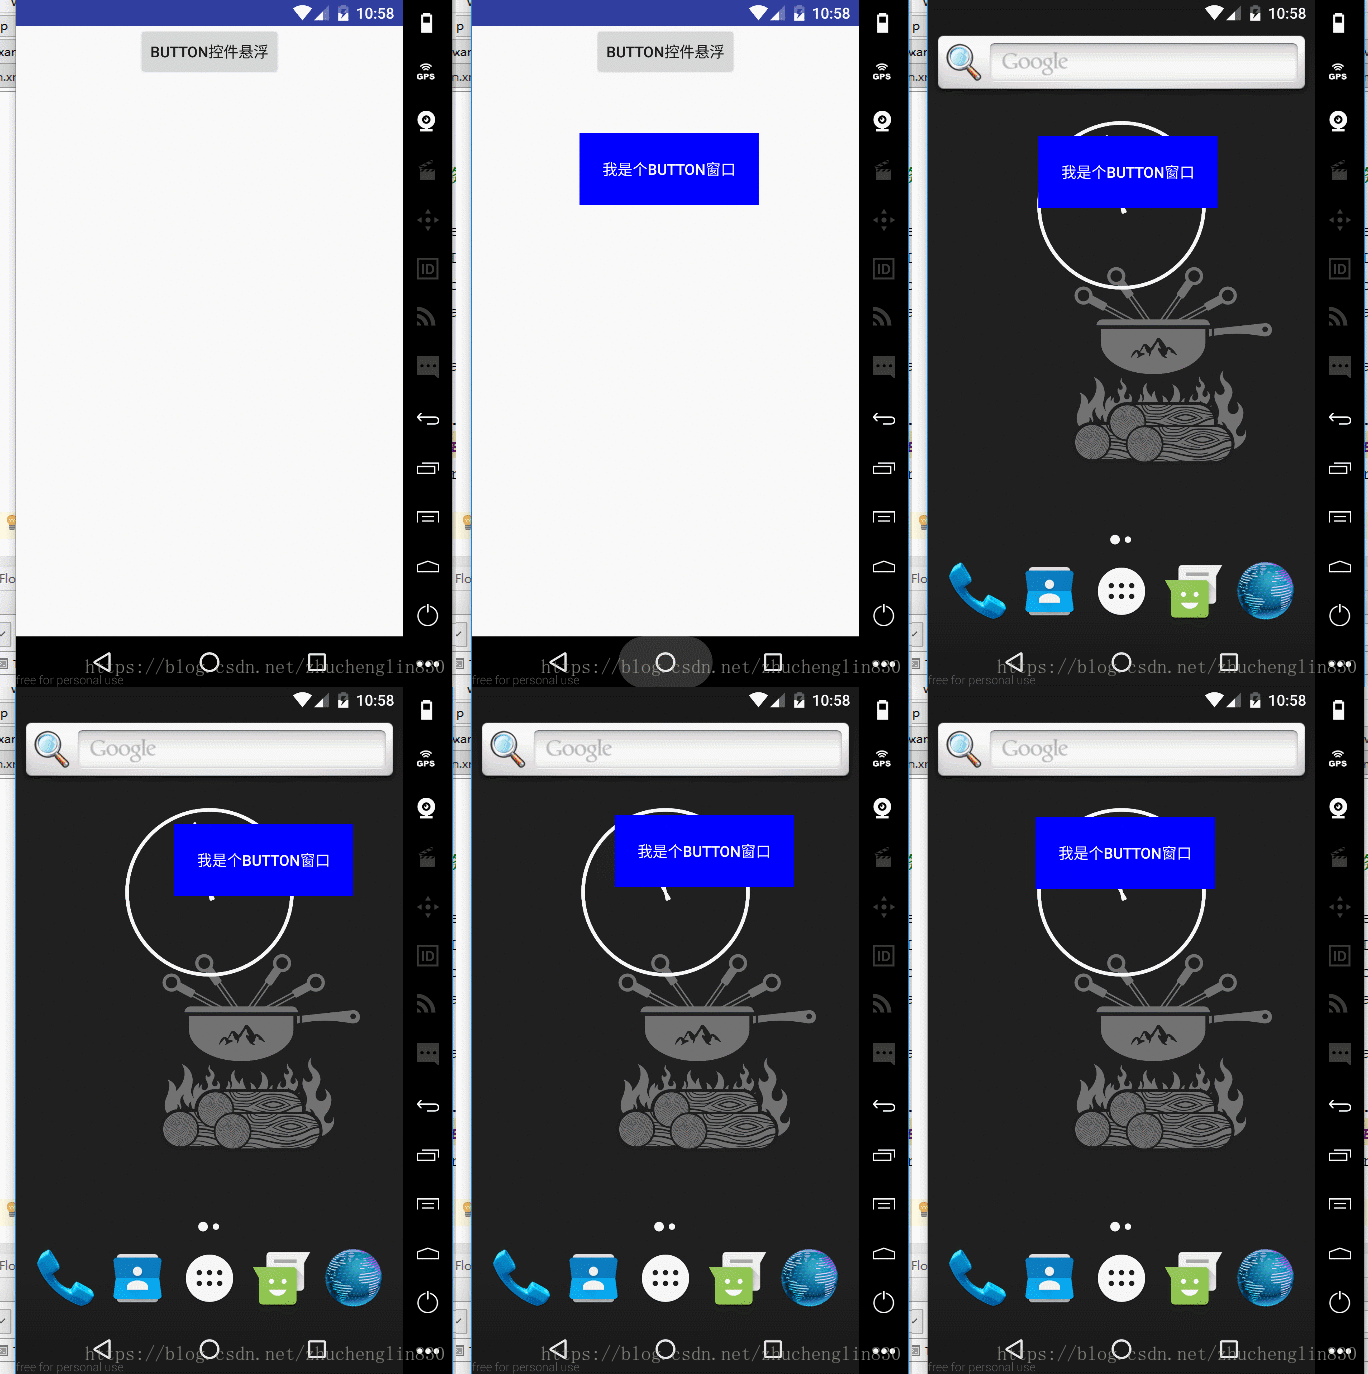
懸浮窗是在系統上顯示的內容,好像微信視頻聊天時的小窗口一樣,在退出軟件后依然存在的一個窗口,本博客以窗口中放一個button組件為例,簡單展示懸浮窗,其中包括了對Android 6.0以下、Android 6.0到Android 8.0、Android 8.0以上版本的處理,下面開始介紹實現方法:
1、MainActivity中的代碼
public Button mFloatingButton;

 @Override
 protected void onCreate(Bundle savedInstanceState) {
  super.onCreate(savedInstanceState);
  setContentView(R.layout.activity_main);

  //初始化view
  initView();
 }
 //初始化view
 private void initView() {
  mFloatingButton=(Button) findViewById(R.id.floating_btn);
  mFloatingButton.setOnClickListener(this);
 }

 public void startFloatingButtonService(View view) {
  Log.e("測試流程", "測試流程");
  if (FloatingService_Button.isStarted) {
   Log.e("測試流程2", "測試流程2");
   return;
  }
  if (Build.VERSION.SDK_INT >= Build.VERSION_CODES.M) {//判斷系統版本
   if (!Settings.canDrawOverlays(this)) {
    Toast.makeText(this, "當前無權限,請授權", Toast.LENGTH_SHORT);
    Log.e("測試流程3", "測試流程3");
    startActivityForResult(new Intent(Settings.ACTION_MANAGE_OVERLAY_PERMISSION, Uri.parse("package:" + getPackageName())), 0);
   } else {
    Log.e("測試流程4", "測試流程4");
    startService(new Intent(MainActivity.this, FloatingService_Button.class));
   }
  } else {
   startService(new Intent(MainActivity.this, FloatingService_Button.class));
  }

 }

 @Override
 protected void onActivityResult(int requestCode, int resultCode, Intent data) {
  if (requestCode == 0) {
   if (!Settings.canDrawOverlays(this)) {
    Log.e("測試流程5", "測試流程5");
    Toast.makeText(this, "授權失敗", Toast.LENGTH_SHORT).show();
   } else {
    Log.e("測試流程6", "測試流程6");
    Toast.makeText(this, "授權成功", Toast.LENGTH_SHORT).show();
    startService(new Intent(MainActivity.this, FloatingService_Button.class));
   }
  }
 }

 @Override
 public void onClick(View v) {
  switch (v.getId()){
   case R.id.floating_btn :
    startFloatingButtonService(v);
    break;
  }
 }
思路簡單解釋:點擊彈出懸浮窗按鈕時,獲取版本并判斷“Build.VERSION.SDK_INT >= Build.VERSION_CODES.M”如果系統版本在6.0以下這不需要請求權限,如果系統版本在6.0以上需要進行權限檢測以及請求,獲取權限后,彈出懸浮框
2、activity_main.xml代碼
<?xml version="1.0" encoding="utf-8"?>
<LinearLayout xmlns:android="http://schemas.android.com/apk/res/android"
 xmlns:tools="http://schemas.android.com/tools"
 android:layout_width="match_parent"
 android:layout_height="match_parent"
 android:orientation="vertical"
 tools:context="com.example.jack_lin.suspendwindow.MainActivity">

 <Button
  android:id="@+id/floating_btn"

  android:text="@string/floating_btn" />


</LinearLayout>
簡單解釋:xml中沒什么特別東西,線性布局中放一個按鈕
3、FloatingService_Button的代碼
public static boolean isStarted = false;

 private WindowManager windowManager;
 private WindowManager.LayoutParams layoutParams;

 private Button button;

 @Override
 public void onCreate() {
  super.onCreate();
  Log.e("進入服務1", "進入服務1");
  isStarted = true;
  windowManager = (WindowManager) getSystemService(WINDOW_SERVICE);
  layoutParams = new WindowManager.LayoutParams();
  if (Build.VERSION.SDK_INT >= Build.VERSION_CODES.O) {
   layoutParams.type = WindowManager.LayoutParams.TYPE_APPLICATION_OVERLAY;
  } else {
   layoutParams.type = WindowManager.LayoutParams.TYPE_PHONE;
  }
  layoutParams.format = PixelFormat.RGBA_8888;
  layoutParams.gravity = Gravity.LEFT | Gravity.TOP;
  layoutParams.flags = WindowManager.LayoutParams.FLAG_NOT_TOUCH_MODAL | WindowManager.LayoutParams.FLAG_NOT_FOCUSABLE;
  layoutParams.width = 500;
  layoutParams.height = 100;
  layoutParams.x = 300;
  layoutParams.y = 300;
 }

 @Nullable
 @Override
 public IBinder onBind(Intent intent) {
  Log.e("進入服務2", "進入服務2");

  return null;
 }

 @Override
 public int onStartCommand(Intent intent, int flags, int startId) {
  Log.e("進入服務3", "進入服務3");
  showFloatingWindow();
  return super.onStartCommand(intent, flags, startId);
 }

 private void showFloatingWindow() {
  if (Build.VERSION.SDK_INT >= Build.VERSION_CODES.M) {//判斷系統版本
   if (Settings.canDrawOverlays(this)) {
    button = new Button(getApplicationContext());
    button.setText("我是個button窗口");
    button.setBackgroundColor(Color.BLUE);
    windowManager.addView(button, layoutParams);

    button.setOnTouchListener(new FloatingOnTouchListener());
   }
  } else {
   button = new Button(getApplicationContext());
   button.setText("我是個button窗口");
   button.setBackgroundColor(Color.BLUE);
   windowManager.addView(button, layoutParams);

   button.setOnTouchListener(new FloatingOnTouchListener());
  }
 }

 private class FloatingOnTouchListener implements View.OnTouchListener {
  private int x;
  private int y;

  @Override
  public boolean onTouch(View view, MotionEvent event) {
   switch (event.getAction()) {
    case MotionEvent.ACTION_DOWN:
     x = (int) event.getRawX();
     y = (int) event.getRawY();
     break;
    case MotionEvent.ACTION_MOVE:
     int nowX = (int) event.getRawX();
     int nowY = (int) event.getRawY();
     int movedX = nowX - x;
     int movedY = nowY - y;
     x = nowX;
     y = nowY;
     layoutParams.x = layoutParams.x + movedX;
     layoutParams.y = layoutParams.y + movedY;
     windowManager.updateViewLayout(view, layoutParams);
     break;
    default:
     break;
   }
   return false;
  }
 }
思路簡單解釋:首先獲取WindowManager服務,然后定義并設置在window上顯示的layoutParams(此處需注意Android 8.0以上版本中LayoutParam里的type變量變為TYPE_APPLICATION_OVERLAY與Android 8.0以下版本LayoutParam里的type變量TYPE_PHONE不一樣,需要通過判斷系統版本進行區分),然后定義并設置在layoutParams上面顯示的Button按鈕以及監聽事件(此處的監聽事件主要是懸浮窗口拖動的監聽)最后將設置好的button與layoutParams添加入window中
4、AndroidManifest.xml中權限添加
<uses-permission android:name="android.permission.SYSTEM_ALERT_WINDOW" />
<uses-permission android:name="android.permission.INTERNET" />
5、效果圖

以上是“Android如何實現懸浮窗全系統版本”這篇文章的所有內容,感謝各位的閱讀!相信大家都有了一定的了解,希望分享的內容對大家有所幫助,如果還想學習更多知識,歡迎關注億速云行業資訊頻道!
免責聲明:本站發布的內容(圖片、視頻和文字)以原創、轉載和分享為主,文章觀點不代表本網站立場,如果涉及侵權請聯系站長郵箱:is@yisu.com進行舉報,并提供相關證據,一經查實,將立刻刪除涉嫌侵權內容。