您好,登錄后才能下訂單哦!
您好,登錄后才能下訂單哦!
這篇文章將為大家詳細講解有關Netty + ZooKeeper如何實現簡單的服務注冊與發現,小編覺得挺實用的,因此分享給大家做個參考,希望大家閱讀完這篇文章后可以有所收獲。
一. 背景
最近的一個項目:我們的系統接收到上游系統的派單任務后,會推送到指定的門店的相關設備,并進行相應的業務處理。
二. Netty 的使用
在接收到派單任務之后,通過 Netty 推送到指定門店相關的設備。在我們的系統中 Netty 實現了消息推送、長連接以及心跳機制。

2.1 Netty Server 端:
每個 Netty 服務端通過 ConcurrentHashMap 保存了客戶端的 clientId 以及它連接的 SocketChannel。
服務器端向客戶端發送消息時,只要獲取 clientId 對應的 SocketChannel,往 SocketChannel 里寫入相應的 message 即可。
EventLoopGroup boss = new NioEventLoopGroup(1);
  EventLoopGroup worker = new NioEventLoopGroup();
  ServerBootstrap bootstrap = new ServerBootstrap();
  bootstrap.group(boss, worker)
    .channel(NioServerSocketChannel.class)
    .option(ChannelOption.SO_BACKLOG, 128)
    .option(ChannelOption.TCP_NODELAY, true)
    .childOption(ChannelOption.SO_KEEPALIVE, true)
    .childHandler(new ChannelInitializer() {
     @Override
     protected void initChannel(Channel channel) throws Exception {
      ChannelPipeline p = channel.pipeline();
      p.addLast(new MessageEncoder());
      p.addLast(new MessageDecoder());
      p.addLast(new PushServerHandler());
     }
    });
  ChannelFuture future = bootstrap.bind(host,port).sync();
  if (future.isSuccess()) {
   logger.info("server start...");
  }
2.2 Netty Client 端:
客戶端用于接收服務端的消息,隨即進行業務處理。客戶端還有心跳機制,它通過 IdleEvent 事件定時向服務端放送 Ping 消息以此來檢測 SocketChannel 是否中斷。
public PushClientBootstrap(String host, int port) throws InterruptedException {
  this.host = host;
  this.port = port;
  start(host,port);
 }
 private void start(String host, int port) throws InterruptedException {
  bootstrap = new Bootstrap();
  bootstrap.channel(NioSocketChannel.class)
    .option(ChannelOption.SO_KEEPALIVE, true)
    .group(workGroup)
    .remoteAddress(host, port)
    .handler(new ChannelInitializer(){
     @Override
     protected void initChannel(Channel channel) throws Exception {
      ChannelPipeline p = channel.pipeline();
      p.addLast(new IdleStateHandler(20, 10, 0)); // IdleStateHandler 用于檢測心跳
      p.addLast(new MessageDecoder());
      p.addLast(new MessageEncoder());
      p.addLast(new PushClientHandler());
     }
    });
  doConnect(port, host);
 }
 /**
  * 建立連接,并且可以實現自動重連.
  * @param port port.
  * @param host host.
  * @throws InterruptedException InterruptedException.
  */
 private void doConnect(int port, String host) throws InterruptedException {
  if (socketChannel != null && socketChannel.isActive()) {
   return;
  }
  final int portConnect = port;
  final String hostConnect = host;
  ChannelFuture future = bootstrap.connect(host, port);
  future.addListener(new ChannelFutureListener() {
   @Override
   public void operationComplete(ChannelFuture futureListener) throws Exception {
    if (futureListener.isSuccess()) {
     socketChannel = (SocketChannel) futureListener.channel();
     logger.info("Connect to server successfully!");
    } else {
     logger.info("Failed to connect to server, try connect after 10s");
     futureListener.channel().eventLoop().schedule(new Runnable() {
      @Override
      public void run() {
       try {
        doConnect(portConnect, hostConnect);
       } catch (InterruptedException e) {
        e.printStackTrace();
       }
      }
     }, 10, TimeUnit.SECONDS);
    }
   }
  }).sync();
 }
三. 借助 ZooKeeper 實現簡單的服務注冊與發現
3.1 服務注冊
服務注冊本質上是為了解耦服務提供者和服務消費者。服務注冊是一個高可用強一致性的服務發現存儲倉庫,主要用來存儲服務的api和地址對應關系。為了高可用,服務注冊中心一般為一個集群,并且能夠保證分布式一致性。目前常用的有 ZooKeeper、Etcd 等等。
在我們項目中采用了 ZooKeeper 實現服務注冊。
public class ServiceRegistry {
 private static final Logger logger = LoggerFactory.getLogger(ServiceRegistry.class);
 private CountDownLatch latch = new CountDownLatch(1);
 private String registryAddress;
 public ServiceRegistry(String registryAddress) {
  this.registryAddress = registryAddress;
 }
 public void register(String data) {
  if (data != null) {
   ZooKeeper zk = connectServer();
   if (zk != null) {
    createNode(zk, data);
   }
  }
 }
 /**
  * 連接 zookeeper 服務器
  * @return
  */
 private ZooKeeper connectServer() {
  ZooKeeper zk = null;
  try {
   zk = new ZooKeeper(registryAddress, Constants.ZK_SESSION_TIMEOUT, new Watcher() {
    @Override
    public void process(WatchedEvent event) {
     if (event.getState() == Event.KeeperState.SyncConnected) {
      latch.countDown();
     }
    }
   });
   latch.await();
  } catch (IOException | InterruptedException e) {
   logger.error("", e);
  }
  return zk;
 }
 /**
  * 創建節點
  * @param zk
  * @param data
  */
 private void createNode(ZooKeeper zk, String data) {
  try {
   byte[] bytes = data.getBytes();
   String path = zk.create(Constants.ZK_DATA_PATH, bytes, ZooDefs.Ids.OPEN_ACL_UNSAFE, CreateMode.EPHEMERAL_SEQUENTIAL);
   logger.debug("create zookeeper node ({} => {})", path, data);
  } catch (KeeperException | InterruptedException e) {
   logger.error("", e);
  }
 }
}
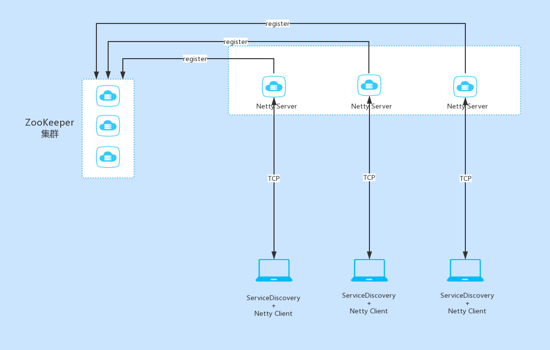
有了服務注冊,在 Netty 服務端啟動之后,將 Netty 服務端的 ip 和 port 注冊到 ZooKeeper。
EventLoopGroup boss = new NioEventLoopGroup(1);
  EventLoopGroup worker = new NioEventLoopGroup();
  ServerBootstrap bootstrap = new ServerBootstrap();
  bootstrap.group(boss, worker)
    .channel(NioServerSocketChannel.class)
    .option(ChannelOption.SO_BACKLOG, 128)
    .option(ChannelOption.TCP_NODELAY, true)
    .childOption(ChannelOption.SO_KEEPALIVE, true)
    .childHandler(new ChannelInitializer() {
     @Override
     protected void initChannel(Channel channel) throws Exception {
      ChannelPipeline p = channel.pipeline();
      p.addLast(new MessageEncoder());
      p.addLast(new MessageDecoder());
      p.addLast(new PushServerHandler());
     }
    });
  ChannelFuture future = bootstrap.bind(host,port).sync();
  if (future.isSuccess()) {
   logger.info("server start...");
  }
  if (serviceRegistry != null) {
   serviceRegistry.register(host + ":" + port);
  }
3.2 服務發現
這里我們采用的是客戶端的服務發現,即服務發現機制由客戶端實現。
客戶端在和服務端建立連接之前,通過查詢注冊中心的方式來獲取服務端的地址。如果存在有多個 Netty 服務端的話,可以做服務的負載均衡。在我們的項目中只采用了簡單的隨機法進行負載。
public class ServiceDiscovery {
 private static final Logger logger = LoggerFactory.getLogger(ServiceDiscovery.class);
 private CountDownLatch latch = new CountDownLatch(1);
 private volatile List<String> serviceAddressList = new ArrayList<>();
 private String registryAddress; // 注冊中心的地址
 public ServiceDiscovery(String registryAddress) {
  this.registryAddress = registryAddress;
  ZooKeeper zk = connectServer();
  if (zk != null) {
   watchNode(zk);
  }
 }
 /**
  * 通過服務發現,獲取服務提供方的地址
  * @return
  */
 public String discover() {
  String data = null;
  int size = serviceAddressList.size();
  if (size > 0) {
   if (size == 1) { //只有一個服務提供方
    data = serviceAddressList.get(0);
    logger.info("unique service address : {}", data);
   } else {   //使用隨機分配法。簡單的負載均衡法
    data = serviceAddressList.get(ThreadLocalRandom.current().nextInt(size));
    logger.info("choose an address : {}", data);
   }
  }
  return data;
 }
 /**
  * 連接 zookeeper
  * @return
  */
 private ZooKeeper connectServer() {
  ZooKeeper zk = null;
  try {
   zk = new ZooKeeper(registryAddress, Constants.ZK_SESSION_TIMEOUT, new Watcher() {
    @Override
    public void process(WatchedEvent event) {
     if (event.getState() == Watcher.Event.KeeperState.SyncConnected) {
      latch.countDown();
     }
    }
   });
   latch.await();
  } catch (IOException | InterruptedException e) {
   logger.error("", e);
  }
  return zk;
 }
 /**
  * 獲取服務地址列表
  * @param zk
  */
 private void watchNode(final ZooKeeper zk) {
  try {
   //獲取子節點列表
   List<String> nodeList = zk.getChildren(Constants.ZK_REGISTRY_PATH, new Watcher() {
    @Override
    public void process(WatchedEvent event) {
     if (event.getType() == Event.EventType.NodeChildrenChanged) {
      //發生子節點變化時再次調用此方法更新服務地址
      watchNode(zk);
     }
    }
   });
   List<String> dataList = new ArrayList<>();
   for (String node : nodeList) {
    byte[] bytes = zk.getData(Constants.ZK_REGISTRY_PATH + "/" + node, false, null);
    dataList.add(new String(bytes));
   }
   logger.debug("node data: {}", dataList);
   this.serviceAddressList = dataList;
  } catch (KeeperException | InterruptedException e) {
   logger.error("", e);
  }
 }
}
Netty 客戶端啟動之后,通過服務發現獲取 Netty 服務端的 ip 和 port。
/**
  * 支持通過服務發現來獲取 Socket 服務端的 host、port
  * @param discoveryAddress
  * @throws InterruptedException
  */
 public PushClientBootstrap(String discoveryAddress) throws InterruptedException {

  serviceDiscovery = new ServiceDiscovery(discoveryAddress);
  serverAddress = serviceDiscovery.discover();

  if (serverAddress!=null) {
   String[] array = serverAddress.split(":");
   if (array!=null && array.length==2) {

    String host = array[0];
    int port = Integer.parseInt(array[1]);

    start(host,port);
   }
  }
 }
關于“Netty + ZooKeeper如何實現簡單的服務注冊與發現”這篇文章就分享到這里了,希望以上內容可以對大家有一定的幫助,使各位可以學到更多知識,如果覺得文章不錯,請把它分享出去讓更多的人看到。
免責聲明:本站發布的內容(圖片、視頻和文字)以原創、轉載和分享為主,文章觀點不代表本網站立場,如果涉及侵權請聯系站長郵箱:is@yisu.com進行舉報,并提供相關證據,一經查實,將立刻刪除涉嫌侵權內容。