溫馨提示×
您好,登錄后才能下訂單哦!
點擊 登錄注冊 即表示同意《億速云用戶服務條款》
您好,登錄后才能下訂單哦!
這篇文章給大家介紹Springboot中任務整合的方法有哪些,內容非常詳細,感興趣的小伙伴們可以參考借鑒,希望對大家能有所幫助。
一 異步任務
啟動類
@MapperScan("com.topcheer.*.*.dao")
@SpringBootApplication
@EnableCaching
@EnableRabbit
@EnableAsync
public class Oss6Application {
  public static void main(String[] args) {
    SpringApplication.run(Oss6Application.class, args);
  }
}
Controller層
/**
 * @author WGR
 * @create 2019/10/12 -- 21:53
 */
@RestController
public class AsynController {

  @Autowired
  AsynService asyncService;

  @GetMapping("/hello")
  public String hello(){
    asyncService.hello();
    return "success";
  }
}
Service層
/**
 * @author WGR
 * @create 2019/10/12 -- 21:52
 */
@Service
public class AsynService {

  //告訴Spring這是一個異步方法
  @Async
  public void hello() {
    try {
      Thread.sleep(3000);
    } catch (InterruptedException e) {
      e.printStackTrace();
    }
    System.out.println("處理數據中...");
  }

}
測試結果:
頁面直接顯示success,控制臺過3秒顯示處理數據中...
二 定時任務
此處的定時,標注在方法上+注解,假如想修改生成環境的時間,不是很靈活,后面補充Quartz+boot,采用數據庫配置和反射的原理。
注:java的cron表達式和Linux的不太一樣,請注意,java為6位,linux為5位。
啟動類
@SpringBootApplication
@EnableScheduling
public class Oss6Application {
  public static void main(String[] args) {
    SpringApplication.run(Oss6Application.class, args);
  }
}
服務類
@Service
public class ScheduledService {

  /**
   * second(秒), minute(分), hour(時), day of month(日), month(月), day of week(周幾).
   * 0 * * * * MON-FRI
   * 【0 0/5 14,18 * * ?】 每天14點整,和18點整,每隔5分鐘執行一次
   * 【0 15 10 ? * 1-6】 每個月的周一至周六10:15分執行一次
   * 【0 0 2 ? * 6L】每個月的最后一個周六凌晨2點執行一次
   * 【0 0 2 LW * ?】每個月的最后一個工作日凌晨2點執行一次
   * 【0 0 2-4 ? * 1#1】每個月的第一個周一凌晨2點到4點期間,每個整點都執行一次;
   */
  // @Scheduled(cron = "0 * * * * MON-SAT")
  //@Scheduled(cron = "0,1,2,3,4 * * * * MON-SAT")
  // @Scheduled(cron = "0-4 * * * * MON-SAT")
  @Scheduled(cron = "0/4 * * * * MON-SAT") //每4秒執行一次
  public void hello(){
    System.out.println("hello ... ");
  }
}
三 郵件任務
pom.xml
 <dependency>       <groupId>org.springframework.boot</groupId>
       <artifactId>spring-boot-starter-mail</artifactId>
       <scope>test</scope>
     </dependency>
配置文件
spring:
 mail:
  username: ***********
  password: *********  (這是qq郵箱的授權碼)
  host: smtp.qq.com
spring.mail.properties.mail.smtp.ssl.enable=true
測試類
@Autowired(required = false)
  JavaMailSenderImpl mailSender;

  @Test
  public void contextLoads() {
    SimpleMailMessage message = new SimpleMailMessage();
    //郵件設置
    message.setSubject("通知-今晚開會");
    message.setText("今晚7:30開會");

    message.setTo("**************");
    message.setFrom("**************");

    mailSender.send(message);
  }

  @Test
  public void test02() throws Exception{
    //1、創建一個復雜的消息郵件
    MimeMessage mimeMessage = mailSender.createMimeMessage();
    MimeMessageHelper helper = new MimeMessageHelper(mimeMessage, true);

    //郵件設置
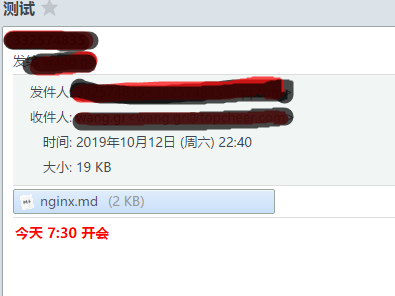
    helper.setSubject("測試");
    helper.setText("<b style='color:red'>今天 7:30 開會</b>",true);

    helper.setTo("***************");
    helper.setFrom("**************");

    //上傳文件
    helper.addAttachment("nginx.md",new File("C:\\Users\\asus\\Desktop\\nginx.md"));

    mailSender.send(mimeMessage);

  }
結果:

關于Springboot中任務整合的方法有哪些就分享到這里了,希望以上內容可以對大家有一定的幫助,可以學到更多知識。如果覺得文章不錯,可以把它分享出去讓更多的人看到。
免責聲明:本站發布的內容(圖片、視頻和文字)以原創、轉載和分享為主,文章觀點不代表本網站立場,如果涉及侵權請聯系站長郵箱:is@yisu.com進行舉報,并提供相關證據,一經查實,將立刻刪除涉嫌侵權內容。