您好,登錄后才能下訂單哦!
您好,登錄后才能下訂單哦!
小編給大家分享一下iOS狀態欄、導航欄的示例分析,相信大部分人都還不怎么了解,因此分享這篇文章給大家參考一下,希望大家閱讀完這篇文章后大有收獲,下面讓我們一起去了解一下吧!
前言
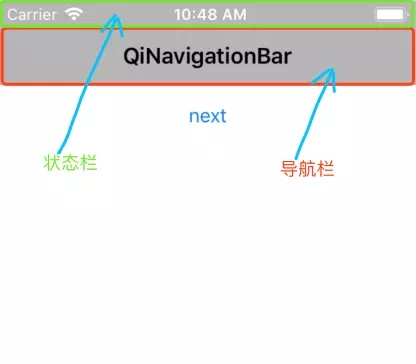
IOS的界面分為狀態欄和導航欄,如下圖所示:

狀態欄與導航欄的位置如上圖,我們可以通過[UIApplication sharedApplication].statusBarFrame.size獲取狀態欄的size(一般沒有劉海時的高度為20,有劉海時的高度為44)。
通過self.navigationController.navigationBar.frame.size獲取導航欄的size(一般高度為44,大標題時高度為xyz,當然也可以通過自定義來改變導航欄樣式)。
***ps:***在我們通過[nav.navigationBar setBarTintColor:[UIColor lightGrayColor]];來設置導航欄顏色時,將導致導航欄和狀態欄背景色均變為淺灰色。
1. 狀態欄內容是否高亮
狀態欄內容包括信號、時間、電量等,只有兩種顏色樣式(黑或白)。iOS開發過程中提供修改狀態欄內容顏色樣式的方法:
在代碼中設置狀態欄內容顏色:info.plist文件中直接設置狀態欄內容顏色:在info.plist中添加字段View controller-based status bar appearance, 當其取值為YES時,表示以UIController對狀態欄的設置為準,UIApplication對狀態欄進行的設置將不起作用。
// 在controller中重寫該方法,并返回相應值
- (UIStatusBarStyle)preferredStatusBarStyle {

 return UIStatusBarStyleLightContent;
}

// 注意:
// 當controller嵌入UINavigationController中時,controller中的方法preferredStatusBarStyle是不會自動被調用的,而navController中的該方法會被調用;
// 當有navController時,在重寫controller中的preferredStatusBarStyle方法同時,我們還應重寫navController中的childViewControllerForStatusBarStyle方法。
- (UIViewController *)childViewControllerForStatusBarStyle {

 return self.topViewController;
}
當字段View controller-based status bar appearance取值為NO時,則以UIApplication為準,控制器設置狀態欄的方法preferredStatusBarStyle則根本不會被調用。
// 狀態欄內容-黑色
[UIApplication sharedApplication].statusBarStyle = UIStatusBarStyleDefault;
// 狀態欄內容-白色
[UIApplication sharedApplication].statusBarStyle = UIStatusBarStyleLightContent;
在info.plist文件中直接設置狀態欄內容顏色:字段View controller-based status bar appearance取值為NO,且Status bar style取值為UIStatusBarStyleLightContent(可選),則不寫代碼,也可控制應用中的狀態欄內容顏色。
2. 隱藏狀態欄
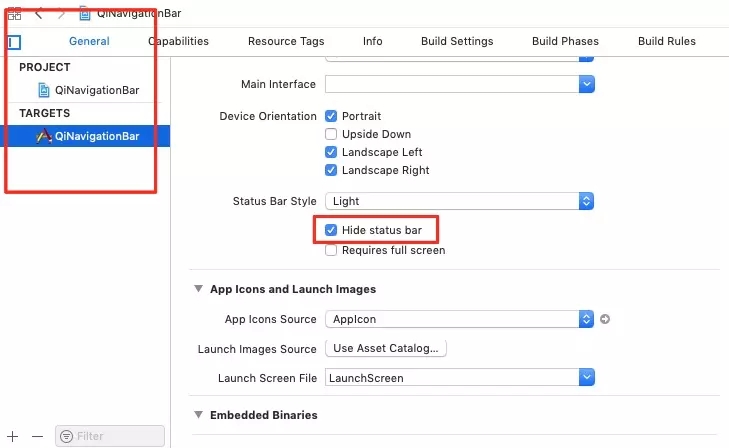
整個項目隱藏在Targets -> General -> 勾選 Hide status bar 即可。

在單個界面中隱藏
// iOS 9.0 之前
// 隱藏=YES,顯示=NO; Animation:動畫效果
[[UIApplication sharedApplication] setStatusBarHidden:YES withAnimation:UIStatusBarAnimationNone];

// iOS 9.0 之后推薦使用這個
// 注意:該方法可以通過UIController中的方法setNeedsStatusBarAppearanceUpdate來間接調用
- (BOOL)prefersStatusBarHidden {

 return YES;
}注意:上面兩個操作狀態方法依然受到Info.plist中字段View controller-based status bar appearance取值得影響,該字段取值為YES時,進入controller會自動調用prefersStatusBarHidden方法。當controller嵌入UINavigationController中時,controller中的方法prefersStatusBarHidden是不會自動被調用的,而navController中的該方法會被調用;當有navController時,在重寫controller中的prefersStatusBarHidden方法同時,我們還應重寫navController中的childViewControllerForStatusBarHidden方法。
- (UIViewController *)childViewControllerForStatusBarHidden {

 return self.topViewController;
}
啟動頁隱藏狀態欄,進入程序后正常顯示狀態欄
首先,在Targets->General->勾選中Hide status bar或者在info.plist里面 Status bar is initially hidden 設置為 YES;
其次,在AppDelegate.m中添加代碼
-(BOOL)application:(UIApplication *)application didFinishLaunchingWithOptions:(NSDictionary *)launchOptions
{
 [application setStatusBarHidden:NO withAnimation:UIStatusBarAnimationFade];
}
3. 導航欄

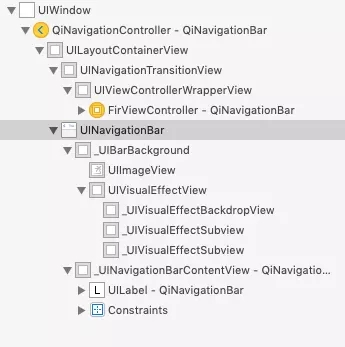
UINavigationController的視圖層次結構比較清晰,用戶可見的導航欄即為其中的***UINavigationBar***,通過它,我們就可以修改導航欄的樣式。下面我們就逐步介紹一些常用的關于導航欄的操作。
導航欄常用操作
// 隱藏導航欄
//[self.navigationController setNavigationBarHidden:YES];
[self.navigationController setNavigationBarHidden:YES animated:YES];

// 設置導航背景為紅色
[self.navigationController.navigationBar setBarTintColor:[UIColor redColor]];

// 設置navigationBar的透明效果
[self.navigationController.navigationBar setTranslucent:YES];
//設置導航欄的背景圖片
[self.navigationController.navigationBar setBackgroundImage:[UIImage imageNamed:@"imgName"] forBarMetrics:UIBarMetricsDefault];

// Attributes 屬性
NSDictionary *textAttributes = @{NSForegroundColorAttributeName:[UIColor whiteColor],NSFontAttributeName:[UIFont systemFontOfSize:30]};
// 設置導航欄標題的字體大小、顏色
[self.navigationController.navigationBar setTitleTextAttributes:textAttributes];
4. 導航欄常用樣式
在日常開發中,我們經常需要修改導航欄樣式,如使導航欄透明、導航欄尺寸等,在不同樣式導航欄之間的切換時還要注意是否平順...(隱藏,與正常導航欄的切換)
導航欄大標題
if (@available(iOS 11.0, *)) {
  [self.navigationController.navigationBar setPrefersLargeTitles:YES];
}
自定義導航欄大標題樣式
重寫UINavigationBar中的layoutSubviews方法,可通過發送通知的形式來監聽導航欄高度變化,如下:
-(void)layoutSubviews {
 [super layoutSubviews];

 [[NSNotificationCenter defaultCenter] postNotificationName:KEY_UINavigationBar_Height_Changed object:self userInfo:nil];
}
使導航欄透明
當需要設置導航欄透明且title等項正常顯示時,最好將設置過程置于viewWillAppear:方法中:
//// 需要導航欄透明的ViewController中
- (void)viewWillAppear:(BOOL)animated {

 [super viewWillAppear:animated];

 _navView.hidden = NO;
 self.edgesForExtendedLayout = UIRectEdgeTop;
 self.navigationController.navigationBar.translucent = YES;
 [self.navigationController.navigationBar setShadowImage:[UIImage new]];
 [self.navigationController.navigationBar setBackgroundImage:[UIImage new] forBarMetrics:UIBarMetricsDefault];
 [self.navigationController.navigationBar setTitleTextAttributes:@{NSForegroundColorAttributeName: [UIColor whiteColor]}];
}

//// 導航欄為非透明的ViewController中
- (void)viewWillAppear:(BOOL)animated {

 [super viewWillAppear:animated];

 self.edgesForExtendedLayout = UIRectEdgeNone;
 self.navigationController.navigationBar.translucent = NO;
 [self.navigationController.navigationBar setShadowImage:nil];
 [self.navigationController.navigationBar setTintColor:[UIColor blackColor]];
 [self.navigationController.navigationBar setBackgroundImage:nil forBarMetrics:UIBarMetricsDefault];
 [self.navigationController.navigationBar setTitleTextAttributes:@{NSForegroundColorAttributeName: [UIColor blackColor]}];
}
以上是“iOS狀態欄、導航欄的示例分析”這篇文章的所有內容,感謝各位的閱讀!相信大家都有了一定的了解,希望分享的內容對大家有所幫助,如果還想學習更多知識,歡迎關注億速云行業資訊頻道!
免責聲明:本站發布的內容(圖片、視頻和文字)以原創、轉載和分享為主,文章觀點不代表本網站立場,如果涉及侵權請聯系站長郵箱:is@yisu.com進行舉報,并提供相關證據,一經查實,將立刻刪除涉嫌侵權內容。