您好,登錄后才能下訂單哦!
您好,登錄后才能下訂單哦!
這篇文章給大家介紹Springboot2中怎么對knife4j進行整合,內容非常詳細,感興趣的小伙伴們可以參考借鑒,希望對大家能有所幫助。
1.代碼結構

2.pom.xml
<?xml version="1.0" encoding="UTF-8"?>
<project xmlns="http://maven.apache.org/POM/4.0.0" xmlns:xsi="http://www.w3.org/2001/XMLSchema-instance"
     xsi:schemaLocation="http://maven.apache.org/POM/4.0.0 https://maven.apache.org/xsd/maven-4.0.0.xsd">
  <modelVersion>4.0.0</modelVersion>
  <parent>
    <groupId>org.springframework.boot</groupId>
    <artifactId>spring-boot-starter-parent</artifactId>
    <version>2.2.5.RELEASE</version>
    <relativePath/> <!-- lookup parent from repository -->
  </parent>
  <groupId>com.example</groupId>
  <artifactId>knife4j-demo</artifactId>
  <version>0.0.1-SNAPSHOT</version>
  <name>knife4j-demo</name>
  <description>Demo project for Spring Boot</description>

  <properties>
    <java.version>1.8</java.version>
  </properties>

  <dependencies>
    <dependency>
      <groupId>org.springframework.boot</groupId>
      <artifactId>spring-boot-starter-web</artifactId>
    </dependency>

    <dependency>
      <groupId>org.springframework.boot</groupId>
      <artifactId>spring-boot-starter-test</artifactId>
      <scope>test</scope>
      <exclusions>
        <exclusion>
          <groupId>org.junit.vintage</groupId>
          <artifactId>junit-vintage-engine</artifactId>
        </exclusion>
      </exclusions>
    </dependency>
    <dependency>
      <groupId>com.github.xiaoymin</groupId>
      <artifactId>knife4j-spring-boot-starter</artifactId>
      <!--在引用時請在maven中央倉庫搜索最新版本號-->
      <version>2.0.2</version>
    </dependency>
    <dependency>
      <groupId>com.alibaba</groupId>
      <artifactId>fastjson</artifactId>
      <version>1.2.58</version>
    </dependency>
    <dependency>
      <groupId>org.projectlombok</groupId>
      <artifactId>lombok</artifactId>
      <version>1.18.10</version>
    </dependency>
  </dependencies>

  <build>
    <plugins>
      <plugin>
        <groupId>org.springframework.boot</groupId>
        <artifactId>spring-boot-maven-plugin</artifactId>
      </plugin>
    </plugins>
  </build>

</project>
3.配置類
package com.example.knife4j.demo.config;

import com.github.xiaoymin.knife4j.spring.annotations.EnableKnife4j;
import org.springframework.context.annotation.Bean;
import org.springframework.context.annotation.Configuration;
import org.springframework.context.annotation.Import;
import springfox.bean.validators.configuration.BeanValidatorPluginsConfiguration;
import springfox.documentation.builders.ApiInfoBuilder;
import springfox.documentation.builders.PathSelectors;
import springfox.documentation.builders.RequestHandlerSelectors;
import springfox.documentation.service.ApiInfo;
import springfox.documentation.spi.DocumentationType;
import springfox.documentation.spring.web.plugins.Docket;
import springfox.documentation.swagger2.annotations.EnableSwagger2;

@Configuration
@EnableSwagger2
@EnableKnife4j
@Import(BeanValidatorPluginsConfiguration.class)
public class SwaggerConfiguration {


  @Bean(value = "defaultApi2")
  public Docket defaultApi2() {
    Docket docket=new Docket(DocumentationType.SWAGGER_2)
        .apiInfo(apiInfo())
        //分組名稱
        .groupName("2.X版本")
        .select()
        //這里指定Controller掃描包路徑(項目路徑也行)
        .apis(RequestHandlerSelectors.basePackage("com.example.knife4j.demo"))
        .paths(PathSelectors.any())
        .build();
    return docket;
  }
  private ApiInfo apiInfo() {
    return new ApiInfoBuilder()
        .title("不重要")
        .description("測試名稱不重要")
        .termsOfServiceUrl("http://localhost:88888/")
        .contact("10086@mail.com")
        .version("1.0")
        .build();
  }
}
4.模型bean
package com.example.knife4j.demo.beans;

import io.swagger.annotations.ApiModel;
import io.swagger.annotations.ApiModelProperty;

/**
 * 創建時間: 23:09 2018/9/19
 * 修改時間:
 * 編碼人員: ZhengQf
 * 版  本: 0.0.1
 * 功能描述:
 */
@ApiModel(value = "用戶模型")
public class UserEntity {
  @ApiModelProperty(value="id" ,required= true,example = "123")
  private Integer id;
  @ApiModelProperty(value="用戶姓名" ,required=true,example = "鄭欽鋒")
  private String name;


  public Integer getId() {
    return id;
  }

  public void setId(Integer id) {
    this.id = id;
  }

  public String getName() {
    return name;
  }

  public void setName(String name) {
    this.name = name;
  }

  @Override
  public String toString() {
    return "DemoDoctor [id=" + id + ", name=" + name + "]";
  }

}
5.兩個接口controller
package com.example.knife4j.demo.controller;

import io.swagger.annotations.Api;
import io.swagger.annotations.ApiOperation;
import org.springframework.web.bind.annotation.GetMapping;
import org.springframework.web.bind.annotation.RestController;

@Api(value = "IndexController測試接口")
@RestController
public class IndexController {
  @ApiOperation(value = "測試index接口", nickname = "測試IndexController的index接口")
  @GetMapping("/index")
  public String index() {
    return "測試IndexController的index接口...";
  }

}
package com.example.knife4j.demo.controller;
import com.example.knife4j.demo.beans.UserEntity;
import io.swagger.annotations.Api;
import io.swagger.annotations.ApiImplicitParam;
import io.swagger.annotations.ApiImplicitParams;
import io.swagger.annotations.ApiOperation;
import org.springframework.web.bind.annotation.*;
@Api(value = "用戶接口")
@RestController
public class UserController {
@ApiOperation(value = "獲取用戶信息接口", nickname = "根據用戶ID獲取用戶相關信息")
@ApiImplicitParam(name = "id", value = "用戶ID", required = true, dataType = "int")
@PostMapping("/postMember")
public UserEntity postMember(@RequestParam Integer id) {
UserEntity userEntity = new UserEntity();
userEntity.setId(id);
userEntity.setName("admin");
return userEntity;
}
@ApiOperation(value = "添加用戶", nickname = "添加用戶接口1", notes = "入參是復雜對象", produces = "application/json")
@PostMapping("/postUser")
@ResponseBody
@ApiImplicitParam(paramType = "query", name = "userId", value = "用戶id", required = true, dataType = "int")
public UserEntity postUser(@RequestBody UserEntity user, @RequestParam("userId") int userId) { // 這里用包裝類竟然報錯
if (user.getId() == userId) {
return user;
}
return new UserEntity();
}
@ApiOperation(value = "添加用戶", nickname = "添加用戶接口2", notes = "入參是簡單對象", produces = "application/json")
@PostMapping("/addUser")
@ResponseBody
@ApiImplicitParams({
@ApiImplicitParam(paramType = "query", name = "userName", value = "用戶姓名", required = true, dataType = "String"),
@ApiImplicitParam(paramType = "query", name = "id", value = "用戶id", required = true, dataType = "int")})
public UserEntity addUser(String userName, int id) {
UserEntity userEntity = new UserEntity();
userEntity.setName(userName);
userEntity.setId(id);
return userEntity;
}
}6.srpingboot項目啟動類
package com.example.knife4j.demo;

import org.springframework.boot.SpringApplication;
import org.springframework.boot.autoconfigure.SpringBootApplication;
import org.springframework.boot.autoconfigure.condition.ConditionalOnClass;
import org.springframework.web.servlet.config.annotation.ResourceHandlerRegistry;
import org.springframework.web.servlet.config.annotation.WebMvcConfigurer;
import springfox.documentation.spring.web.SpringfoxWebMvcConfiguration;

@ConditionalOnClass(SpringfoxWebMvcConfiguration.class)
@SpringBootApplication
public class Knife4jDemoApplication implements WebMvcConfigurer {

  public static void main(String[] args) {
    SpringApplication.run(Knife4jDemoApplication.class, args);
  }
  @Override
  public void addResourceHandlers(ResourceHandlerRegistry registry) {
    registry.addResourceHandler("doc.html").addResourceLocations("classpath:/META-INF/resources/");
    registry.addResourceHandler("/webjars/**").addResourceLocations("classpath:/META-INF/resources/webjars/");
  }
}
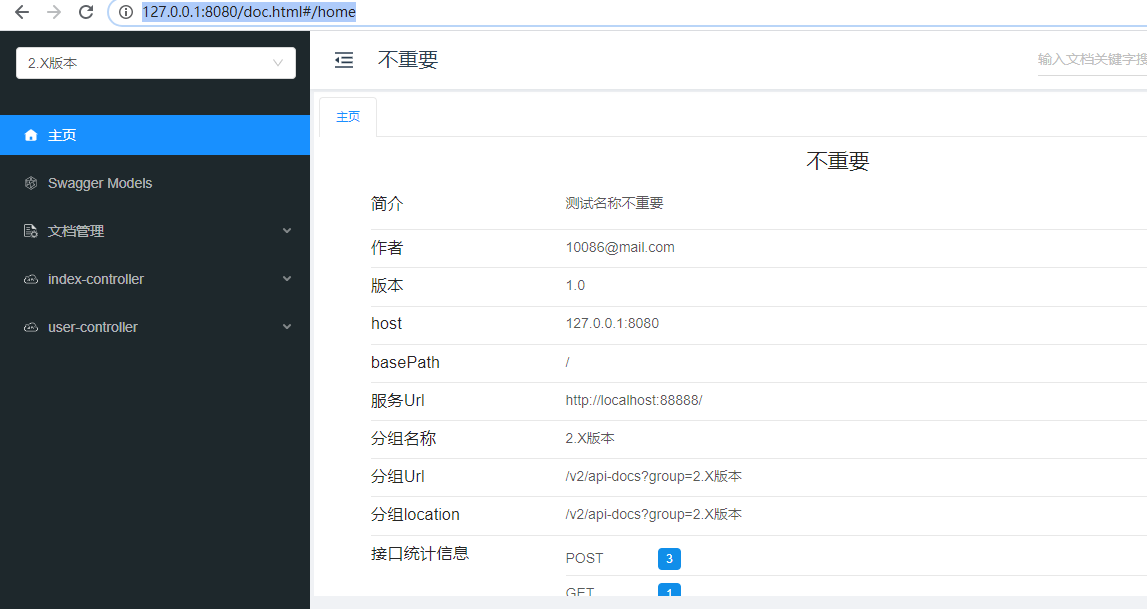
這樣簡單一配置,就ok了,瀏覽器訪問:http://127.0.0.1:8080/doc.html

不過,在項目中我使用了ResponseBodyAdvice接口對項目接口響應內容做統一處理,然后使用knife4j就出問題了。
ResponseBodyAdvice接口實現如下:
import org.springframework.context.annotation.Configuration;
import org.springframework.core.MethodParameter;
import org.springframework.http.MediaType;
import org.springframework.http.converter.HttpMessageConverter;
import org.springframework.http.server.ServerHttpRequest;
import org.springframework.http.server.ServerHttpResponse;
import org.springframework.web.bind.annotation.RestControllerAdvice;
import org.springframework.web.servlet.config.annotation.EnableWebMvc;
import org.springframework.web.servlet.mvc.method.annotation.ResponseBodyAdvice;

/**
 * 自定義advise ,對restful請求響應體進行統一規范
 */
@EnableWebMvc
@Configuration
@RestControllerAdvice
public class ResponseAdvise implements ResponseBodyAdvice<Object> {
  @Override
  public boolean supports(MethodParameter returnType, Class<? extends HttpMessageConverter<?>> converterType) {
    return true;
  }

  @Override
  public Object beforeBodyWrite(Object object, MethodParameter returnType, MediaType selectedContentType, Class<? extends HttpMessageConverter<?>> selectedConverterType, ServerHttpRequest request, ServerHttpResponse response) {

    if (object instanceof ResponseData) {
      return object;
    }
    return ResponseData.of().setData(object);
  }
}
請求報錯

而且后臺還說找不到映射路徑
2020-03-10 23:31:01.533 WARN 7940 --- [nio-8080-exec-1] o.s.web.servlet.PageNotFound : No mapping for GET /service-worker.js
2020-03-10 23:31:01.560 WARN 7940 --- [nio-8080-exec-4] o.s.web.servlet.PageNotFound : No mapping for GET /favicon.ico
2020-03-10 23:31:14.468 WARN 7940 --- [nio-8080-exec-8] o.s.web.servlet.PageNotFound : No mapping for GET /service-worker.js
然后,我在ResponseAdvise#beforeBodyWrite方法中打上斷點,發現我將swagger的請求內容進行了修改,以至于報了404。
最后在ResponseAdvise類上聲明只對本項目的響應體內容進行統一處理
@RestControllerAdvice(basePackages = "com.example.knife4j.demo")
關于Springboot2中怎么對knife4j進行整合就分享到這里了,希望以上內容可以對大家有一定的幫助,可以學到更多知識。如果覺得文章不錯,可以把它分享出去讓更多的人看到。
免責聲明:本站發布的內容(圖片、視頻和文字)以原創、轉載和分享為主,文章觀點不代表本網站立場,如果涉及侵權請聯系站長郵箱:is@yisu.com進行舉報,并提供相關證據,一經查實,將立刻刪除涉嫌侵權內容。