您好,登錄后才能下訂單哦!
您好,登錄后才能下訂單哦!
這篇文章主要講解了如何實現Spring Boot2發布調用REST服務,內容清晰明了,對此有興趣的小伙伴可以學習一下,相信大家閱讀完之后會有幫助。
開發環境:IntelliJ IDEA 2019.2.2
Spring Boot版本:2.1.8
一、發布REST服務
1、IDEA新建一個名稱為rest-server的Spring Boot項目
2、新建一個實體類User.java
package com.example.restserver.domain;

public class User {
  String name;
  Integer age;

  public String getName() {
    return name;
  }
  public void setName(String name) {
    this.name = name;
  }
  public Integer getAge() {
    return age;
  }
  public void setAge(Integer age) {
    this.age = age;
  }
}
3、新建一個控制器類 UserController.java
package com.example.restserver.web;

import com.example.restserver.domain.User;
import org.springframework.http.MediaType;
import org.springframework.web.bind.annotation.PathVariable;
import org.springframework.web.bind.annotation.RequestMapping;
import org.springframework.web.bind.annotation.RestController;

@RestController
public class UserController {

  @RequestMapping(value="/user/{name}", produces = MediaType.APPLICATION_JSON_VALUE)
  public User user(@PathVariable String name) {
    User u = new User();
    u.setName(name);
    u.setAge(30);
    return u;
  }
}
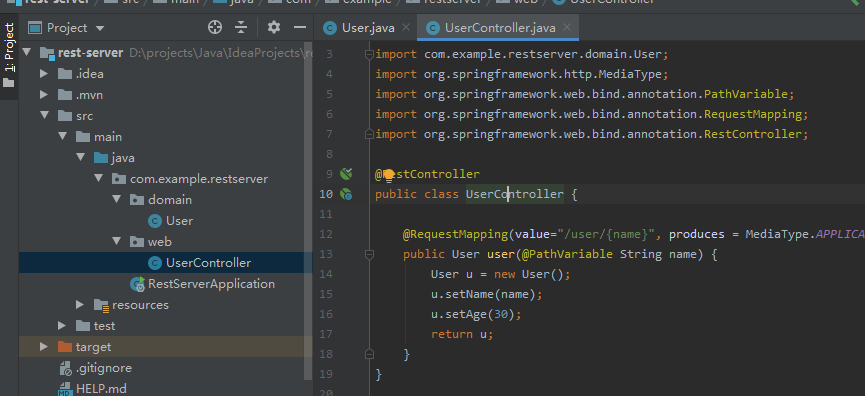
項目結構如下:

訪問http://localhost:8080/user/lc,頁面顯示:
{"name":"lc","age":30}
二、使用RestTemplae調用服務
1、IDEA新建一個名稱為rest-client的Spring Boot項目
2、新建一個含有main方法的普通類RestTemplateMain.java,調用服務
package com.example.restclient;

import com.example.restclient.domain.User;
import org.springframework.web.client.RestTemplate;

public class RestTemplateMain {
  public static void main(String[] args){
    RestTemplate tpl = new RestTemplate();
    User u = tpl.getForObject("http://localhost:8080/user/lc", User.class);
    System.out.println(u.getName() + "," + u.getAge());
  }
}
右鍵Run 'RestTemplateMain.main()',控制臺輸出:lc,30
3、在bean里面使用RestTemplate,可使用RestTemplateBuilder,新建類UserService.java
package com.example.restclient.service;

import com.example.restclient.domain.User;
import org.springframework.beans.factory.annotation.Autowired;
import org.springframework.boot.web.client.RestTemplateBuilder;
import org.springframework.context.annotation.Bean;
import org.springframework.stereotype.Service;
import org.springframework.web.client.RestTemplate;

@Service
public class UserService {
  @Autowired
  private RestTemplateBuilder builder;

  @Bean
  public RestTemplate restTemplate(){
    return builder.rootUri("http://localhost:8080").build();
  }

  public User userBuilder(String name){
    User u = restTemplate().getForObject("/user/" + name, User.class);
    return u;
  }

}
4、編寫一個單元測試類,來測試上面的UserService的bean。
package com.example.restclient.service;

import com.example.restclient.domain.User;
import org.junit.Assert;
import org.junit.Test;
import org.junit.runner.RunWith;
import org.springframework.beans.factory.annotation.Autowired;
import org.springframework.boot.test.context.SpringBootTest;
import org.springframework.test.context.junit4.SpringRunner;

@RunWith(SpringRunner.class)
@SpringBootTest(webEnvironment = SpringBootTest.WebEnvironment.NONE)
public class UserServiceTest {
  @Autowired
  private UserService userService;

  @Test
  public void testUser(){
    User u = userService.userBuilder("lc");
    Assert.assertEquals("lc", u.getName());
  }
}
5、控制器類UserController.cs 中調用
配置在application.properties 配置端口和8080不一樣,如server.port = 9001
@Autowired
  private UserService userService;

  @RequestMapping(value="/user/{name}", produces = MediaType.APPLICATION_JSON_VALUE)
  public User user(@PathVariable String name) {
    User u = userService.userBuilder(name);
    return u;
  }
三、使用Feign調用服務
繼續在rest-client項目基礎上修改代碼。
1、pom.xml添加依賴
<dependency>
      <groupId>io.github.openfeign</groupId>
      <artifactId>feign-core</artifactId>
      <version>9.5.0</version>
    </dependency>

    <dependency>
      <groupId>io.github.openfeign</groupId>
      <artifactId>feign-gson</artifactId>
      <version>9.5.0</version>
    </dependency>
2、新建接口UserClient.java
package com.example.restclient.service;

import com.example.restclient.domain.User;
import feign.Param;
import feign.RequestLine;


public interface UserClient {

  @RequestLine("GET /user/{name}")
  User getUser(@Param("name")String name);

}
3、在控制器類UserController.java 中調用
decoder(new GsonDecoder()) 表示添加了解碼器的配置,GsonDecoder會將返回的JSON字符串轉換為接口方法返回的對象。
相反的,encoder(new GsonEncoder())則是編碼器,將對象轉換為JSON字符串。
@RequestMapping(value="/user2/{name}", produces = MediaType.APPLICATION_JSON_VALUE)
  public User user2(@PathVariable String name) {
    UserClient service = Feign.builder().decoder(new GsonDecoder())
                  .target(UserClient.class, "http://localhost:8080/");
    User u = service.getUser(name);
    return u;
  }
4、優化第3步代碼,并把請求地址放到配置文件中。
(1)application.properties 添加配置
(2)新建配置類ClientConfig.java
package com.example.restclient.config;

import com.example.restclient.service.UserClient;
import feign.Feign;
import feign.gson.GsonDecoder;
import org.springframework.beans.factory.annotation.Value;
import org.springframework.context.annotation.Bean;
import org.springframework.context.annotation.Configuration;

@Configuration
public class ClientConfig {
  @Value("${application.client.url}")
  private String clientUrl;

  @Bean
  UserClient userClient(){
    UserClient client = Feign.builder()
        .decoder(new GsonDecoder())
        .target(UserClient.class, clientUrl);
    return client;
  }
}
(3)控制器 UserController.java 中調用
@Autowired
  private UserClient userClient;

  @RequestMapping(value="/user3/{name}", produces = MediaType.APPLICATION_JSON_VALUE)
  public User user3(@PathVariable String name) {
    User u = userClient.getUser(name);
    return u;
  }
UserController.java最終內容:
package com.example.restclient.web;

import com.example.restclient.domain.User;
import com.example.restclient.service.UserClient;
import com.example.restclient.service.UserService;
import feign.Feign;
import feign.gson.GsonDecoder;
import org.springframework.beans.factory.annotation.Autowired;
import org.springframework.http.MediaType;
import org.springframework.web.bind.annotation.PathVariable;
import org.springframework.web.bind.annotation.RequestMapping;
import org.springframework.web.bind.annotation.RestController;

@RestController
public class UserController {
  @Autowired
  private UserService userService;
  @Autowired
  private UserClient userClient;

  @RequestMapping(value="/user/{name}", produces = MediaType.APPLICATION_JSON_VALUE)
  public User user(@PathVariable String name) {
    User u = userService.userBuilder(name);
    return u;
  }

  @RequestMapping(value="/user2/{name}", produces = MediaType.APPLICATION_JSON_VALUE)
  public User user2(@PathVariable String name) {
    UserClient service = Feign.builder().decoder(new GsonDecoder())
                  .target(UserClient.class, "http://localhost:8080/");
    User u = service.getUser(name);
    return u;
  }
  @RequestMapping(value="/user3/{name}", produces = MediaType.APPLICATION_JSON_VALUE)
  public User user3(@PathVariable String name) {
    User u = userClient.getUser(name);
    return u;
  }
}
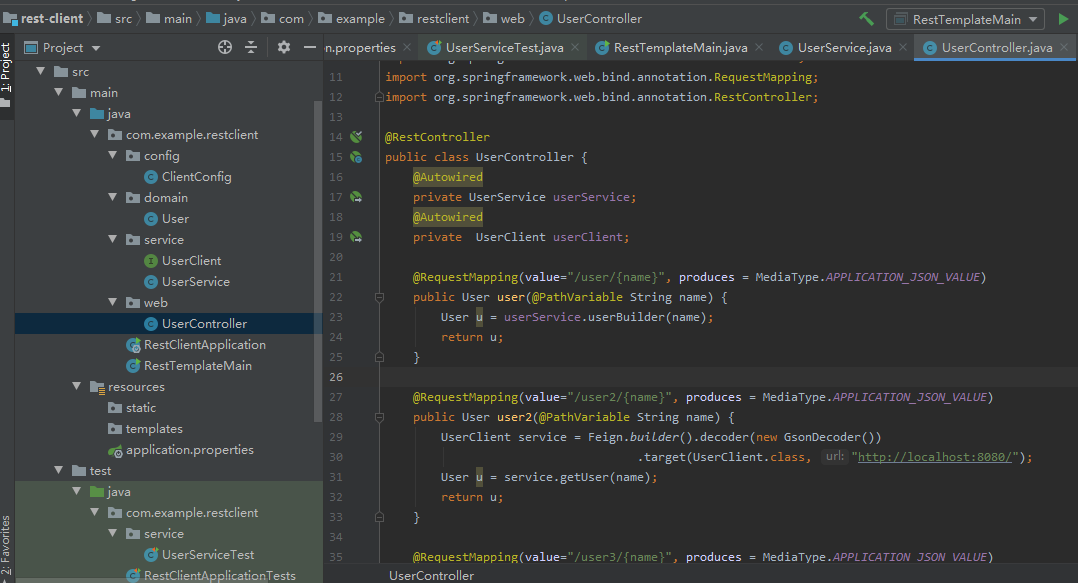
項目結構

先后訪問下面地址,可見到輸出正常結果
http://localhost:9001/user/lc
http://localhost:9001/user2/lc2
http://localhost:9001/user3/lc3
看完上述內容,是不是對如何實現Spring Boot2發布調用REST服務有進一步的了解,如果還想學習更多內容,歡迎關注億速云行業資訊頻道。
免責聲明:本站發布的內容(圖片、視頻和文字)以原創、轉載和分享為主,文章觀點不代表本網站立場,如果涉及侵權請聯系站長郵箱:is@yisu.com進行舉報,并提供相關證據,一經查實,將立刻刪除涉嫌侵權內容。