您好,登錄后才能下訂單哦!
您好,登錄后才能下訂單哦!
這篇文章給大家分享的是有關Bootstrap中Validator如何實現注冊校驗和登錄錯誤提示效果的內容。小編覺得挺實用的,因此分享給大家做個參考,一起跟隨小編過來看看吧。
1、介紹
在AdminEAP框架中,使用了BootstrapValidator校驗框架,本文以注冊校驗的用戶名、登錄名、密碼、確認密碼的校驗(后面還有時間區間、服務器校驗)為例,講述BootstrapValidator的使用。同時以登錄錯誤提示為例,說明如何在動態改變組件的錯誤提示信息。
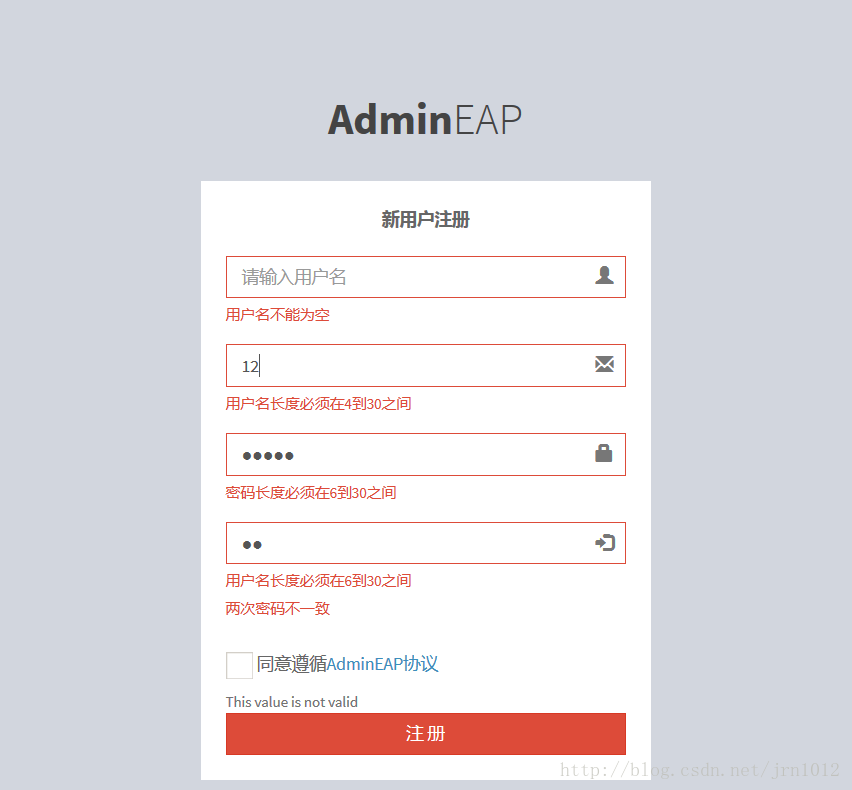
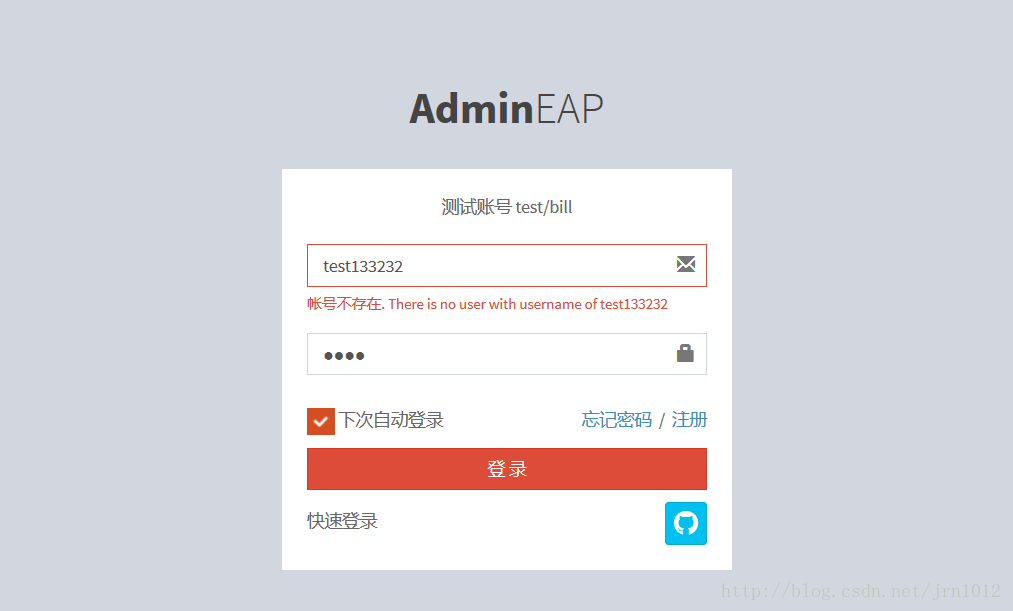
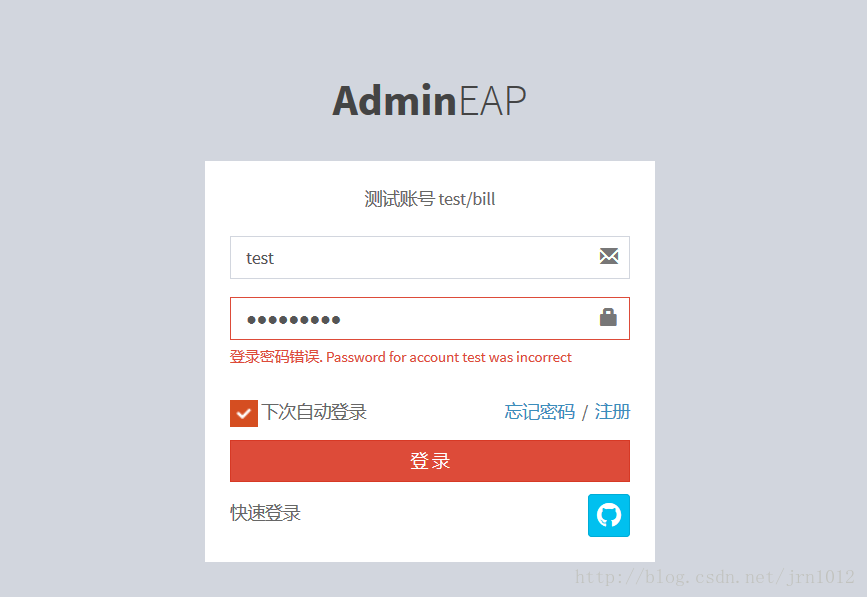
先看下面的注冊與登錄的校驗效果圖:
注冊校驗:

登錄錯誤提示:根據不同的錯誤類型,動態改變組件的樣式和錯誤提示內容


2、注冊校驗
1、頭部引入bootstrap-validator.css
復制代碼 代碼如下:
<link rel="stylesheet" href="${basePath}/resources/adminlte/plugins/bootstrap-validator/dist/css/bootstrap-validator.css" rel="external nofollow" />
${basePath}為系統的路徑變量
2、form組件
<form action="${basePath}/oauth/register" method="post" id="register-form">
      <input type="hidden" name="oAuthId" value="${oAuthInfo.oAuthId?default('-1')}">
      <input type="hidden" name="oAuthType" value="${oAuthInfo.oAuthType?default('-1')}">
      <div class="form-group has-feedback">
        <input type="text" class="form-control" name="userName" id="userName" placeholder="請輸入用戶名" required>
        <span class="glyphicon glyphicon-user form-control-feedback"></span>
      </div>
      <div class="form-group has-feedback">
        <input type="text" class="form-control" name="loginName" id="loginName" placeholder="請輸入登錄郵箱/登錄名">
        <span class="glyphicon glyphicon-envelope form-control-feedback"></span>
      </div>
      <div class="form-group has-feedback">
        <input type="password" class="form-control" name="password" id="password" placeholder="請輸入密碼">
        <span class="glyphicon glyphicon-lock form-control-feedback"></span>
      </div>
      <div class="form-group has-feedback">
        <input type="password" class="form-control" name="repassword" id="repassword" placeholder="再次確認密碼">
        <span class="glyphicon glyphicon-log-in form-control-feedback"></span>
      </div>
      <div class="row">
        <div class="col-xs-12">
          <div class="checkbox icheck">
            <label>
              <input type="checkbox" name="rememberMe" required> 同意遵循<a href="#" rel="external nofollow" >AdminEAP協議</a>
            </label>
          </div>
        </div>
        <!-- /.col -->
      </div>
      <div class="row">
        <div class="col-xs-12">
          <button type="submit" class="btn btn-danger btn-block btn-flat">注 冊</button>
        </div>
      </div>
    </form>
3、引入bootstrap-validator.js
<script src="${basePath}/resources/adminlte/bootstrap/js/bootstrap.min.js"></script>4、校驗的核心js代碼
<script>
  $(function () {
    //將checkbox渲染為icheck樣式
    $('input').iCheck({
      checkboxClass: 'icheckbox_square-red',
      radioClass: 'iradio_square-red',
      increaseArea: '20%' // optional
    });

    //此處為校驗的核心代碼
    $("#register-form").bootstrapValidator({
      submitHandler: function (valiadtor, loginForm, submitButton) {

        valiadtor.defaultSubmit();
      },
      fields: {
        userName: {
          validators: {
            notEmpty: {
              message: '用戶名不能為空'
            },
            stringLength: {
              /*長度提示*/
              min: 4,
              max: 30,
              message: '用戶名長度必須在4到30之間'
            }
          }
        },
        loginName: {
          validators: {
            notEmpty: {
              message: '登錄郵箱名或用戶名不能為空'
            },
            stringLength: {
              /*長度提示*/
              min: 4,
              max: 30,
              message: '用戶名長度必須在4到30之間'
            },
            threshold: 4,//只有4個字符以上才發送ajax請求
            remote: {
              url: "${basePath}/oauth/checkUnique",
              data: function (validator) {
                return {
                  loginName: $("#loginName").val(),
                  userId: null
                };
              },
              message: '該登錄名已被使用,請使用其他登錄名',
              delay:2000
            }
          }
        },
        password: {
          validators: {
            notEmpty: {
              message: '密碼不能為空'
            },
            stringLength: {
              /*長度提示*/
              min: 6,
              max: 30,
              message: '密碼長度必須在6到30之間'
            },
            different: {//不能和用戶名相同
              field: 'loginName',//需要進行比較的input name值
              message: '不能和用戶名相同'
            },
            regexp: {
              regexp: /^[a-zA-Z0-9_\.]+$/,
              message: '密碼由數字字母下劃線和.組成'
            }
          }
        },
        repassword: {
          message: '密碼無效',
          validators: {
            notEmpty: {
              message: '密碼不能為空'
            },
            stringLength: {
              min: 6,
              max: 30,
              message: '用戶名長度必須在6到30之間'
            },
            identical: {//相同
              field: 'password',
              message: '兩次密碼不一致'
            },
            different: {//不能和用戶名相同
              field: 'loginName',
              message: '不能和用戶名相同'
            },
            regexp: {//匹配規則
              regexp: /^[a-zA-Z0-9_\.]+$/,
              message: '密碼由數字字母下劃線和.組成'
            }
          }
        }

      }
    });

  });
5、登錄名唯一性校驗的后臺代碼
 /**
   * 校驗當前登錄名/郵箱的唯一性
   * @param loginName 登錄名
   * @param userId 用戶ID(用戶已經存在,即又改回原來的名字還是唯一的)
   * @return
   */
  @RequestMapping(value = "/oauth/checkUnique", method = RequestMethod.POST)
  @ResponseBody
  public Map checkExist(String loginName, String userId) {
    Map<String, Boolean> map = new HashMap<String, Boolean>();
    User user = userService.getUserByLoginName(loginName);
    //用戶不存在,校驗有效
    if (user == null) {
      map.put("valid", true);
    } else {
      //用戶存在(存在的用戶是當前用戶,登錄名一致,校驗通過,否則校驗不通過)
      if(!StrUtil.isEmpty(userId)&&userId.equals(user.getLoginName())){
        map.put("valid",true);
      }else {
        map.put("valid", false);
      }
    }
    return map;
  }
以上的配置完成了注冊文本框的各種校驗,更多的校驗內容,可以查看相關的bootstrap-validator的API文檔。
3、登錄錯誤動態提示
1、在后臺登錄時,會拋出各種登錄不成功的提示,需要動態改變前端組件的錯誤提示信息。不同類型的錯誤信息編碼,要控制不同的組件樣式和提示內容。以下是后臺拋出的錯誤類型和錯誤信息(使用shiro認證)。
 try {
      subject.login(token);
      //通過認證
      if (subject.isAuthenticated()) {
        Set<String> roles = roleService.getRoleCodeSet(userName);
        if (!roles.isEmpty()) {
          subject.getSession().setAttribute("isAuthorized", true);
          return MAIN_PAGE;
        } else {//沒有授權
          msg = "您沒有得到相應的授權!";
          model.addAttribute("message", new ResultCode("1", msg));
          subject.getSession().setAttribute("isAuthorized", false);
          LOGGER.error(msg);
          return LOGIN_PAGE;
        }

      } else {
        return LOGIN_PAGE;
      }
      //0 未授權 1 賬號問題 2 密碼錯誤 3 賬號密碼錯誤
    } catch (IncorrectCredentialsException e) {
      msg = "登錄密碼錯誤. Password for account " + token.getPrincipal() + " was incorrect";
      model.addAttribute("message", new ResultCode("2", msg));
      LOGGER.error(msg);
    } catch (ExcessiveAttemptsException e) {
      msg = "登錄失敗次數過多";
      model.addAttribute("message", new ResultCode("3", msg));
      LOGGER.error(msg);
    } catch (LockedAccountException e) {
      msg = "帳號已被鎖定. The account for username " + token.getPrincipal() + " was locked.";
      model.addAttribute("message", new ResultCode("1", msg));
      LOGGER.error(msg);
    } catch (DisabledAccountException e) {
      msg = "帳號已被禁用. The account for username " + token.getPrincipal() + " was disabled.";
      model.addAttribute("message", new ResultCode("1", msg));
      LOGGER.error(msg);
    } catch (ExpiredCredentialsException e) {
      msg = "帳號已過期. the account for username " + token.getPrincipal() + " was expired.";
      model.addAttribute("message", new ResultCode("1", msg));
      LOGGER.error(msg);
    } catch (UnknownAccountException e) {
      msg = "帳號不存在. There is no user with username of " + token.getPrincipal();
      model.addAttribute("message", new ResultCode("1", msg));
      LOGGER.error(msg);
    } catch (UnauthorizedException e) {
      msg = "您沒有得到相應的授權!" + e.getMessage();
      model.addAttribute("message", new ResultCode("1", msg));
      LOGGER.error(msg);
    }
2、前端核心JS代碼
<script>
    $(function () {
      $('input').iCheck({
        checkboxClass: 'icheckbox_square-red',
        radioClass: 'iradio_square-red',
        increaseArea: '20%' // optional
      });

      fillbackLoginForm();
      $("#login-form").bootstrapValidator({
        message:'請輸入用戶名/密碼',
        submitHandler:function (valiadtor,loginForm,submitButton) {
          rememberMe($("input[name='rememberMe']").is(":checked"));
          valiadtor.defaultSubmit();
        },
        fields:{
          userName:{
            validators:{
              notEmpty:{
                message:'登錄郵箱名或用戶名不能為空'
              }
            }
          },
          password:{
            validators:{
              notEmpty:{
                message:'密碼不能為空'
              }
            }
          }
        }
      });
      <!--freemark語法,查看是否從后臺傳送過來錯誤信息,并初始化錯誤提示組件LoginValidator-->
      <#if message??>
        new LoginValidator({
          code:"${message.code?default('-1')}",
          message:"${message.message?default('')}",
          userName:'userName',
          password:'password'
        });
      </#if>
    });

    //使用本地緩存記住用戶名密碼
    function rememberMe(rm_flag){
      //remember me
      if(rm_flag){
         localStorage.userName=$("input[name='userName']").val();
         localStorage.password=$("input[name='password']").val();
        localStorage.rememberMe=1;
      }
      //delete remember msg
      else{
        localStorage.userName=null;
        localStorage.password=null;
        localStorage.rememberMe=0;
      }
    }

    //記住回填
    function fillbackLoginForm(){
      if(localStorage.rememberMe&&localStorage.rememberMe=="1"){
        $("input[name='userName']").val(localStorage.userName);
        $("input[name='password']").val(localStorage.password);
        $("input[name='rememberMe']").iCheck('check');
        $("input[name='rememberMe']").iCheck('update');
      }
    }
  </script>
3、LoginValidator組件的代碼 login.js
/**
 * Created by billJiang on 2017/1/12.
 * 登錄異常信息顯示
 */

function LoginValidator(config) {
  this.code = config.code;
  this.message = config.message;
  this.userName = config.userName;
  this.password = config.password;
  this.initValidator();
}

//0 未授權 1 賬號問題 2 密碼錯誤 3 賬號密碼錯誤
LoginValidator.prototype.initValidator = function () {
  if (!this.code)
    return;
  if(this.code==0){
    this.addPasswordErrorMsg();
  }else if(this.code==1){
    this.addUserNameErrorStyle();
    this.addUserNameErrorMsg();
  }else if(this.code==2){
    this.addPasswordErrorStyle();
    this.addPasswordErrorMsg();
  }else if(this.code==3){
    this.addUserNameErrorStyle();
    this.addPasswordErrorStyle();
    this.addPasswordErrorMsg();
  }
  return;
}

LoginValidator.prototype.addUserNameErrorStyle = function () {
  this.addErrorStyle(this.userName);
}

LoginValidator.prototype.addPasswordErrorStyle = function () {
  this.addErrorStyle(this.password);
}

LoginValidator.prototype.addUserNameErrorMsg = function () {
  this.addErrorMsg(this.userName);
}

LoginValidator.prototype.addPasswordErrorMsg = function () {
  this.addErrorMsg(this.password);
}


LoginValidator.prototype.addErrorMsg=function(field){
  $("input[name='"+field+"']").parent().append('<small data-bv-validator="notEmpty" data-bv-validator-for="'+field+'" class="help-block">' + this.message + '</small>');
}

LoginValidator.prototype.addErrorStyle=function(field){
  $("input[name='" + field + "']").parent().addClass("has-error");
}
以上把錯誤提示封裝成了一個LoginValidator組件,方便前端調用,增強代碼的可維護性,因為沒有找到Bootstrap-validator改變錯誤提示的接口,所以查看了源碼之后做了封裝。
4、補充
1、時間區間校驗
 "startTime":{
          validators:{
            date:{
              format:'YYYY-MM-DD HH:mm',
              message:'日期格式不正確'
            },
            callback:{
              callback:function(value,validator){
                var startTime=value;
                var endTime=$("#endTime").val();
                if(startTime&&endTime){
                  return DateDiff(endTime,startTime)>0;
                }else{
                  return true;
                }

              },
              message:'結束時間不能小于開始時間'
            }
          }
        },
        "endTime":{
          validators:{
            date:{
              format:'YYYY-MM-DD HH:mm',
              message:'日期格式不正確'
            },
            callback:{
              callback:function(value,validator){
                var startTime=$("#startTime").val();
                var endTime=value;
                if(startTime&&endTime){
                  return DateDiff(endTime,startTime)>0;
                }else{
                  return true;
                }

              },
              message:'結束時間不能小于開始時間'
            }

          }
        },
2、服務器校驗
"jobClass": {
    validators: {
        notEmpty: {message: '執行類名不能為空'},
        remote:{
          url:basePath+"/job/checkJobClass",
          data: function(validator) {
            return {
              jobClass:$('#jobClass').val(),
            };
          },
          message:'該執行類不存在'
        }
      }
    }
后臺代碼
 @RequestMapping(value="/checkJobClass",method = RequestMethod.POST)
  @ResponseBody
  public Map checkJobClass(String jobClass){
    Map map=new HashMap<>();
    try {
      Class<?> objClass = Class.forName(jobClass);
      if(objClass!=null)
      map.put("valid", true);
      return map;
    } catch (Exception ex) {
      logger.error(ex.getMessage().toString());
      map.put("valid", false);
      return map;
    }
  }
感謝各位的閱讀!關于“Bootstrap中Validator如何實現注冊校驗和登錄錯誤提示效果”這篇文章就分享到這里了,希望以上內容可以對大家有一定的幫助,讓大家可以學到更多知識,如果覺得文章不錯,可以把它分享出去讓更多的人看到吧!
免責聲明:本站發布的內容(圖片、視頻和文字)以原創、轉載和分享為主,文章觀點不代表本網站立場,如果涉及侵權請聯系站長郵箱:is@yisu.com進行舉報,并提供相關證據,一經查實,將立刻刪除涉嫌侵權內容。