您好,登錄后才能下訂單哦!
您好,登錄后才能下訂單哦!
前言
相信大家應該都有所了解,在這個AJAX時代,如果想進行 API 等網絡請求都是通過 XMLHttpRequest 或者封裝后的框架進行網絡請求。 現在產生的 fetch 框架簡直就是為了提供更加強大、高效的網絡請求而生,雖然在目前會有一點瀏覽器兼容的問題,但是當我們進行一些異步請求時,都可以使用 fetch 進行完美的網絡請求。下面話不多說,來一起看看詳細的介紹吧。
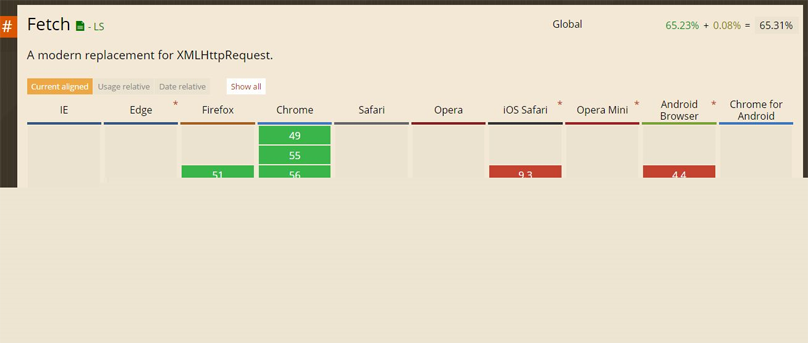
先來看看各個瀏覽器對fetch的原生支持情況,可以看到支持性并不是很高,safari在10.1 之后才支持,ios更是10.3之后才支持,IE完全不支持。當然新技術的發展總會經歷這個過程。

Ajax請求
普通的Ajax請求,用XHR發送一個json請求一般是這樣的:
var xhr = new XMLHttpRequest();
xhr.open("GET", url);
xhr.responseType = 'json';
xhr.onload = function(){
 console.log(xhr.response);
};
xhr.onerror = function(){
 console.log("error")
}
xhr.send();
使用fetch實現的方式:
fetch(url).then(function(response){
 return response.json();
}).then(function(data){
 console.log(data)
}).catch(function(e){
 console.log("error")
})
也可以用async/await的方式
try{
 let response = await fetch(url);
 let data = await response.json();
 console.log(data);
} catch(e){
 console.log("error")
}
用了await后,寫異步代碼感覺像同步代碼一樣爽。await后面可以跟Promise對象,表示等待Promise resolve()才會繼續下去執行,如果Promise被reject()或拋出異常則會被外面的try...catch捕獲。
使用fetch
fetch的主要優點是
但是也有它的不足
fetch(url, {credentials: 'include'})fetch語法:
fetch(url, options).then(function(response) {
 // handle HTTP response
}, function(error) {
 // handle network error
})
具體參數案例:
//兼容包
require('babel-polyfill')
require('es6-promise').polyfill()

import 'whatwg-fetch'

fetch(url, {
 method: "POST",
 body: JSON.stringify(data),
 headers: {
 "Content-Type": "application/json"
 },
 credentials: "same-origin"
}).then(function(response) {
 response.status //=> number 100–599
 response.statusText //=> String
 response.headers //=> Headers
 response.url //=> String

 response.text().then(function(responseText) { ... })
}, function(error) {
 error.message //=> String
})
參數說明
url
定義要獲取的資源。這可能是:一個 USVString 字符串,包含要獲取資源的 URL。一個 Request 對象。
options(可選)
一個配置項對象,包括所有對請求的設置。可選的參數有:
response
一個 Promise,resolve 時回傳 Response 對象:
屬性:
status (number) - HTTP請求結果參數,在100–599 范圍statusText (String) - 服務器返回的狀態報告ok (boolean) - 如果返回200表示請求成功則為trueheaders (Headers) - 返回頭部信息,下面詳細介紹url (String) - 請求的地址方法:
text() - 以string的形式生成請求textjson() - 生成JSON.parse(responseText)的結果blob() - 生成一個BlobarrayBuffer() - 生成一個ArrayBufferformData() - 生成格式化的數據,可用于其他的請求其他方法:
clone()Response.error() Response.redirect()response.headershas(name) (boolean) - 判斷是否存在該信息頭get(name) (String) - 獲取信息頭的數據getAll(name) (Array) - 獲取所有頭部數據set(name, value) - 設置信息頭的參數append(name, value) - 添加header的內容delete(name) - 刪除header的信息forEach(function(value, name){ ... }, [thisContext]) - 循環讀取header的信息使用實例
//獲取css里ul的id屬性
let uldom = document.getElementById("students");
//單獨創建一個json文件,獲取地址
let url = "data.json";

function main(){
 fetch(url).then(respone=>{
 return respone.json();
 }).then(students=>{

 let html = ``;
 for(let i=0, l=students.length; i<l; i++){
  let name = students[i].name;
  let age = students[i].age;
  html += `
  <li>姓名:${name},年齡:${age}</li>
  `
 }

 uldom.innerHTML = html;
 });
}

main();
結合await最終代碼
let uldom = document.getElementById("students");
let url = "data.json";

async function main(){
 let respone = await fetch(url);
 let students = await respone.json();

let html =``;
for(let i=0, l=students.length; i<l; i++){
 let name = students[i].name;
 let age = students[i].age;
 html += `
 <li>姓名:${name},年齡:${age}</li>
`
}
uldom.innerHTML = html;
}
main();
data.json文件內容如下:
[
 {"name":"張三","age":"3"},
 {"name":"李萬","age":"1"},
 {"name":"王二","age":"4"},
 {"name":"二狗","age":"3"},
 {"name":"狗蛋","age":"5"},
 {"name":"牛娃","age":"7"}
]
運行后結果是:
姓名:張三,年齡:3
姓名:李萬,年齡:1
姓名:王二,年齡:4
姓名:二狗,年齡:3
姓名:狗蛋,年齡:5
姓名:牛娃,年齡:7
源碼下載
下載地址:http://xiazai.jb51.net/201707/yuanma/js-fetch(jb51.net).rar
總結
以上就是這篇文章的全部內容了,希望本文的內容對大家的學習或者工作能帶來一定的幫助,如果有疑問大家可以留言交流,謝謝大家對億速云的支持。
免責聲明:本站發布的內容(圖片、視頻和文字)以原創、轉載和分享為主,文章觀點不代表本網站立場,如果涉及侵權請聯系站長郵箱:is@yisu.com進行舉報,并提供相關證據,一經查實,將立刻刪除涉嫌侵權內容。