您好,登錄后才能下訂單哦!
您好,登錄后才能下訂單哦!
本篇文章給大家分享的是有關Vue中TodoList如何使用,小編覺得挺實用的,因此分享給大家學習,希望大家閱讀完這篇文章后可以有所收獲,話不多說,跟著小編一起來看看吧。
1. methods
methods類似react中組件的方法,不同的是vue采用的與html綁定事件。
給個例子
 /*html*/
 <input type="button" value="點擊" v-on:click='handlClick' id="app">
 /*js*/
 var app = new Vue({
    el:'#app',
    methods:{
      handlClick:function(){
        alert('succeed!');
      },
    }
  })
通過在input標簽中的vue命令 v-on命令綁定handlClick事件,而handlClick事件是寫在methods屬性里的
2. computed
/*html*/
<div id="app2">{{even}}</div>
/*js*/
var app2 = new Vue({
el:'#app2',
data:{
message:[1,2,3,4,5,6]
},
computed:{
even:function(){ //篩選偶數
return this.message.filter(function(item){
return item%2 === 0;
});
},
},
});可以看到篩選出來了message中的偶數,現在在控制臺打印出message看看

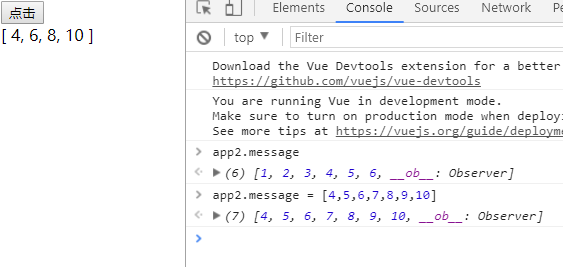
可以看到,message并沒有變,還是原來的message,然后在控制臺中修改message試試,

修改后我并沒有人為的觸發任何函數,左邊的顯示就變成了新的數組的偶數選集
3. 區別
methods是一種交互方法,通常是把用戶的交互動作寫在methods中;而computed是一種數據變化時mvc中的module 到 view 的數據轉化映射。
簡單點講就是methods是需要去人為觸發的,而computed是在檢測到data數據變化時自動觸發的,還有一點就是,性能消耗的區別,這個好解釋。
首先,methods是方式,方法計算后垃圾回收機制就把變量回收,所以下次在要求解篩選偶數時它會再次的去求值。而computed會是依賴數據的,就像閉包一樣,數據占用內存是不會被垃圾回收掉的,所以再次訪問篩選偶數集,不會去再次計算而是返回上次計算的值,當data中的數據改變時才會重新計算。簡而言之,methods是一次性計算沒有緩存,computed是有緩存的計算。
4. TodoList例子
看了一下Vue官網的todo例子,好像沒有篩選功能,所以就寫了有個篩選功能的例子,下面代碼中,@click的意思是v-on='click'的簡寫,:class=的意思是v-bind:'class'=的簡寫
<!doctype html>
<html lang="en">
<head>
  <meta charset="UTF-8">
  <title>todos</title>
  <script src="https://cdn.bootcss.com/vue/2.4.2/vue.js"></script>
  <style>
    .wrap{
      width: 400px;
      background-color: #ccc;
      margin: 0 auto;
    }
    i{
      color: #f00;
      font-size: 12px;
      margin-left: 20px;
      cursor: pointer;
    }
    i:hover{
      font-weight: 700;
    }
    ol{
      /*white-space: nowrap;*/
      word-wrap:break-word;
    }
    .done{
      text-decoration: line-through;
    }
    .not{

    }
  </style>
</head>
<body>
  <div class="wrap" id="todos">
    <input type="text" v-model='nextItem' @keyup.enter='append'>
    <button id="append" @click='append'>添加</button>
    <ol>
      <li v-for='(item,index) of comp'
      :key=item.id
      :class='item.state ? "not" : "done"'>
        {{item.text}}
        <i @click='remove(index)'>完成</i>
      </li>
    </ol>
    <button @click='all'>全部</button>
    <button @click='done'>已完成</button>
    <button @click='todos'>待完成</button>
  </div>
</body>
<script>
  var todos = new Vue({
    el:'#todos',
    data:{
      nextItem: '',
      nextID: 1,
      list: [],
      type: null,
    },
    computed:{
      comp:function(){
        if( this.type === 0 ){
          return this.list;
        }
        else if(this.type === 1){ //show all
          return this.list.filter(function(item){
            return true;
          })
        }
        else if(this.type === 2){ //done
          return this.list.filter(function(item){
            return item.state ? false : true;
          })
        }
        else if(this.type === 3){ //todos
          return this.list.filter(function(item){
            return item.state ? true : false;
          })
        }
      }
    },
    methods:{
      append:function(){//添加到todo
        this.list.push({
          id:this.nextID++,
          text:this.nextItem,
          state: true,
        });
        this.nextItem = '';
        this.type = 0;
      },
      remove:function(index){ //添加到donelist
        this.list[index].state = !this.list[index].state;
      },
      all:function(){
        this.type = 1;
      },
      done:function(){
        this.type = 2;
      },
      todos:function(){
        this.type = 3;
      }
    }
  });
</script>
</html>
以上就是Vue中TodoList如何使用,小編相信有部分知識點可能是我們日常工作會見到或用到的。希望你能通過這篇文章學到更多知識。更多詳情敬請關注億速云行業資訊頻道。
免責聲明:本站發布的內容(圖片、視頻和文字)以原創、轉載和分享為主,文章觀點不代表本網站立場,如果涉及侵權請聯系站長郵箱:is@yisu.com進行舉報,并提供相關證據,一經查實,將立刻刪除涉嫌侵權內容。