溫馨提示×
您好,登錄后才能下訂單哦!
點擊 登錄注冊 即表示同意《億速云用戶服務條款》
您好,登錄后才能下訂單哦!
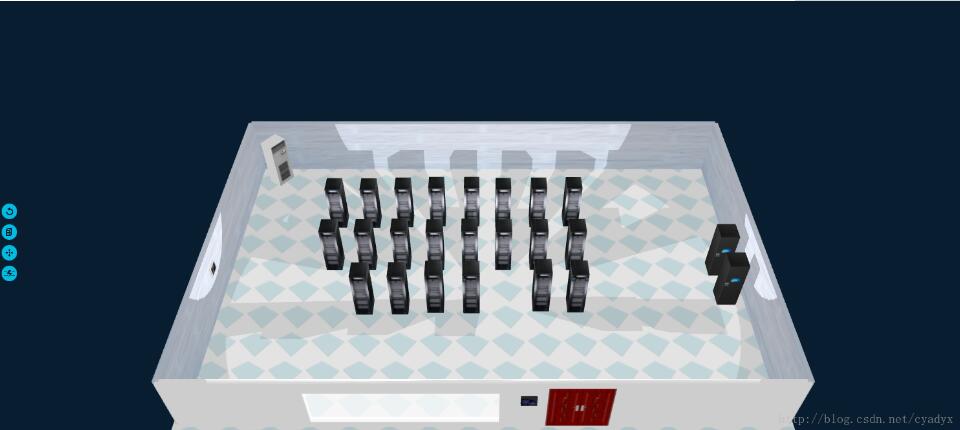
3D機房系統是最近用戶的需求,通過相關了解最后使用Three.js,也發現最近有東西可以寫出來分享:
分步實現3D效果
一 . 初始化3D模型參數
//參數處理
this.option = new Object();
this.option.antialias = option.antialias || true;
this.option.clearCoolr = option.clearCoolr || 0x1b7ace;
this.option.showHelpGrid = option.showHelpGrid || false;
//對象
this.id = id;
this.width = width();
this.height = height();
this.renderer = null;//渲染器
this.scene = null;//場景
this.camera = null;//攝像機
this.selected=null;
this.objects = [];
this.mouseClick = new THREE.Vector2();
this.raycaster = new THREE.Raycaster();
this.controls = null;//鼠標控制器
this.trsnaformControls = null;//鼠標控制器
this.dragcontrols = null;
this.objList = json.objects;//對象列表
this.eventList = json.events;//事件對象列表
this.dragList = [];
this.objectStatusList = {};
this.clickList = [];
var that = this;
對于一些需要使用的參數,開始加載進行初始化操作。
二 . 開始搭建場景
搭建場景包含一些具體的初始化操作 一些初始化方法(之后才對具體方法加以說明):
var that = this;
room3dObj = that;
that.initThree(that.id); //初始化渲染器
that.initCamera(); //初始化攝像機
that.initScene();//創建場景
that.initHelpGrid();//創建網格
that.initLight();//燈光布置
//添加3D對象
$.each(that.objList, function (index,obj) {
that.InitAddObject(obj);//添加對象到場景中
});
that.initMouseCtrl();//創建鼠標控制器
that.animation();//循環渲染界面
三 . 初始化渲染器
渲染器 WebGLRenderer 定義語法:
var that = this;
that.renderer = new THREE.WebGLRenderer({ alpha: true, antialias: that.option.antialias });
that.renderer.setSize(that.width, that.height);
$(“#” + that.id).append(that.renderer.domElement);
that.renderer.setClearColor(that.option.clearCoolr, 1.0);
that.renderer.shadowMap.enabled = true;
that.renderer.shadowMapSoft = true;
//事件
that.renderer.domElement.addEventListener(‘mousedown',that.onDocumentMouseDown, false);
that.renderer.domElement.addEventListener(‘mousemove',that.onDocumentMouseMove, false);
四 . 初始化攝像機
采用PerspectiveCamera 相機:
var that = this;
  that.camera = new THREE.PerspectiveCamera(45, that.width / that.height, 1, 100000);
  that.camera.name = 'mainCamera';
  that.camera.position.x =0;
  that.camera.position.y =2000;
  that.camera.position.z =1800;
  that.camera.up.x = 0;
  that.camera.up.y =1;
  that.camera.up.z =0;
  that.camera.lookAt({ x: 100, y: 0, z: 100 });
  that.objects.push(that.camera);
  that.dragList.push(that.camera);
  that.clickList.push(that.camera);
五 . 創建場景
var that = this;
that.scene = new THREE.Scene();
六 . 燈光布置
/*
AmbientLight: 環境光,基礎光源,它的顏色會被加載到整個場景和所有對象的當前顏色上。
PointLight:點光源,朝著所有方向都發射光線
SpotLight :聚光燈光源:類型臺燈,天花板上的吊燈,手電筒等
DirectionalLight:方向光,又稱無限光,從這個發出的光源可以看做是平行光.
*/
var that = this;
var light = new THREE.AmbientLight(0xcccccc);
light.position.set(0, 0,0);
that.scene.add(light);
var light2 = new THREE.PointLight(0x555555);
light2.shadow.camera.near =1;
light2.shadow.camera.far = 5000;
light2.position.set(0, 350, 0);
light2.castShadow = true;//表示這個光是可以產生陰影的
that.scene.add(light2);
七 . 創建網格
var that = this;
if (that.option.showHelpGrid) {
var helpGrid = new THREE.GridHelper(1000, 50);
that.scene.add(helpGrid);
}
八 . 循環渲染界面
var that = room3dObj;
if (TWEEN != null && typeof (TWEEN) != ‘undefined') {
TWEEN.update();
}
requestAnimationFrame(that.animation);
that.renderer.render(that.scene, that.camera);
九 . 創建鼠標控制器
var that = this;
that.controls = new THREE.OrbitControls(that.camera,that.renderer.domElement);
that.controls.addEventListener(‘change', that.updateControls);
十 . 添加對象到場景中
var that = room3dObj;
that.scene.add(obj);
that.objects.push(obj);
最后效果

瀏覽器兼容
以上就是本文的全部內容,希望對大家的學習有所幫助,也希望大家多多支持億速云。
免責聲明:本站發布的內容(圖片、視頻和文字)以原創、轉載和分享為主,文章觀點不代表本網站立場,如果涉及侵權請聯系站長郵箱:is@yisu.com進行舉報,并提供相關證據,一經查實,將立刻刪除涉嫌侵權內容。