溫馨提示×
您好,登錄后才能下訂單哦!
點擊 登錄注冊 即表示同意《億速云用戶服務條款》
您好,登錄后才能下訂單哦!
這篇文章將為大家詳細講解有關基于wxPython的GUI如何實現輸入對話框,小編覺得挺實用的,因此分享給大家做個參考,希望大家閱讀完這篇文章后可以有所收獲。
在程序輸入中,有時會要求同時改變多個參數值,而且類型也不盡相同,
這時TextEntryDialog就顯得不適用了.WxInput模塊則比較徹底的解決了這個問題.
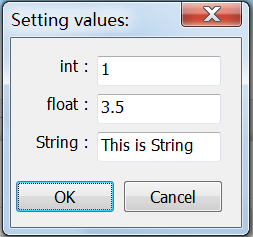
比如我有三個值要用戶交互式設置,一個是int數,一個是str,一個是float,先看示例文件:
from WInput import InputBox
values={'int':1,'String':'This is String','float':3.5}
title='Setting values:'
rvalues=InputBox(title,values)
print(rvalues)
顯示GUI如下:

上面的代碼的關鍵是設置字典values的值.
WxInput會自動根據字典values的內容生成輸入界面,
而且返回值的類型確保和原始類型一樣.
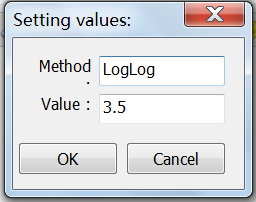
再比如程序中有任意兩個參數Method和num要設置,那么如下就可了:
title='Setting values:'
values={'Method':'LogLog','Value':3.5}
rvalues=InputBox(title,values)
生成的界面如下:

WxInput模塊的代碼如下:
#-*- coding:utf-8 -*-
#~ #--------------------------------------------------------------------------------
#~ module:wlab
#~ FileName=WInput.py
#~ Funciton:wx的輸入對話框
#~ author:吳徐平
#~ Date:2013-04-28
#~ Email:539688300@qq.com
#~ #-------------------------------------------------
import wx
import wx.lib.sized_controls as wxsc
#~ #-------------------------------------------------
#~ #set value for widgets( StaticText and TextCtrl) height
wh=30
#~ #set value for max width times
mwt=8
#~ #set value for wh times
wht=3
#~ #-------------------------------------------------
class InputDialog(wxsc.SizedDialog):

 def __init__(self,title='Setting values:',values={'int':1,'String':'This is String','float':3.5}):
 '''
 #~ using it as follow:
 #~ dialog = InputDialog(title='Setting values:',values={'int':1,'String':'This is String','float':3.5})
 #~ just for test:
 #~ dialog = InputDialog()
 '''
 style = wx.DEFAULT_DIALOG_STYLE | wx.RESIZE_BORDER
 wxsc.SizedDialog.__init__(self,parent=None, id=-1, title=title, style=style)

 self.originvalues=values.copy()
 self.modifiedvalues=values.copy()
 self.pane = self.GetContentsPane()
 self.pane.SetSizerType("form")


 maxlen1=mwt*max([len(str(key)) for key in values])
 if maxlen1<wh*wht:
  maxlen1=wh*wht

 maxlen2=mwt*max([len(str(values[key])) for key in values])
 if maxlen2<wh*wht:
  maxlen2=wh*wht

 for key in self.modifiedvalues:
  keyStr=str(key)
  label=keyStr+' :'
  StaticText = wx.StaticText(parent=self.pane,id=-1,label=label,style=wx.ALIGN_RIGHT)
  StaticText.SetInitialSize((maxlen1,wh))
  value=str(self.modifiedvalues[key])
  TextCtrl = wx.TextCtrl(parent=self.pane, id=-1,value=value)
  TextCtrl.SetInitialSize((maxlen2,wh))
  TextCtrl.SetSizerProps(expand=True)
  #~set a name for TextCtrl,so later we can use wx.FindWindowByName()
  TextCtrl.Name='TC_'+str(keyStr)
  #StaticText.Name='ST_'+str(keyStr)


 #~ # add dialog buttons
 self.SetButtonSizer(self.CreateStdDialogButtonSizer(wx.OK | wx.CANCEL))

 self.Fit()
 self.Center()

 def GetOriginValue(self):
 '''
 #~ if the user select wx.ID_CANCEL,then return originvalues
 '''
 return self.originvalues

 def GetValue(self):
 '''
 #~ if the user select wx.ID_OK,then return self.modifiedvalues
 '''
 for key in self.modifiedvalues:
  keyStr=str(key)
  TextCtrlName='TC_'+str(keyStr)
  TextCtrl=self.FindWindowByName(TextCtrlName)
  ovk=self.modifiedvalues[key]
  if(type(ovk)==int):
  self.modifiedvalues[key]=int(TextCtrl.GetValue().strip())
  elif(type(ovk)==float):
  self.modifiedvalues[key]=float(TextCtrl.GetValue().strip())
  else:
  self.modifiedvalues[key]=str(TextCtrl.GetValue())

 return self.modifiedvalues

#~ #-------------------------------------------------
def InputBox(title='Setting values',values={'int':1,'String':'This is String','float':3.5}):
 '''
 #~ >>>values={'int':1,'String':'This is String','float':3.5}
 #~ >>>title='Setting values:'
 #~ >>>rvalues=InputBox(title,values)
 #~ >>>print(rvalues):
 '''
 app = wx.PySimpleApp()
 dialog = InputDialog(title=title,values=values)
 if dialog.ShowModal() == wx.ID_OK:
 values= dialog.GetValue()
 else:
 values=dialog.GetOriginValue()

 dialog.Destroy()
 app.MainLoop()
 return values

##~ #測試InputBox
#if __name__ == '__main__':
 #values={'int':1,'String':'This is String','float':3.5}
 #title='Setting values'
 #rvalues=InputBox(title,values=values)
 #print(rvalues)

##~ #-------------------------------------------------
class InputPanel(wx.Panel):
 def __init__(self,parent,label='Setting values:',values={'int':1,'String':'This is String','float':3.5}):
 '''
 #~ >>>ipl = InputPanel(parent,label='Setting values:',values={'int':1,'String':'This is String','float':3.5})
  #~>>> rvalues=ipl.GetValue(self)
 '''
 wx.Panel.__init__(self,parent=parent, id=-1)

 self.modifiedvalues=values.copy()

 box = wx.StaticBox(self, -1, label=label)
 sbsizer = wx.StaticBoxSizer(box, wx.VERTICAL)

 gridsizer = wx.FlexGridSizer(cols=2, hgap=5, vgap=5)


 maxlen1=mwt*max([len(str(key)) for key in values])
 if maxlen1<wh*wht:
  maxlen1=wh*3

 maxlen2=mwt*max([len(str(values[key])) for key in values])
 if maxlen2<wh*wht:
  maxlen2=wh*wht

 for key in self.modifiedvalues:
  keyStr=str(key)
  label=keyStr+' :'
  StaticText = wx.StaticText(parent=self,id=-1,label=label,style=wx.ALIGN_RIGHT)
  StaticText.SetInitialSize((maxlen1,wh))
  gridsizer.Add(StaticText, 0, wx.EXPAND|wx.ALIGN_CENTER_VERTICAL|wx.LEFT|wx.RIGHT, 3)
  value=str(self.modifiedvalues[key])
  TextCtrl = wx.TextCtrl(parent=self, id=-1,value=value)
  TextCtrl.SetInitialSize((maxlen2,wh))
  gridsizer.Add(TextCtrl, 0, wx.EXPAND|wx.ALIGN_CENTER_VERTICAL|wx.LEFT|wx.RIGHT, 3)

  #~set a name for TextCtrl,so later we can use wx.FindWindowByName()
  TextCtrl.Name='TC_'+str(keyStr)

 sbsizer.Add(gridsizer, 1, wx.EXPAND)
 gridsizer.Layout()
 PanelSizer = wx.BoxSizer(wx.VERTICAL)
 PanelSizer.Add(sbsizer, 0, wx.ALL|wx.EXPAND, 5)
 self.SetSizer(PanelSizer)
 PanelSizer.Layout()
 PanelSizer.Fit(self)

 def GetValue(self):
 '''
 #~ return self.modifiedvalues
 '''
 for key in self.modifiedvalues:
  keyStr=str(key)
  TextCtrlName='TC_'+str(keyStr)
  TextCtrl=self.FindWindowByName(TextCtrlName)
  ovk=self.modifiedvalues[key]
  if(type(ovk)==int):
  self.modifiedvalues[key]=int(TextCtrl.GetValue().strip())
  elif(type(ovk)==float):
  self.modifiedvalues[key]=float(TextCtrl.GetValue().strip())
  else:
  self.modifiedvalues[key]=str(TextCtrl.GetValue())

 return self.modifiedvalues


##~ #-------------------------------------------------
class InputFrame(wx.Frame):
 def __init__(self,title='InputFrame:',label='Setting values:',values={'int':1,'String':'This is String','float':3.5},size=(400,200)):
 '''
 #~ >>>IFrame = InputFrame(title='InputFrame:',label='Setting values:',values={'int':1,'String':'This is String','float':3.5},size=(400,200)):
  #~>>> rvalues=IFrame.GetValue()
 '''
 wx.Frame.__init__(self,parent=None,title = title,size=size)
 self.modifiedvalues=values.copy()
 self.IPL = InputPanel(self,label=label,values=values)
 #~ #創建FlexGridSizer
 self.FlexGridSizer=wx.FlexGridSizer( rows=9, cols=1, vgap=5,hgap=5)
 self.FlexGridSizer.SetFlexibleDirection(wx.BOTH)

 self.RightPanel = wx.Panel(self,-1)

 #~ #測試按鈕1
 self.Button1 = wx.Button(self.RightPanel,-1,"TestButton",size=(100,40),pos=(10,10))
 self.Button1.Bind(wx.EVT_BUTTON,self.GetValue)
 #~ #加入Sizer中
 self.FlexGridSizer.Add(self.Button1,proportion =0, border = 5,flag = wx.ALL | wx.EXPAND)
 self.RightPanel.SetSizer(self.FlexGridSizer)
 self.BoxSizer=wx.BoxSizer(wx.HORIZONTAL)
 self.BoxSizer.Add(self.IPL,proportion =-10, border = 2,flag = wx.ALL | wx.EXPAND)
 self.BoxSizer.Add(self.RightPanel,proportion =0, border = 2,flag = wx.ALL | wx.EXPAND)
 self.SetSizer(self.BoxSizer)
 self.Center(wx.BOTH)
 #~ #按鈕事件,用于測試
 def GetValue(self,event):
 self.modifiedvalues=self.IPL.GetValue()
 #~ print(self.modifiedvalues)
 return self.modifiedvalues

#~ #主程序測試
def TestInputFrame():
 app = wx.PySimpleApp()
 title='InputFrame:'
 label='Setting values:'
 values={'int':234,'String':'This is String','float':3.5}
 frame =InputFrame(title,label,values)
 frame.Show()
 app.MainLoop()
 return

if __name__ == '__main__':
 app = wx.PySimpleApp()
 title='InputFrame:'
 label='Setting values:'
 values={'int':234,'String':'This is String','float':3.5}
 frame =InputFrame(title,label,values)
 frame.Show()
 app.MainLoop()
關于“基于wxPython的GUI如何實現輸入對話框”這篇文章就分享到這里了,希望以上內容可以對大家有一定的幫助,使各位可以學到更多知識,如果覺得文章不錯,請把它分享出去讓更多的人看到。
免責聲明:本站發布的內容(圖片、視頻和文字)以原創、轉載和分享為主,文章觀點不代表本網站立場,如果涉及侵權請聯系站長郵箱:is@yisu.com進行舉報,并提供相關證據,一經查實,將立刻刪除涉嫌侵權內容。