您好,登錄后才能下訂單哦!
您好,登錄后才能下訂單哦!
環境準備
[root@oldboy ~]# cat /etc/redhat-release
CentOS release 6.9 (Final)
[root@oldboy ~]# uname -r
2.6.32-696.el6.x86_64
[root@oldboy ~]# getenforce
Disabled
[root@oldboy ~]# /etc/init.d/iptables status
iptables: Firewall is not running.
[root@oldboy ~]# ifconfig eth0|awk -F "[ :]+" 'NR==2 {print $4}'
10.0.0.100
[root@oldboy ~]# hostname
oldboy
[root@oldboy ~]# wget -O /etc/yum.repos.d/epel.repo http://mirrors.aliyun.com/repo/epel-6.repo
1安裝EPEL源
yum install epel-release -y
2安裝cobbler
yum install cobbler httpd rsync tftp-server xinetd dhcp python-ctypes cman pykickstart –y
3、rpm -ql cobbler # 查看安裝的文件,下面列出部分。
/etc/cobbler # 配置文件目錄
/etc/cobbler/settings # cobbler主配置文件,這個文件是YAML格式,Cobbler是python寫的程序。
/etc/cobbler/dhcp.template # DHCP服務的配置模板
/etc/cobbler/tftpd.template # tftp服務的配置模板
/etc/cobbler/rsync.template # rsync服務的配置模板
/etc/cobbler/iso # iso模板配置文件目錄
/etc/cobbler/pxe # pxe模板文件目錄
/etc/cobbler/power # 電源的配置文件目錄
/etc/cobbler/users.conf # Web服務授權配置文件
/etc/cobbler/users.digest # 用于web訪問的用戶名密碼配置文件
/etc/cobbler/dnsmasq.template # DNS服務的配置模板
/etc/cobbler/modules.conf # Cobbler模塊配置文件
/var/lib/cobbler # Cobbler數據目錄
/var/lib/cobbler/config # 配置文件
/var/lib/cobbler/kickstarts#默認存放kickstart文件
/var/lib/cobbler/loaders # 存放的各種引導程序
/var/www/cobbler # 系統安裝鏡像目錄
/var/www/cobbler/ks_mirror # 導入的系統鏡像列表
/var/www/cobbler/images # 導入的系統鏡像啟動文件
/var/www/cobbler/repo_mirror # yum源存儲目錄
/var/log/cobbler # 日志目錄
/var/log/cobbler/install.log # 客戶端系統安裝日志
/var/log/cobbler/cobbler.log # cobbler日志
  1. [root@linux-node1 ~]# /etc/init.d/httpd restart
  2. 停止 httpd:                                               [失敗]
  3. 正在啟動 httpd:                                           [確定]
  4. [root@linux-node1 ~]# /etc/init.d/cobblerd start
  5. Starting cobbler daemon:                                   [確定]
  6. [root@linux-node1 ~]# cobbler check  # 檢查Cobbler的配置,如果看不到下面的結果,再次執行/etc/init.d/cobblerd restart
  7. The following are potential configuration items that you may want to fix:
  8.
  9. 1 : The 'server' field in /etc/cobbler/settings must be set to something other than localhost, or kickstarting features will not work.  This should be a resolvable hostname or IP for the boot server as reachable by all machines that will use it.
  10. 2 : For PXE to be functional, the 'next_server' field in /etc/cobbler/settings must be set to something other than 127.0.0.1, and should match the IP of the boot server on the PXE network.
  11. 3 : some network boot-loaders are missing from /var/lib/cobbler/loaders, you may run 'cobbler get-loaders' to download them, or, if you only want to handle x86/x86_64 netbooting, you may ensure that you have installed a *recent* version of the syslinux package installed and can ignore this message entirely.  Files in this directory, should you want to support all architectures, should include pxelinux.0, menu.c32, elilo.efi, and yaboot. The 'cobbler get-loaders' command is the easiest way to resolve these requirements.
  12. 4 : change 'disable' to 'no' in /etc/xinetd.d/rsync
  13. 5 : debmirror package is not installed, it will be required to manage debian deployments and repositories
  14. 6 : The default password used by the sample templates for newly installed machines (default_password_crypted in /etc/cobbler/settings) is still set to 'cobbler' and should be changed, try: "openssl passwd -1 -salt 'random-phrase-here' 'your-password-here'" to generate new one
  15. 7 : fencing tools were not found, and are required to use the (optional) power management features. install cman or fence-agents to use them
  16.
  17. Restart cobblerd and then run 'cobbler sync' to apply changes.
  18.
  19. # 看著上面的結果,一個一個解決。
  20. # 第1、2、6個問題,順便修改其他功能
  21. [root@linux-node1 ~]# cp /etc/cobbler/settings{,.ori}  # 備份
  22.
  23. # server,Cobbler服務器的IP。
  24. sed -i 's/server: 127.0.0.1/server: 10.0.0.7/' /etc/cobbler/settings
  25.
  26. # next_server,如果用Cobbler管理DHCP,修改本項,作用不解釋,看kickstart。
  27. sed -i 's/next_server: 127.0.0.1/next_server: 10.0.0.7/' /etc/cobbler/settings
  28.
  29. # 用Cobbler管理DHCP
  30. sed -i 's/manage_dhcp: 0/manage_dhcp: 1/' /etc/cobbler/settings
  31.
  32. # 防止循環裝系統,適用于服務器第一啟動項是PXE啟動。
  33. sed -i 's/pxe_just_once: 0/pxe_just_once: 1/' /etc/cobbler/settings
  34.
  35. # 設置新裝系統的默認root密碼123456。下面的命令來源于提示6。random-phrase-here為干擾碼,可以自行設定。
  36. [root@linux-node1 ~]# openssl passwd -1 -salt 'oldboy' '123456'
  37. $1$oldboy$Npg9Pt9k98Mlg0ZeqHAuN1
  38. [root@linux-node1 ~]# vim /etc/cobbler/settings
  39. default_password_crypted: "$1$oldboy$Npg9Pt9k98Mlg0ZeqHAuN1"
  40.
  41. # 第3個問題
  42. [root@linux-node1 ~]# cobbler get-loaders  # 會自動從官網下載
  43. [root@linux-node1 ~]# cd /var/lib/cobbler/loaders/  # 下載的內容
  44. [root@linux-node1 loaders]# ls
  45. COPYING.elilo     COPYING.yaboot  grub-x86_64.efi  menu.c32    README
  46. COPYING.syslinux  elilo-ia64.efi  grub-x86.efi     pxelinux.0  yaboot
  47.
  48. # 第4個問題
  49. [root@linux-node1 ~]# vim /etc/xinetd.d/rsync
  50. disable = no
  51. [root@linux-node1 ~]# /etc/init.d/xinetd restart
  52. 停止 xinetd:                                              [確定]
  53. 正在啟動 xinetd:                                          [確定]
  54.
  55. [root@linux-node1 ~]# /etc/init.d/cobblerd restart
  56. Stopping cobbler daemon:                                   [確定]
  57. Starting cobbler daemon:                                   [確定]
  58. [root@linux-node1 ~]# cobbler check
  59. The following are potential configuration items that you may want to fix:
  60.
  61. 1 : debmirror package is not installed, it will be required to manage debian deployments and repositories  # 和debian系統相關,不需要
  62. 2 : fencing tools were not found, and are required to use the (optional) power management features. install cman or fence-agents to use them # fence設備相關,不需要
  63. Restart cobblerd and then run 'cobbler sync' to apply changes.

  1. 配置DHCP
  1. # 修改cobbler的dhcp模版,不要直接修改dhcp本身的配置文件,因為cobbler會覆蓋。
  2.
  3. [root@linux-node1 ~]# vim /etc/cobbler/dhcp.template
  4. # 僅列出修改過的字段
  5. ……
  6. subnet 10.0.0.0 netmask 255.255.255.0 {
  7.      option routers             10.0.0.2;
  8.      option domain-name-servers 10.0.0.2;
  9.      option subnet-mask         255.255.255.0;
  10.      range dynamic-bootp        10.0.0.100 10.0.0.200;
  11. ……
5、同步cobbler配置
  1. # 同步最新cobbler配置,它會根據配置自動修改dhcp等服務。
  2. [root@linux-node1 ~]# cobbler sync   # 同步所有配置,可以仔細看一下sync做了什么。
  3. task started: 2015-12-03_204822_sync
  4. task started (id=Sync, time=Thu Dec  3 20:48:22 2015)
  5. running pre-sync triggers
  6. cleaning trees
  7. removing: /var/lib/tftpboot/pxelinux.cfg/default
  8. removing: /var/lib/tftpboot/grub/images
  9. copying bootloaders
  10. trying hardlink /var/lib/cobbler/loaders/pxelinux.0 -> /var/lib/tftpboot/pxelinux.0
  11. copying: /var/lib/cobbler/loaders/pxelinux.0 -> /var/lib/tftpboot/pxelinux.0
  12. trying hardlink /var/lib/cobbler/loaders/menu.c32 -> /var/lib/tftpboot/menu.c32
  13. trying hardlink /var/lib/cobbler/loaders/yaboot -> /var/lib/tftpboot/yaboot
  14. trying hardlink /usr/share/syslinux/memdisk -> /var/lib/tftpboot/memdisk
  15. trying hardlink /var/lib/cobbler/loaders/grub-x86.efi -> /var/lib/tftpboot/grub/grub-x86.efi
  16. trying hardlink /var/lib/cobbler/loaders/grub-x86_64.efi -> /var/lib/tftpboot/grub/grub-x86_64.efi
  17. copying distros to tftpboot
  18. copying images
  19. generating PXE configuration files
  20. generating PXE menu structure
  21. rendering DHCP files
  22. generating /etc/dhcp/dhcpd.conf
  23. rendering TFTPD files
  24. generating /etc/xinetd.d/tftp
  25. cleaning link caches
  26. running post-sync triggers
  27. running python triggers from /var/lib/cobbler/triggers/sync/post/*
  28. running python trigger cobbler.modules.sync_post_restart_services
  29. running: dhcpd -t -q
  30. received on stdout:
  31. received on stderr:
  32. running: service dhcpd restart
  33. received on stdout: 關閉 dhcpd:[確定]
  34. 正在啟動 dhcpd:[確定]
  35.
  36. received on stderr:
  37. running shell triggers from /var/lib/cobbler/triggers/sync/post/*
  38. running python triggers from /var/lib/cobbler/triggers/change/*
  39. running python trigger cobbler.modules.scm_track
  40. running shell triggers from /var/lib/cobbler/triggers/change/*
  41. *** TASK COMPLETE ***
  42.
  43. # 再看一下dhcp的配置文件。
  44. [root@linux-node1 ~]# less /etc/dhcp/dhcpd.conf
  45. # ******************************************************************
  46. # Cobbler managed dhcpd.conf file
  47. # generated from cobbler dhcp.conf template (Thu Dec  3 12:48:23 2015)
  48. # Do NOT make changes to /etc/dhcpd.conf. Instead, make your changes
  49. # in /etc/cobbler/dhcp.template, as /etc/dhcpd.conf will be
  50. # overwritten.
  51. # ******************************************************************
  52.
  53. ddns-update-style interim;
  54. …………
6、開機啟動
1. # 啟動相關服務并設置開機啟動(可選) 與第二種方法二選一
2. chkconfig httpd on
3. chkconfig xinetd on
4. chkconfig cobblerd on
5. chkconfig dhcpd on
6. /etc/init.d/httpd restart
7. /etc/init.d/xinetd restart
8. /etc/init.d/cobblerd restart
9. /etc/init.d/dhcpd restart
1. 編寫Cobbler相關服務啟動腳本(可選)
2. cat >>/etc/init.d/cobbler<<EOF
3. #!/bin/bash
4. # chkconfig: 345 80 90
5. # description:cobbler
6.
7. case \$1 in
8. start)
9. /etc/init.d/httpd start
10. /etc/init.d/xinetd start
11. /etc/init.d/dhcpd start
12. /etc/init.d/cobblerd start
13. ;;
14.
15. stop)
16. /etc/init.d/httpd stop
17. /etc/init.d/xinetd stop
18. /etc/init.d/dhcpd stop
19. /etc/init.d/cobblerd stop
20. ;;
21.
22. restart)
23. /etc/init.d/httpd restart
24. /etc/init.d/xinetd restart
25. /etc/init.d/dhcpd restart
26. /etc/init.d/cobblerd restart
27. ;;
28.
29. status)
30. /etc/init.d/httpd status
31. /etc/init.d/xinetd status
32. /etc/init.d/dhcpd status
33. /etc/init.d/cobblerd status
34. ;;
35.
36. sync)
37. cobbler sync
38. ;;
39.
40. *)
41. echo "Input error,please in put 'start|stop|restart|status|sync'!"
42. exit 2
43. ;;
44.
45. esac
46. EOF
47.
48. # chmod +x /etc/init.d/cobbler
49. # chkconfig cobbler on7、Cobbler的命令行管理導入鏡像
1. [root@linux-node1 ~]# cobbler
2. usage
3. =====
4. cobbler <distro|profile|system|repo|image|mgmtclass|package|file> ...
5. [add|edit|copy|getks*|list|remove|rename|report] [options|--help]
6. cobbler <aclsetup|buildiso|import|list|replicate|report|reposync|sync|validateks|version|signature|get-loaders|hardlink> [options|--help]
7. [root@linux-node1 ~]# cobbler import --help # 導入鏡像
8. Usage: cobbler [options]
9.
10. Options:
11. -h, --help show this help message and exit
12. --arch=ARCH OS architecture being imported
13. --breed=BREED the breed being imported
14. --os-version=OS_VERSION
15. the version being imported
16. --path=PATH local path or rsync location
17. --name=NAME name, ex 'RHEL-5'
18. --available-as=AVAILABLE_AS
19. tree is here, don't mirror
20. --kickstart=KICKSTART_FILE
21. assign this kickstart file
22. --rsync-flags=RSYNC_FLAGS
23. pass additional flags to rsync
24.
25. cobbler check 核對當前設置是否有問題
26. cobbler list 列出所有的cobbler元素
27. cobbler report 列出元素的詳細信息
28. cobbler sync 同步配置到數據目錄,更改配置最好都要執行下
29. cobbler reposync 同步yum倉庫
30. cobbler distro 查看導入的發行版系統信息
31. cobbler system 查看添加的系統信息
32. cobbler profile 查看配置信息
1. 導入鏡像
1. [root@linux-node1 ~]# mount /dev/cdrom /mnt/ # 掛載CentOS7的系統鏡像。
2. # 導入系統鏡像
3. [root@linux-node1 ~]# cobbler import --path=/mnt/ --name=CentOS-7.1-x86_64 --arch=x86_64
4. # --path 鏡像路徑
5. # --name 為安裝源定義一個名字
6. # --arch 指定安裝源是32位、64位、ia64, 目前支持的選項有: x86│x86_64│ia64
7. # 安裝源的唯一標示就是根據name參數來定義,本例導入成功后,安裝源的唯一標示就是:CentOS-7.1-x86_64,如果重復,系統會提示導入失敗。
8.
9. [root@linux-node1 ~]# cobbler distro list # 查看鏡像列表
10. CentOS-7.1-x86_64
11.
12. # 鏡像存放目錄,cobbler會將鏡像中的所有安裝文件拷貝到本地一份,放在/var/www/cobbler/ks_mirror下的CentOS-7.1-x86_64目錄下。因此/var/www/cobbler目錄必須具有足夠容納安裝文件的空間。
13. [root@linux-node1 ~]# cd /var/www/cobbler/ks_mirror/
14. [root@linux-node1 ks_mirror]# ls
15. CentOS-7.1-x86_64 config
16. [root@linux-node1 ks_mirror]# ls CentOS-7.1-x86_64/
17. CentOS_BuildTag GPL LiveOS RPM-GPG-KEY-CentOS-7
18. EFI images Packages RPM-GPG-KEY-CentOS-Testing-7
19. EULA isolinux repodata TRANS.TBL
1. 指定ks.cfg文件及調整內核參數
查看默認配置
1. # Cobbler的ks.cfg文件存放位置
2. [root@linux-node1 ks_mirror]# cd /var/lib/cobbler/kickstarts/
3. [root@linux-node1 kickstarts]# ls # 自帶很多
4. default.ks install_profiles sample_autoyast.xml sample_esxi4.ks sample_old.seed
5. esxi4-ks.cfg legacy.ks sample_end.ks(默認使用的ks文件) sample_esxi5.ks sample.seed
6. esxi5-ks.cfg pxerescue.ks sample_esx4.ks sample.ks
上傳自定義的ks文件
1. [root@linux-node1 kickstarts]# rz # 上傳準備好的ks文件
2. rz waiting to receive.
3. Starting zmodem transfer. Press Ctrl+C to cancel.
4. Transferring Cobbler-CentOS-7.1-x86_64.cfg...
5. 100% 1 KB 1 KB/sec 00:00:01 0 Errors
6.
7. [root@linux-node1 kickstarts]# mv Cobbler-CentOS-7.1-x86_64.cfg CentOS-7.1-x86_64.cfg
8.
9. # 在第一次導入系統鏡像后,Cobbler會給鏡像指定一個默認的kickstart自動安裝文件在/var/lib/cobbler/kickstarts下的sample_end.ks。
查看導入鏡像設置及同步
1. [root@linux-node1 ~]# cobbler list
2. distros:
3. CentOS-7.1-x86_64
4.
5. profiles:
6. CentOS-7.1-x86_64
7.
8. systems:
9.
10. repos:
11.
12. images:
13.
14. mgmtclasses:
15.
16. packages:
17.
18. files:
19.
20. # 查看安裝鏡像文件信息
21. [root@linux-node1 ~]# cobbler distro report --name=CentOS-7.1-x86_64
22. Name : CentOS-7.1-x86_64
23. Architecture : x86_64
24. TFTP Boot Files : {}
25. Breed : redhat
26. Comment :
27. Fetchable Files : {}
28. Initrd : /var/www/cobbler/ks_mirror/CentOS-7.1-x86_64/images/pxeboot/initrd.img
29. Kernel : /var/www/cobbler/ks_mirror/CentOS-7.1-x86_64/images/pxeboot/vmlinuz
30. Kernel Options : {}
31. Kernel Options (Post Install) : {}
32. Kickstart Metadata : {'tree': 'http://@@http_server@@/cblr/links/CentOS-7.1-x86_64'}
33. Management Classes : []
34. OS Version : rhel7
35. Owners : ['admin']
36. Red Hat Management Key : <<inherit>>
37. Red Hat Management Server : <<inherit>>
38. Template Files : {}
39.
40. # 查看所有的profile設置
41. [root@linux-node1 ~]# cobbler profile report
42.
43. # 查看指定的profile設置
44. [root@linux-node1 ~]# cobbler profile report --name=CentOS-7.1-x86_64
45. Name : CentOS-7.1-x86_64
46. TFTP Boot Files : {}
47. Comment :
48. DHCP Tag : default
49. Distribution : CentOS-7.1-x86_64
50. Enable gPXE? : 0
51. Enable PXE Menu? : 1
52. Fetchable Files : {}
53. Kernel Options : {}
54. Kernel Options (Post Install) : {}
55. Kickstart : /var/lib/cobbler/kickstarts/sample_end.ks -->默認ks文件
56. Kickstart Metadata : {}
57. Management Classes : []
58. Management Parameters : <<inherit>>
59. Name Servers : []
60. Name Servers Search Path : []
61. Owners : ['admin']
62. Parent Profile :
63. Internal proxy :
64. Red Hat Management Key : <<inherit>>
65. Red Hat Management Server : <<inherit>>
66. Repos : []
67. Server Override : <<inherit>>
68. Template Files : {}
69. Virt Auto Boot : 1
70. Virt Bridge : xenbr0
71. Virt CPUs : 1
72. Virt Disk Driver Type : raw
73. Virt File Size(GB) : 5
74. Virt Path :
75. Virt RAM (MB) : 512
76. Virt Type : kvm
77.
78. # 編輯profile,修改關聯的ks文件
79. [root@linux-node1 ~]# cobbler profile edit --name=CentOS-7.1-x86_64 --kickstart=/var/lib/cobbler/kickstarts/CentOS-7.1-x86_64.cfg
80.
81. # 修改安裝系統的內核參數,在CentOS7系統有一個地方變了,就是網卡名變成eno16777736這種形式,但是為了運維標準化,我們需要將它變成我們常用的eth0,因此使用下面的參數。但要注意是CentOS7才需要下面的步驟,CentOS6不需要。
82. [root@linux-node1 ~]# cobbler profile edit --name=CentOS-7.1-x86_64 --kopts='net.ifnames=0 biosdevname=0'
83.
84. [root@linux-node1 ~]# cobbler profile report CentOS-7.1-x86_64
85. Name : CentOS-7.1-x86_64
86. TFTP Boot Files : {}
87. Comment :
88. DHCP Tag : default
89. Distribution : CentOS-7.1-x86_64
90. Enable gPXE? : 0
91. Enable PXE Menu? : 1
92. Fetchable Files : {}
93. Kernel Options : {'biosdevname': '0', 'net.ifnames': '0'}
94. Kernel Options (Post Install) : {}
95. Kickstart : /var/lib/cobbler/kickstarts/CentOS-7.1-x86_64.cfg
96. Kickstart Metadata : {}
97. Management Classes : []
98. Management Parameters : <<inherit>>
99. Name Servers : []
100. Name Servers Search Path : []
101. Owners : ['admin']
102. Parent Profile :
103. Internal proxy :
104. Red Hat Management Key : <<inherit>>
105. Red Hat Management Server : <<inherit>>
106. Repos : []
107. Server Override : <<inherit>>
108. Template Files : {}
109. Virt Auto Boot : 1
110. Virt Bridge : xenbr0
111. Virt CPUs : 1
112. Virt Disk Driver Type : raw
113. Virt File Size(GB) : 5
114. Virt Path :
115. Virt RAM (MB) : 512
116. Virt Type : kvm
117.
118. # 每次修改完都要同步一次
119. [root@linux-node1 ~]# cobbler sync新建一臺虛擬機,不解釋,開機就可以看到下面的圖片
[root@linux-node1 ~]# cobbler sync # 修改配置都要同步
拓展ks.cfg文件解析
定制化安裝
指定某臺服務器使用指定ks文件
分一臺服務器的最簡單的方法就是物理MAC地址。
物理服務器的MAC地址在服務器上的標簽上寫了。
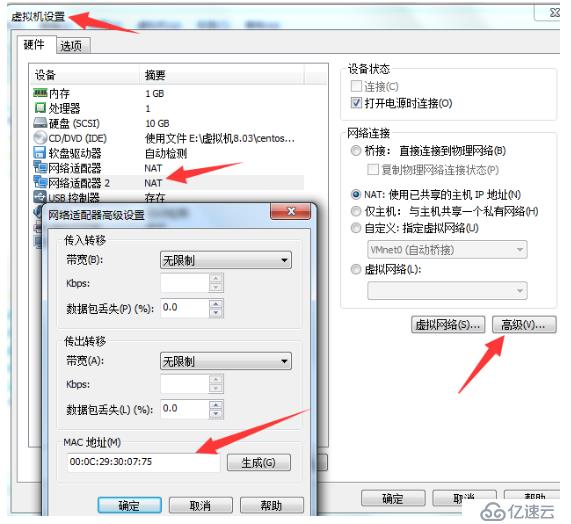
虛擬機的MAC查看
[root@linux-node1 ~]# cobbler sync
下次在開機或重啟就會自動安裝了
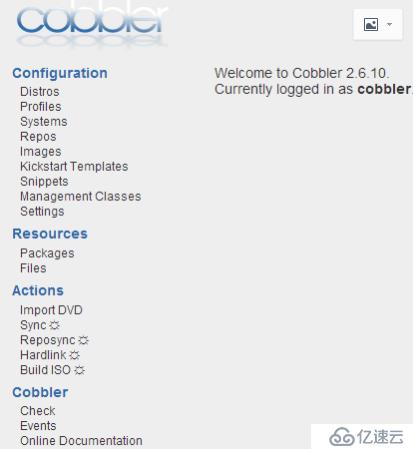
Cobbler的Web管理界面的安裝與配置
已經安裝cobbler-web軟件的環境下。
訪問網址:http://10.0.0.100/cobbler_web和https://10.0.0.100/cobbler_web
默認用戶名:cobbler
默認密碼 :cobbler
溫馨提示:安裝的系統內存要2G以上哦
免責聲明:本站發布的內容(圖片、視頻和文字)以原創、轉載和分享為主,文章觀點不代表本網站立場,如果涉及侵權請聯系站長郵箱:is@yisu.com進行舉報,并提供相關證據,一經查實,將立刻刪除涉嫌侵權內容。