您好,登錄后才能下訂單哦!
您好,登錄后才能下訂單哦!
整個環境的結構圖。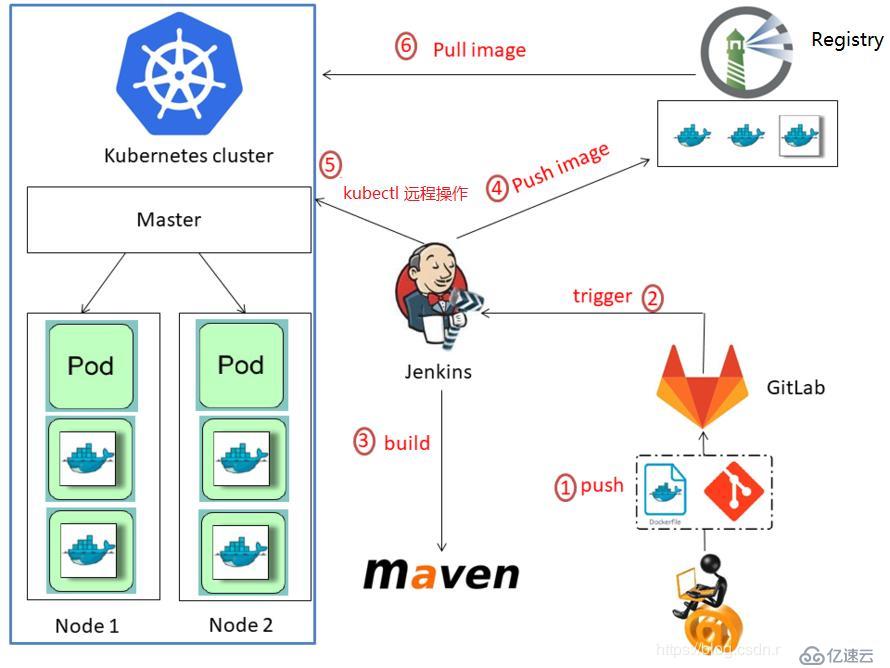
gitlab和harbor我是安裝在kubernetes集群外的一臺主機上的。
[root@support harbor]# cat /etc/yum.repos.d/docker-ce.repo
[docker-ce-stable]
name=Docker CE Stable - $basearch
baseurl=https://mirrors.aliyun.com/docker-ce/linux/centos/7/$basearch/stable
enabled=1
gpgcheck=1
gpgkey=https://mirrors.aliyun.com/docker-ce/linux/centos/gpg

[docker-ce-stable-debuginfo]
name=Docker CE Stable - Debuginfo $basearch
baseurl=https://mirrors.aliyun.com/docker-ce/linux/centos/7/debug-$basearch/stable
enabled=0
gpgcheck=1
gpgkey=https://mirrors.aliyun.com/docker-ce/linux/centos/gpg

[docker-ce-stable-source]
name=Docker CE Stable - Sources
baseurl=https://mirrors.aliyun.com/docker-ce/linux/centos/7/source/stable
enabled=0
gpgcheck=1
gpgkey=https://mirrors.aliyun.com/docker-ce/linux/centos/gpg
[root@support yum.repos.d]# yum install -y docker-ce-18.09.7
[root@support yum.repos.d]# yum install -y docker-compose
[root@support yum.repos.d]# git
[root@support yum.repos.d]# cat /etc/docker/daemon.json
{"registry-mirrors": ["http://f1361db2.m.daocloud.io"]}
[root@support yum.repos.d]# systemctl start docker[root@support yum.repos.d]# wget -b https://storage.googleapis.com/harbor-releases/release-1.9.0/harbor-offline-installer-v1.9.0.tgz
Continuing in background, pid 9771.
Output will be written to ‘wget-log’.
[root@support ~]# tar zxf harbor-offline-installer-v1.9.0.tgz
[root@support ~]# cd harbor
[root@support harbor]# vi harbor.yml
hostname: 139.9.134.177
http:
port: 8080[root@support harbor]# ./prepare
[root@support harbor]# ./install.sh
[root@support harbor]# docker-compose ps
Name Command State Ports
-------------------------------------------------------------------------------------
harbor-core /harbor/harbor_core Up
harbor-db /docker-entrypoint.sh Up 5432/tcp
harbor-jobservice /harbor/harbor_jobservice Up
...
harbor-log /bin/sh -c /usr/local/bin/ Up 127.0.0.1:1514->10514/tcp
...
harbor-portal nginx -g daemon off; Up 8080/tcp
nginx nginx -g daemon off; Up 0.0.0.0:8080->8080/tcp
redis redis-server /etc/redis.conf Up 6379/tcp
registry /entrypoint.sh /etc/regist Up 5000/tcp
...
registryctl /harbor/start.sh Up [root@support yum.repos.d]# docker pull gitlab/gitlab-ce
Using default tag: latest
latest: Pulling from gitlab/gitlab-ce
16c48d79e9cc: Pull complete
3c654ad3ed7d: Pull complete
6276f4f9c29d: Pull complete
a4bd43ad48ce: Pull complete
075ff90164f7: Pull complete
8ed147de678c: Pull complete
c6b08aab9197: Pull complete
6c15d9b5013c: Pull complete
de3573fbdb09: Pull complete
4b6e8211dc80: Verifying Checksum
latest: Pulling from gitlab/gitlab-ce
16c48d79e9cc: Pull complete
3c654ad3ed7d: Pull complete
6276f4f9c29d: Pull complete
a4bd43ad48ce: Pull complete
075ff90164f7: Pull complete
8ed147de678c: Pull complete
c6b08aab9197: Pull complete
6c15d9b5013c: Pull complete
de3573fbdb09: Pull complete
4b6e8211dc80: Pull complete
Digest: sha256:eee5fc2589f9aa3cd4c1c1783d5b89667f74c4fc71c52df54660c12cc493011b
Status: Downloaded newer image for gitlab/gitlab-ce:latest
docker.io/gitlab/gitlab-ce:latest
[root@support yum.repos.d]#[root@bogon /]# docker run --detach \
--hostname 139.9.134.177 \
--publish 10443:443 --publish 10080:80 --publish 10022:22 \
--name gitlab \
--restart always \
--volume /opt/gitlab/config:/etc/gitlab \
--volume /opt/gitlab/logs:/var/log/gitlab \
--volume /opt/gitlab/data:/var/opt/gitlab \
gitlab/gitlab-ce:latestgit倉庫初始化
git init --bare
git clone yum install jenkins -y
java -version
tail -f /var/log/jenkins/jenkins.log
log中輸出jenkins網頁端初始化密碼。github上的kubernetes集群部署 jenkins
https://github.com/jenkinsci/kubernetes-plugin/blob/master/src/main/kubernetes/jenkins.yml
NFS服務準備
# yum安裝nfs-utils
[root@support ~]# yum install -y nfs-utils
[root@support ~]# mkdir /ifs/kubernetes
[root@support ~]# cat /etc/exports
# 提供共享目錄給10.0.0.0網段主機
/ifs/kubernetes 10.0.0.0/24(rw,no_root_squash)
[root@support ~]# systemctl start nfs
[root@support ~]# exportfs -arv
exporting 10.0.0.0/24:/ifs/kubernetes[root@master jenkins]# cat nfs.yaml
kind: ClusterRole
apiVersion: rbac.authorization.k8s.io/v1
metadata:
name: nfs-client-provisioner-runner
rules:
- apiGroups: [""]
resources: ["persistentvolumes"]
verbs: ["get", "list", "watch", "create", "delete"]
- apiGroups: [""]
resources: ["persistentvolumeclaims"]
verbs: ["get", "list", "watch", "update"]
- apiGroups: ["storage.k8s.io"]
resources: ["storageclasses"]
verbs: ["get", "list", "watch"]
- apiGroups: [""]
resources: ["events"]
verbs: ["create", "update", "patch"]
---
kind: ClusterRoleBinding
apiVersion: rbac.authorization.k8s.io/v1
metadata:
name: run-nfs-client-provisioner
subjects:
- kind: ServiceAccount
name: nfs-client-provisioner
namespace: default
roleRef:
kind: ClusterRole
name: nfs-client-provisioner-runner
apiGroup: rbac.authorization.k8s.io
---
kind: Role
apiVersion: rbac.authorization.k8s.io/v1
metadata:
name: leader-locking-nfs-client-provisioner
rules:
- apiGroups: [""]
resources: ["endpoints"]
verbs: ["get", "list", "watch", "create", "update", "patch"]
---
kind: RoleBinding
apiVersion: rbac.authorization.k8s.io/v1
metadata:
name: leader-locking-nfs-client-provisioner
subjects:
- kind: ServiceAccount
name: nfs-client-provisioner
# replace with namespace where provisioner is deployed
namespace: default
roleRef:
kind: Role
name: leader-locking-nfs-client-provisioner
apiGroup: rbac.authorization.k8s.io
---
kind: StorageClass
apiVersion: storage.k8s.io/v1
metadata:
name: managed-nfs-storage
provisioner: fuseim.pri/ifs # or choose another name, must match deployment's env PROVISIONER_NAME'
parameters:
archiveOnDelete: "true"
---
kind: ServiceAccount
apiVersion: v1
metadata:
name: nfs-client-provisioner
---
kind: Deployment
apiVersion: apps/v1
metadata:
name: nfs-client-provisioner
spec:
replicas: 1
strategy:
type: Recreate
selector:
matchLabels:
app: nfs-client-provisioner
template:
metadata:
labels:
app: nfs-client-provisioner
spec:
serviceAccountName: nfs-client-provisioner
containers:
- name: nfs-client-provisioner
image: lizhenliang/nfs-client-provisioner:latest
volumeMounts:
- name: nfs-client-root
mountPath: /persistentvolumes
env:
- name: PROVISIONER_NAME
value: fuseim.pri/ifs
- name: NFS_SERVER
value: 10.0.0.123
- name: NFS_PATH
value: /ifs/kubernetes
volumes:
- name: nfs-client-root
nfs:
server: 10.0.0.123
path: /ifs/kubernetes
[root@master jenkins]## 創建PV動態供給
root@master jenkins]# kubectl apply -f nfs.yamljenkins-master調度到K8S的master節點。

[root@master jenkins]# cat jenkins.yaml
apiVersion: v1
kind: Service
metadata:
  name: jenkins
spec:
  selector:
    name: jenkins
  type: NodePort
  ports:
    -
      name: http
      port: 80
      targetPort: 8080
      protocol: TCP
      nodePort: 30006
    -
      name: agent
      port: 50000
      protocol: TCP

---

apiVersion: v1
kind: ServiceAccount
metadata:
  name: jenkins

---

kind: Role
apiVersion: rbac.authorization.k8s.io/v1
metadata:
  name: jenkins
rules:
- apiGroups: [""]
  resources: ["pods"]
  verbs: ["create","delete","get","list","patch","update","watch"]
- apiGroups: [""]
  resources: ["pods/exec"]
  verbs: ["create","delete","get","list","patch","update","watch"]
- apiGroups: [""]
  resources: ["pods/log"]
  verbs: ["get","list","watch"]
- apiGroups: [""]
  resources: ["secrets"]
  verbs: ["get"]

---

apiVersion: rbac.authorization.k8s.io/v1
kind: RoleBinding
metadata:
  name: jenkins
roleRef:
  apiGroup: rbac.authorization.k8s.io
  kind: Role
  name: jenkins
subjects:
- kind: ServiceAccount
  name: jenkins

---

apiVersion: apps/v1
kind: StatefulSet
metadata:
  name: jenkins
  labels:
    name: jenkins
spec:
  serviceName: jenkins
  replicas: 1
  updateStrategy:
    type: RollingUpdate
  selector:
    matchLabels:
      name: jenkins
  template:
    metadata:
      name: jenkins
      labels:
        name: jenkins
    spec:
      terminationGracePeriodSeconds: 10
      serviceAccountName: jenkins
      # 調度到主節點上
      nodeSelector:
        labelName: master
      # 容忍主節點污點
      tolerations:
      - key: node-role.kubernetes.io/master
        effect: NoSchedule
      containers:
        - name: jenkins
          image: jenkins/jenkins:lts-alpine
          imagePullPolicy: Always
          ports:
            - containerPort: 8080
            - containerPort: 50000
          env:
            - name: LIMITS_MEMORY
              valueFrom:
                resourceFieldRef:
                  resource: limits.memory
                  divisor: 1Mi
            - name: JAVA_OPTS
              value: -Xmx$(LIMITS_MEMORY)m -XshowSettings:vm -Dhudson.slaves.NodeProvisioner.initialDelay=0 -Dhudson.slaves.NodeProvisioner.MARGIN=50 -Dhudson.slaves.NodeProvisioner.MARGIN0=0.85
          volumeMounts:
            - name: jenkins-home
              mountPath: /var/jenkins_home
          livenessProbe:
            httpGet:
              path: /login
              port: 8080
            initialDelaySeconds: 60
            timeoutSeconds: 5
            failureThreshold: 12
          readinessProbe:
            httpGet:
              path: /login
              port: 8080
            initialDelaySeconds: 60
            timeoutSeconds: 5
            failureThreshold: 12
      securityContext:
        fsGroup: 1000
  volumeClaimTemplates:
  - metadata:
      name: jenkins-home
    spec:
      storageClassName: "managed-nfs-storage"
      accessModes: [ "ReadWriteOnce" ]
      resources:
        requests:
          storage: 1Gi
# 創建jenkins Pod
root@master jenkins]# kubectl apply -f jenkins.yaml
# 打開瀏覽器訪問jenkins地址
http://139.9.139.49:30006/
# 卡在啟動界面好久
[root@support default-jenkins-home-jenkins-0-pvc-ea84462f-241e-4d38-a408-e07a59d4bf0e]# cat hudson.model.UpdateCenter.xml
<?xml version='1.1' encoding='UTF-8'?>
<sites>
<site>
<id>default</id>
<url>http://mirror.xmission.com/jenkins/updates/update-center.json</url>
</site>
</sites>在jenkins中安裝插件 系統管理 --> 插件管理
Git plugin        git
GitLab Plugin     gitlab
Kubernetes plugin 動態創建代理
Pipeline          流水線
Email Extension   郵件擴展
安裝插件實在太慢。幾kb每秒 ╮( ̄▽ ̄)╭
我們有一個思路解決這個問題 []~( ̄▽ ̄)~*
使用清華大學鏡像地址https://mirrors.tuna.tsinghua.edu.cn/jenkins/updates/update-center.json
1.進入jenkins系統管理
2.進入插件管理(Manage Plugins)
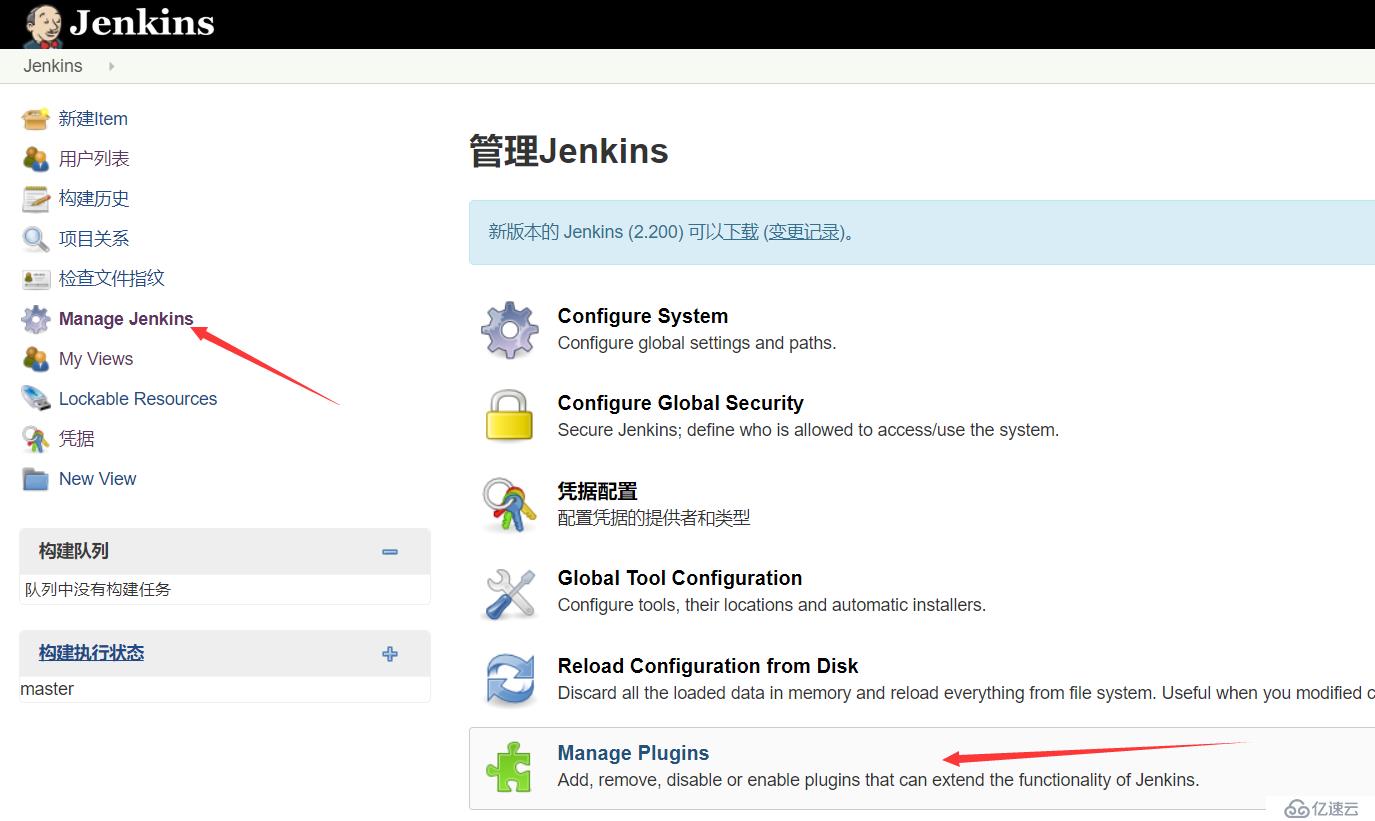
-- > 高級 -- > 升級站點
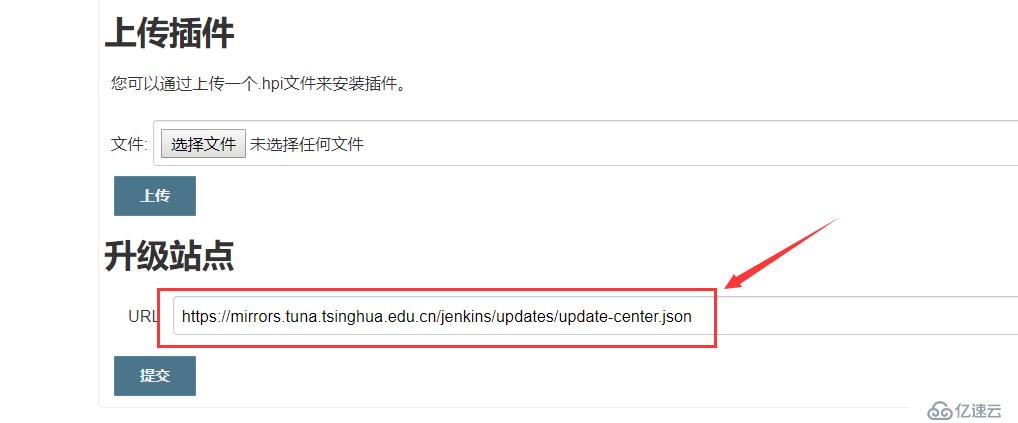
https://mirrors.tuna.tsinghua.edu.cn/jenkins/updates/update-center.json 這個文件里面 包含了所有插件的更新地址,清華把這個文件拿過來了,但是沒有把里面的插件升級地址改成清華。下載插件還是要到國外主機去下載,這樣只會獲取更新信息快,實際下載插件慢的一批。
curl -vvvv  http://updates.jenkins-ci.org/download/plugins/ApicaLoadtest/1.10/ApicaLoadtest.hpi
302到
http://mirrors.jenkins-ci.org/plugins/ApicaLoadtest/1.10/ApicaLoadtest.hpi
又重定向到一個ftp地址分流。

清華的地址是:
https://mirrors.tuna.tsinghua.edu.cn/jenkins/plugins/ApicaLoadtest/1.10/ApicaLoadtest.hpi
只要把mirrors.jenkins-ci.org 代理到 mirrors.tuna.tsinghua.edu.cn/jenkins 即可。綁定 mirrors.jenkins-ci.org 域名到本機 /etc/hosts 中
[root@support nginx]# cat /etc/hosts
127.0.0.1 mirrors.jenkins-ci.org
nginx反向代理至清華的jenkins插件下載地址
[root@support ~]# cat /etc/nginx/nginx.conf
user nginx;
worker_processes auto;
error_log /var/log/nginx/error.log;
pid /run/nginx.pid;

include /usr/share/nginx/modules/*.conf;

events {
    worker_connections 1024;
}

http {

    access_log  /var/log/nginx/access.log;

    sendfile            on;
    tcp_nopush          on;
    tcp_nodelay         on;
    keepalive_timeout   65;
    types_hash_max_size 2048;

    include             /etc/nginx/mime.types;
    default_type        application/octet-stream;

    server
    {
        listen 80;
        server_name mirrors.jenkins-ci.org;
        root    /usr/share/nginx/html;

        location / {
            proxy_redirect off;
            proxy_pass https://mirrors.tuna.tsinghua.edu.cn/jenkins/;
            proxy_set_header X-Real-IP $remote_addr;
            proxy_set_header X-Forwarded-For $proxy_add_x_forwarded_for;
            proxy_set_header Accept-Encoding "";
            proxy_set_header Accept-Language "zh-CN";
        }
        index index.html index.htm index.php;

        location ~ /\.
        {
            deny all;
        }

    }

}
最后我們來看一下nginx訪問日志。從本機發送的jenkins下載插件的請求全部轉發到清華鏡像源了。
127.0.0.1 - - [14/Oct/2019:23:40:32 +0800] "GET /plugins/kubernetes-credentials/0.4.1/kubernetes-credentials.hpi HTTP/1.1" 200 17893 "-" "Java/1.8.0_222"
127.0.0.1 - - [14/Oct/2019:23:40:37 +0800] "GET /plugins/variant/1.3/variant.hpi HTTP/1.1" 200 10252 "-" "Java/1.8.0_222"
127.0.0.1 - - [14/Oct/2019:23:40:40 +0800] "GET /plugins/kubernetes-client-api/4.6.0-2/kubernetes-client-api.hpi HTTP/1.1" 200 11281634 "-" "Java/1.8.0_222"
127.0.0.1 - - [14/Oct/2019:23:40:42 +0800] "GET /plugins/kubernetes/1.20.0/kubernetes.hpi HTTP/1.1" 200 320645 "-" "Java/1.8.0_222"
127.0.0.1 - - [14/Oct/2019:23:40:45 +0800] "GET /plugins/git/3.12.1/git.hpi HTTP/1.1" 200 2320552 "-" "Java/1.8.0_222"
127.0.0.1 - - [14/Oct/2019:23:40:47 +0800] "GET /plugins/gitlab-plugin/1.5.13/gitlab-plugin.hpi HTTP/1.1" 200 8456411 "-" "Java/1.8.0_222"
按照推薦做法,發現速度太快了,基本上秒下 ( ̄ˇ ̄) 網上的大部分教程只做到第一步,設置完了,有時候能加速,有時候不能,這才是真正的最終解決方案。
當然為了做到這一步踩了一晚上的坑,首先在K8S中以pod部署的jenkins不能用這種代理方式。在苦試無果后,我只能非常粗暴的在NFS服務器上安裝了一個同版本的jenkins,實測發現pod中的本地持久目錄/var/jenkins_home所對應的路徑中的文件直接拷貝至/var/lib/jenkins中,這個新jenkins的運行狀態與pod中的jenkins一致。所以在新jenkins下載插件后,將插件目錄/var/lib/jenkins/plugins直接拷貝進pod持久卷即可。
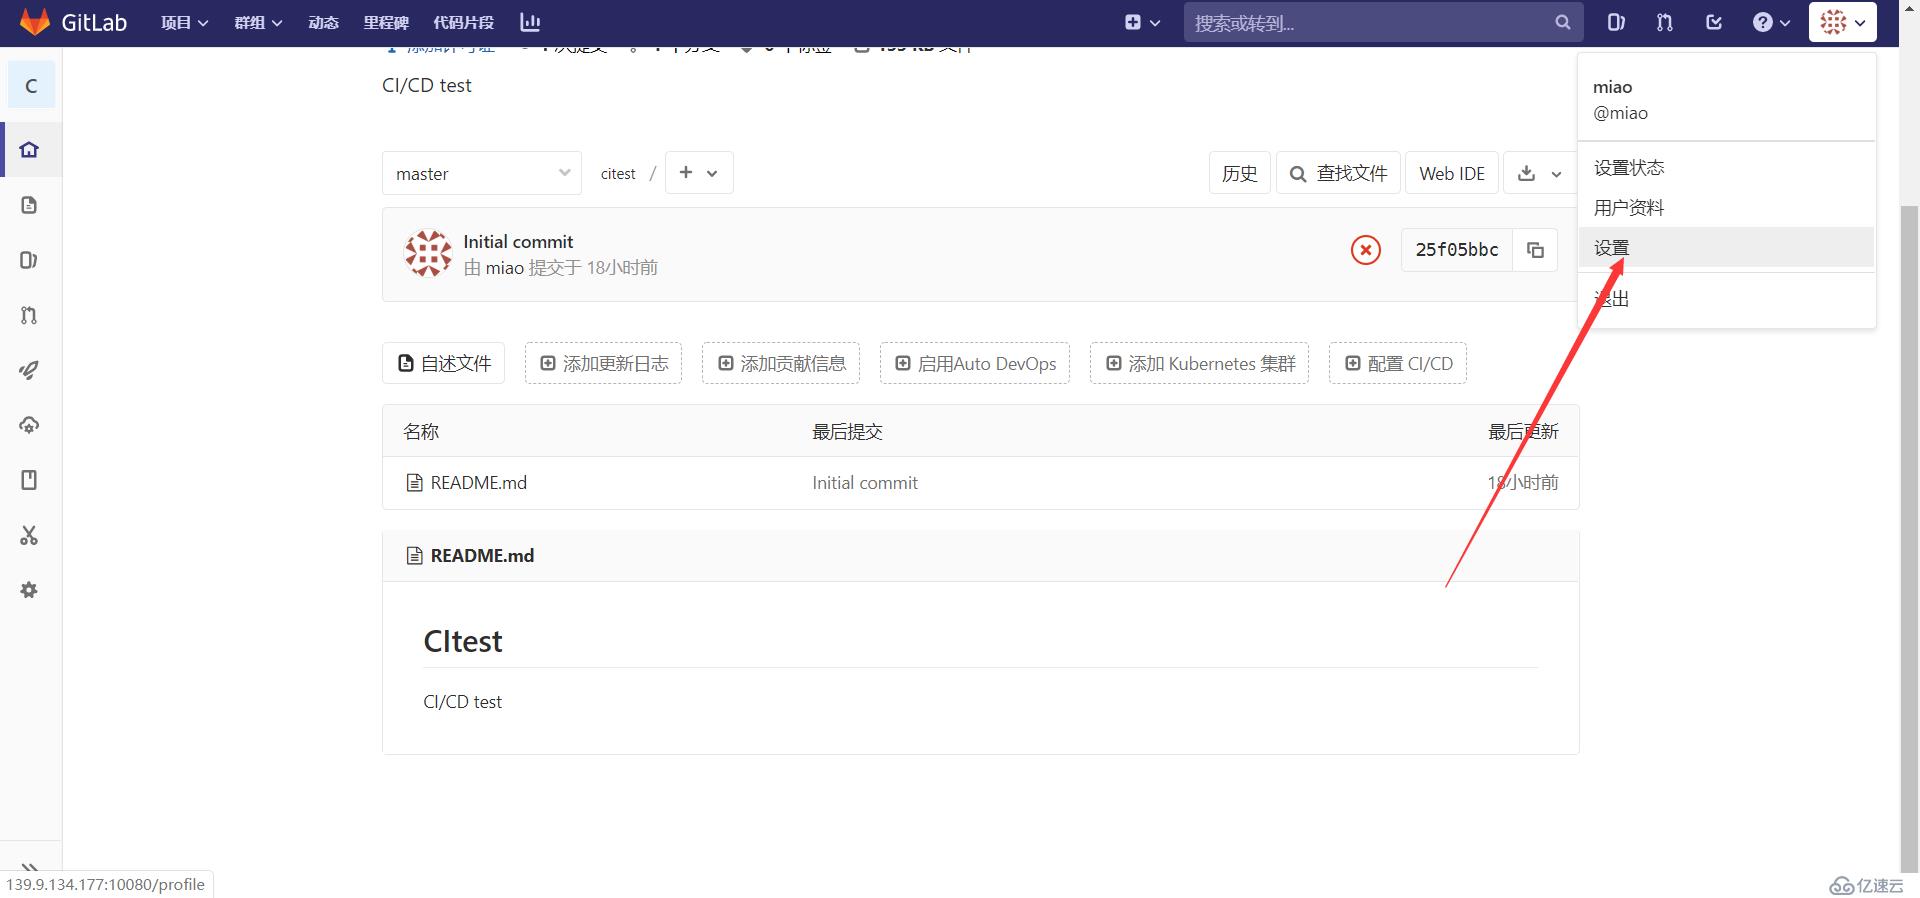
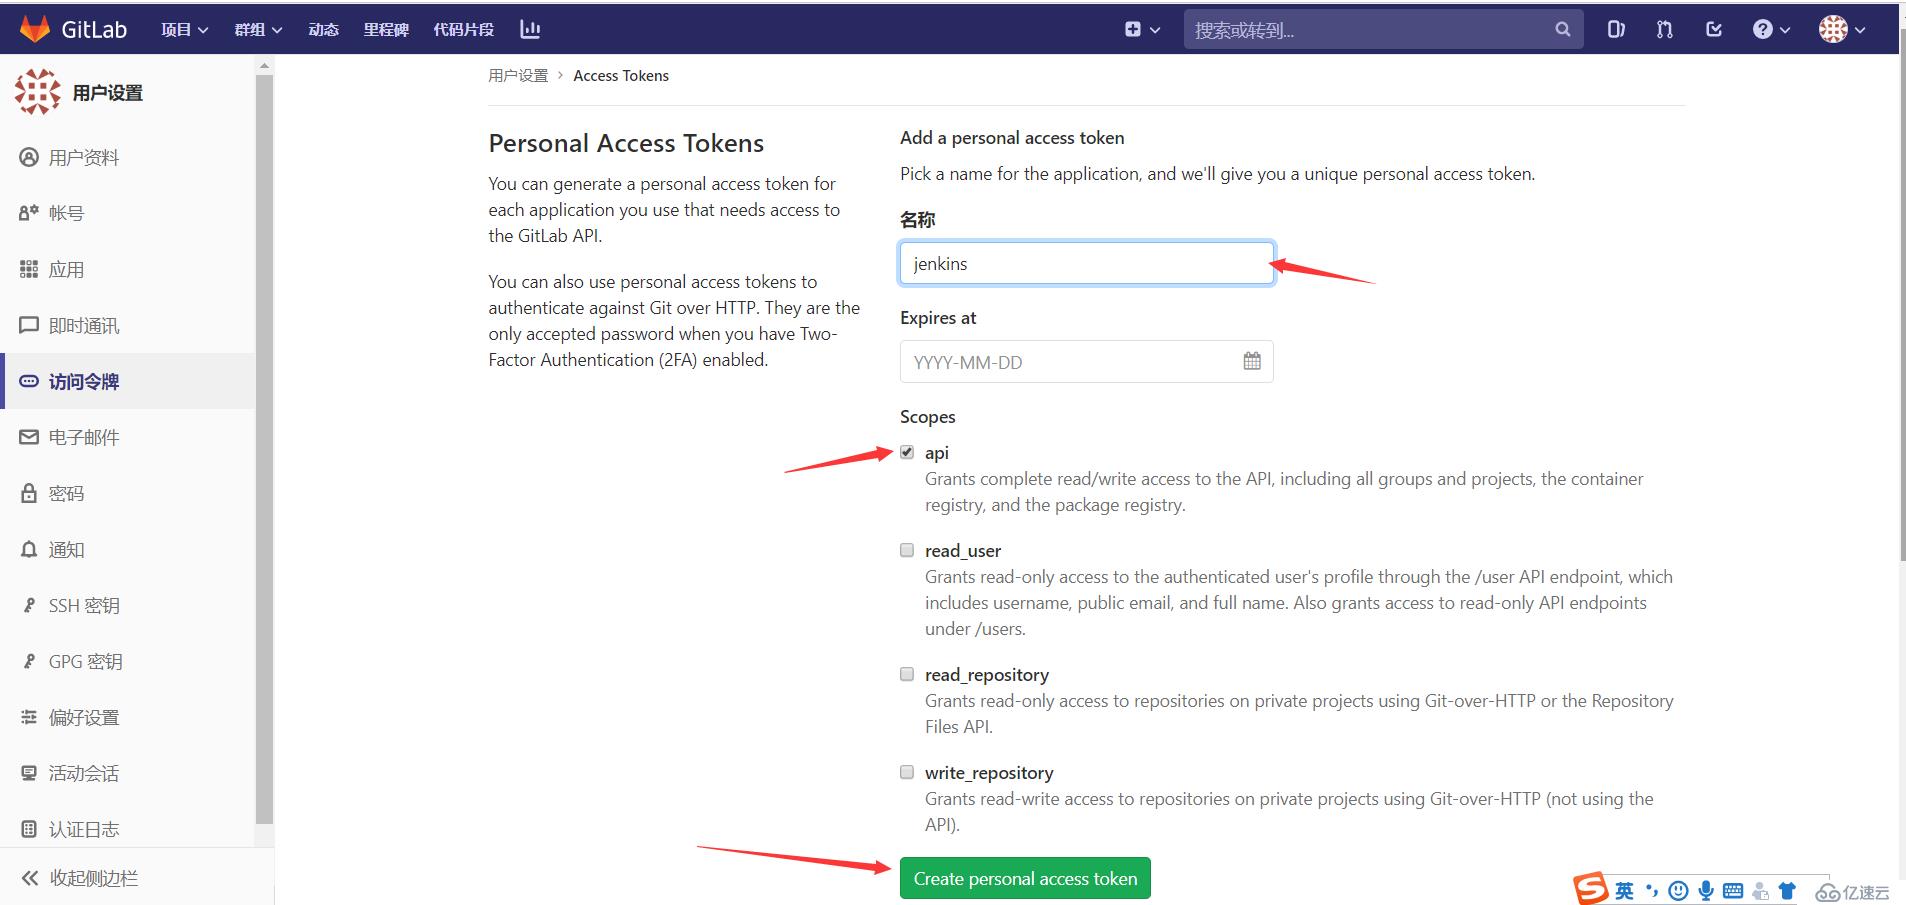

復制此token,此token只顯示一次:vze6nS8tLAQ1dVpdaHYU
點擊 系統管理 --> 系統設置,找到gitlab

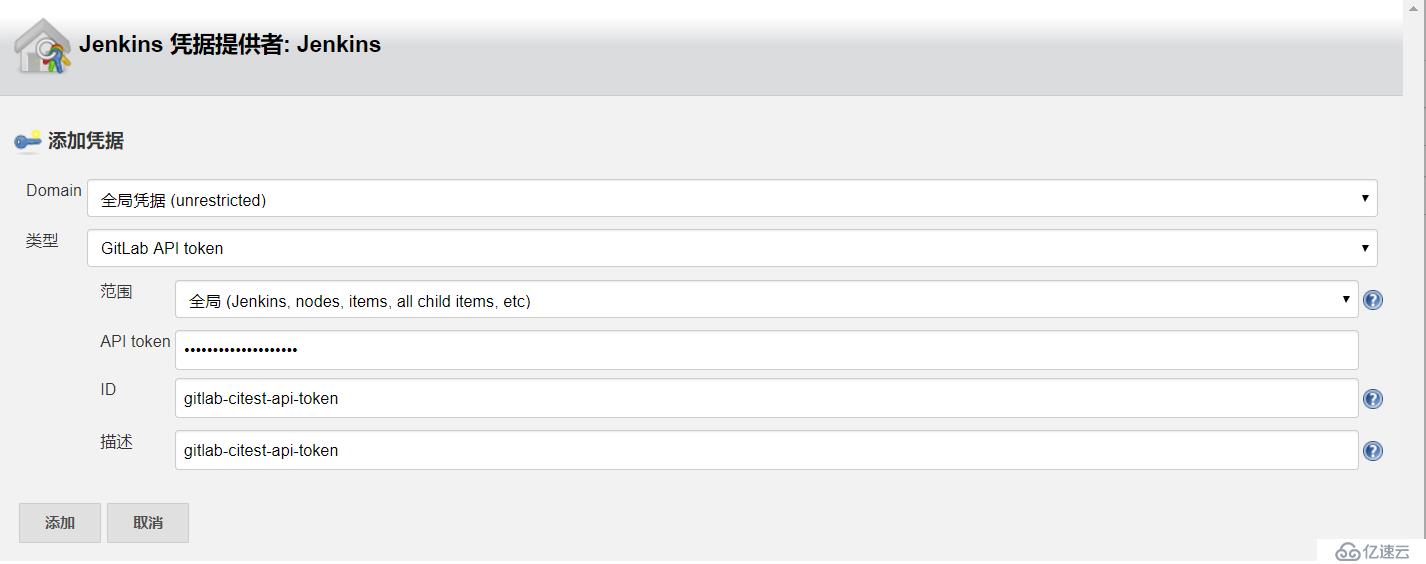
類型選擇gitlab api token,將gitab生成的token填入
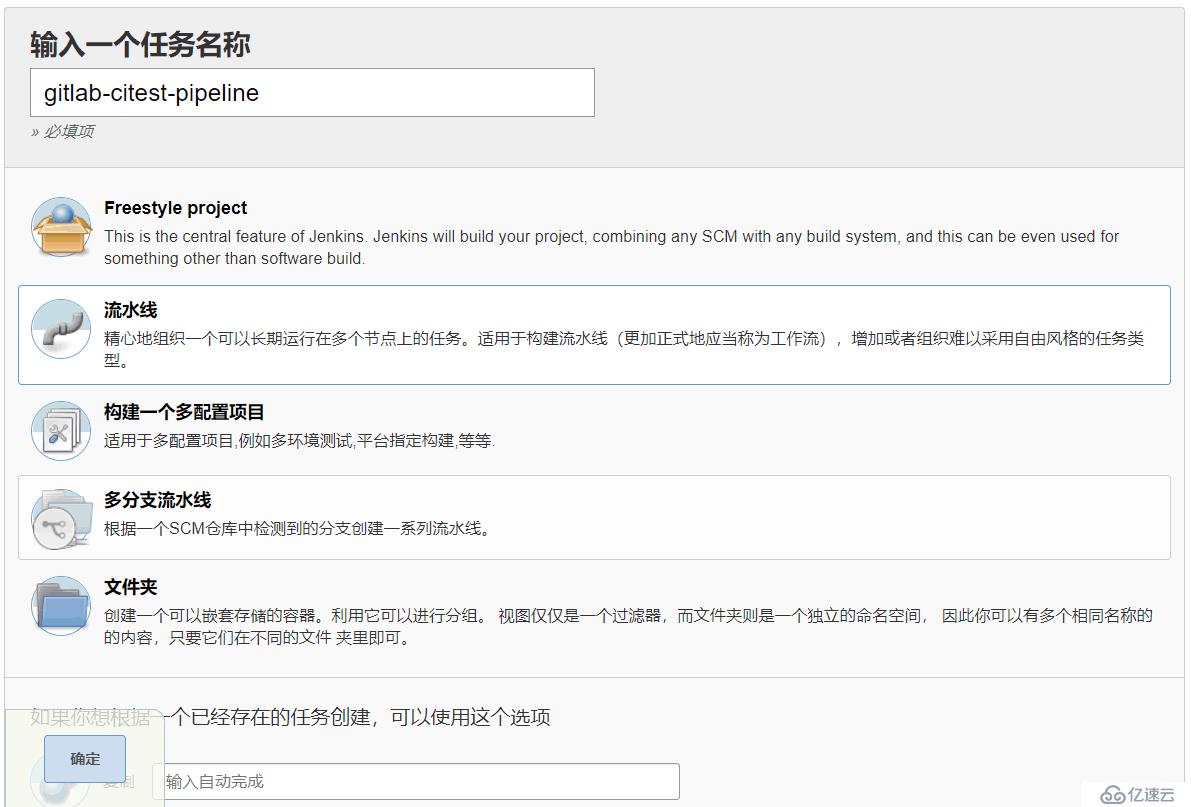
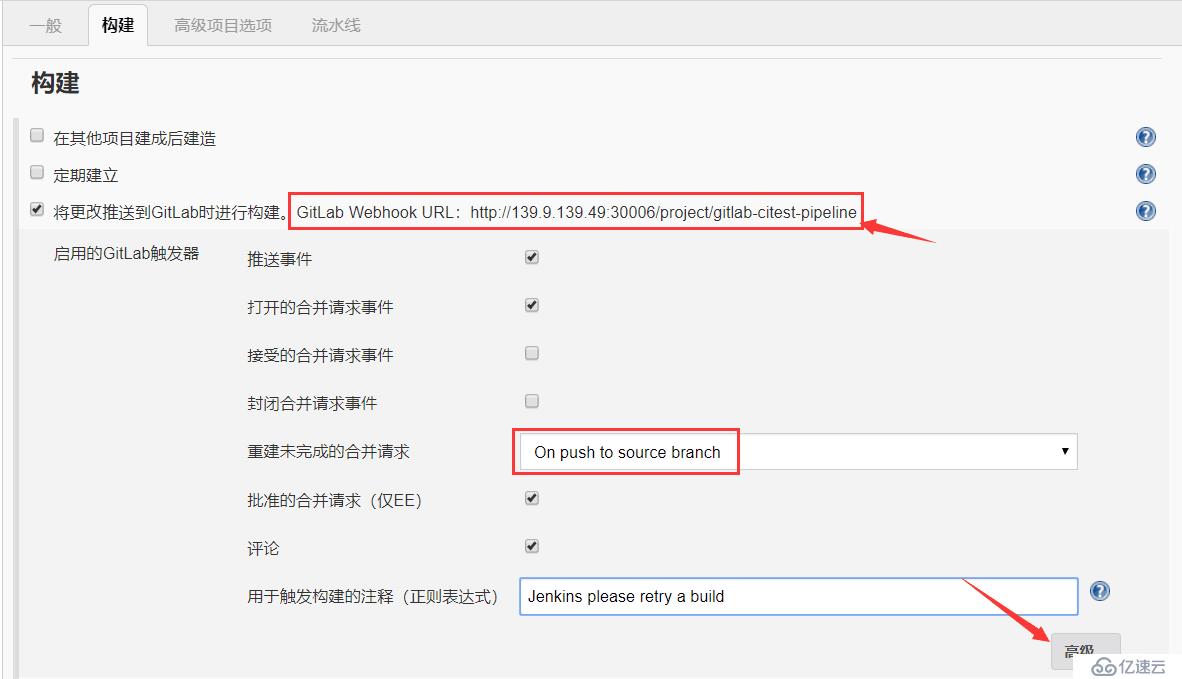
這個地址用來設置gitlab的webhook:http://139.9.139.49:30006/project/gitlab-citest-pipeline
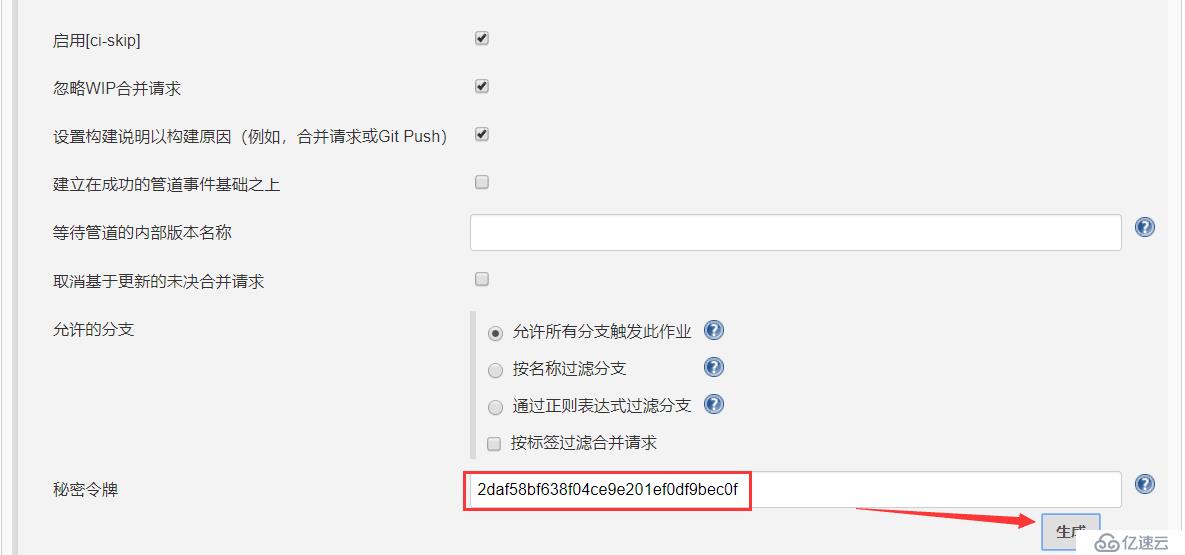
點擊生成token:2daf58bf638f04ce9e201ef0df9bec0f
此token也是用來設置gitlab的webhook
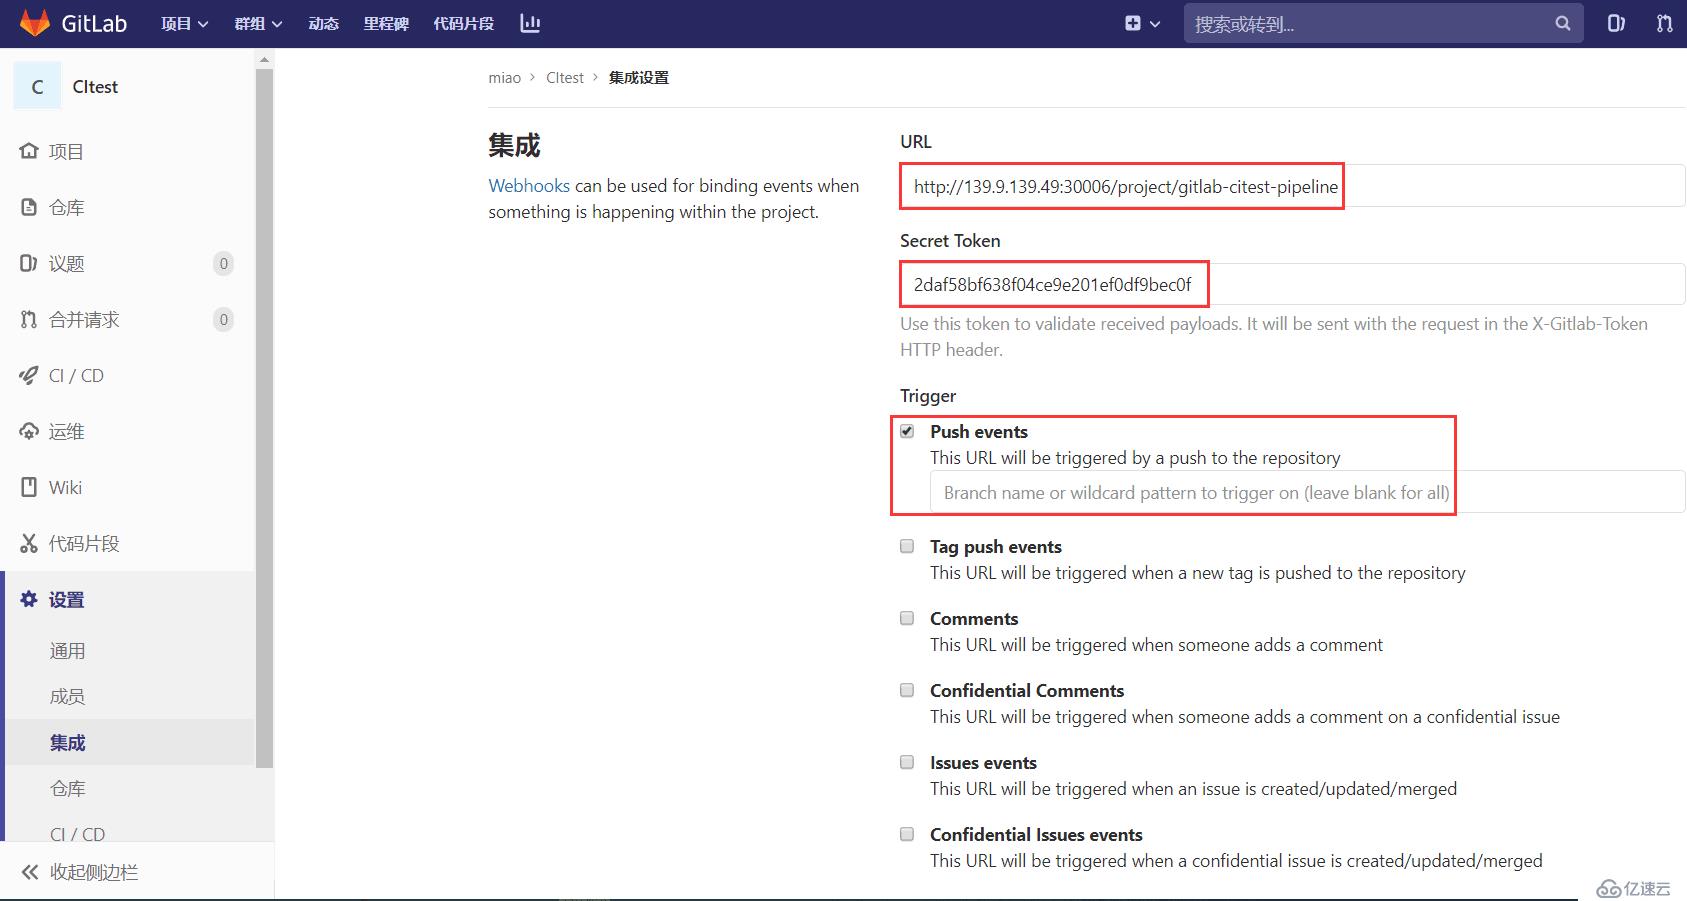

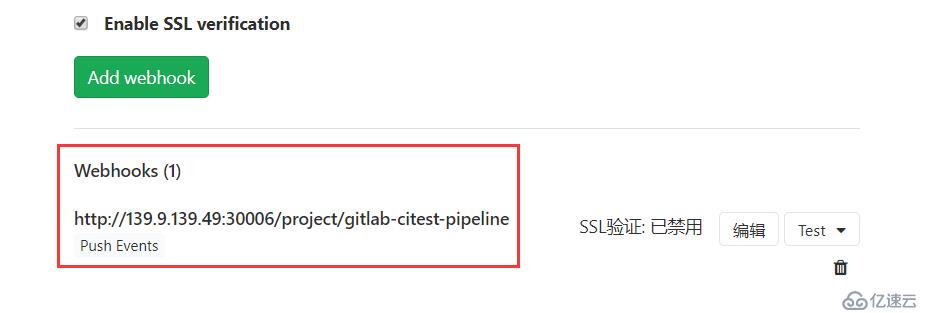
先將gitlab上面的倉庫克隆至本地
[root@support ~]# git clone http://139.9.134.177:10080/miao/citest.git
Cloning into 'citest'...
remote: Enumerating objects: 3, done.
remote: Counting objects: 100% (3/3), done.
remote: Total 3 (delta 0), reused 0 (delta 0)
Unpacking objects: 100% (3/3), done.
修改后提交代碼至gitlab
[root@support citest]# git commit -m "Testing gitlab and jenkins Connection #1"
[master 03264a7] Testing gitlab and jenkins Connection 1
 1 file changed, 3 insertions(+), 1 deletion(-)
[root@support citest]# git push origin master
Username for 'http://139.9.134.177:10080': miao
Password for 'http://miao@139.9.134.177:10080':
Counting objects: 5, done.
Writing objects: 100% (3/3), 294 bytes | 0 bytes/s, done.
Total 3 (delta 0), reused 0 (delta 0)
To http://139.9.134.177:10080/miao/citest.git
   25f05bb..03264a7  master -> master
jenkins任務已經開始執行
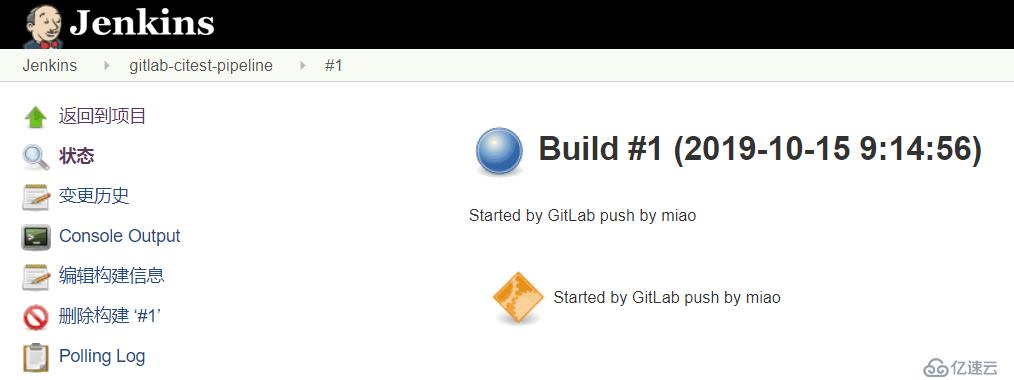
顯示任務由gitlab觸發,第一階段成功。
我們這里使用了Docker in Docker技術,就是把jenkins部署在k8s里。jenkins master會動態創建slave pod,使用slave pod運行代碼克隆,項目構建,鏡像構建等指令操作。構成完成以后刪除這個slave pod。減輕jenkins-master的負載,可以極大地提高資源利用率。
我們已經安裝了Kubernetes插件,我們直接在jenkins中點擊
系統管理 -- > 系統設置 -- > 拉到最底下有一個云。
新增一個云 --> kubernetes
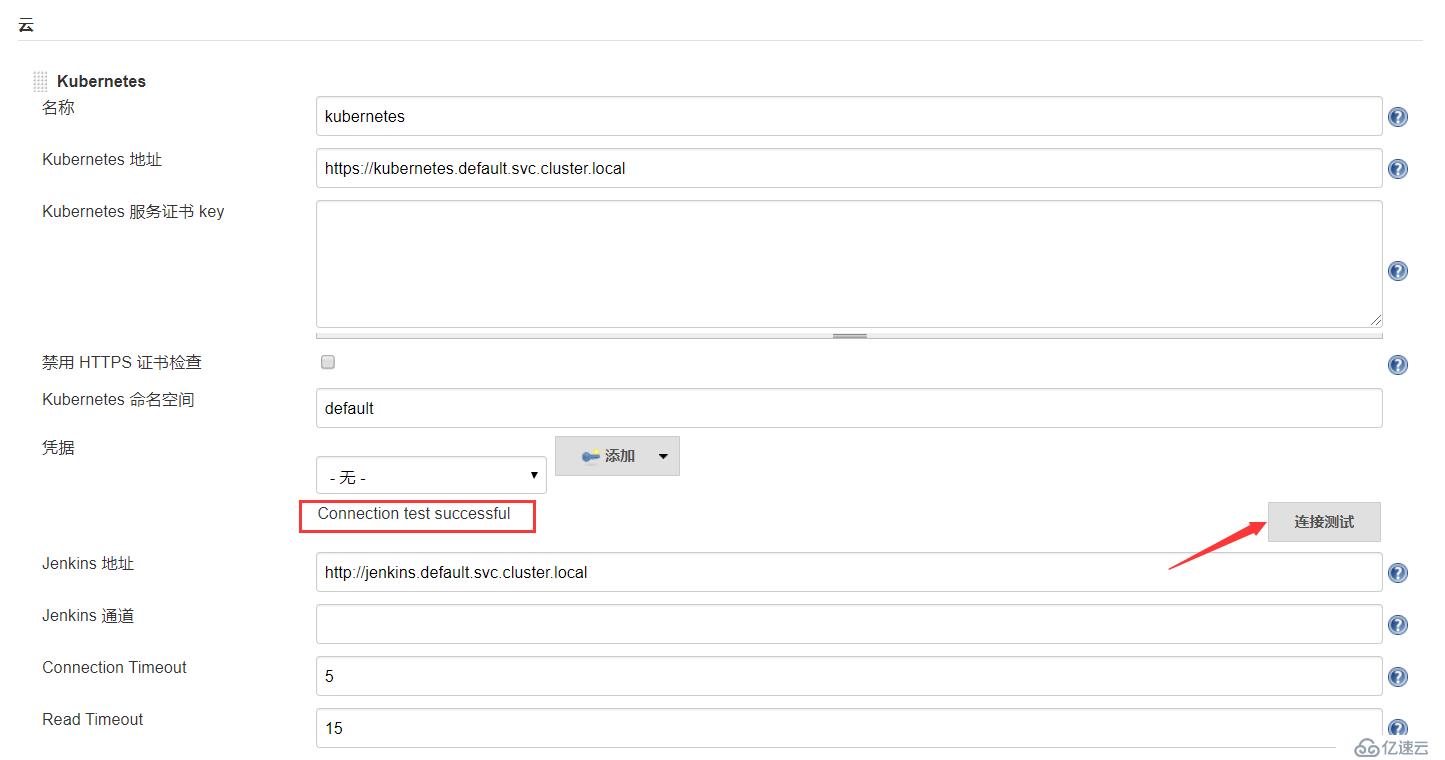
因為jenkins是直接運行在k8s上的,所以可以直接通過k8s的dns訪問kubernetes的service名稱的。點擊 --> 測試連接,成功連接k8s。
然后點擊-->保存
github官方構建slave文檔
https://github.com/jenkinsci/docker-jnlp-slave
構建jenkins-slave鏡像我們需要準備四個文件
1、在jenkins地址欄輸入下列地址獲取slave.jar
http://119.3.226.210:30006/jnlpJars/slave.jar
2、slave.jar的啟動腳本jenkins-slave
[root@support jenkins-slave]# cat jenkins-slave
#!/usr/bin/env sh

if [ $# -eq 1 ]; then

    # if `docker run` only has one arguments, we assume user is running alternate command like `bash` to inspect the image
    exec "$@"

else

    # if -tunnel is not provided try env vars
    case "$@" in
        *"-tunnel "*) ;;
        *)
        if [ ! -z "$JENKINS_TUNNEL" ]; then
            TUNNEL="-tunnel $JENKINS_TUNNEL"
        fi ;;
    esac

    # if -workDir is not provided try env vars
    if [ ! -z "$JENKINS_AGENT_WORKDIR" ]; then
        case "$@" in
            *"-workDir"*) echo "Warning: Work directory is defined twice in command-line arguments and the environment variable" ;;
            *)
            WORKDIR="-workDir $JENKINS_AGENT_WORKDIR" ;;
        esac
    fi

    if [ -n "$JENKINS_URL" ]; then
        URL="-url $JENKINS_URL"
    fi

    if [ -n "$JENKINS_NAME" ]; then
        JENKINS_AGENT_NAME="$JENKINS_NAME"
    fi

    if [ -z "$JNLP_PROTOCOL_OPTS" ]; then
        echo "Warning: JnlpProtocol3 is disabled by default, use JNLP_PROTOCOL_OPTS to alter the behavior"
        JNLP_PROTOCOL_OPTS="-Dorg.jenkinsci.remoting.engine.JnlpProtocol3.disabled=true"
    fi

    # If both required options are defined, do not pass the parameters
    OPT_JENKINS_SECRET=""
    if [ -n "$JENKINS_SECRET" ]; then
        case "$@" in
            *"${JENKINS_SECRET}"*) echo "Warning: SECRET is defined twice in command-line arguments and the environment variable" ;;
            *)
            OPT_JENKINS_SECRET="${JENKINS_SECRET}" ;;
        esac
    fi

    OPT_JENKINS_AGENT_NAME=""
    if [ -n "$JENKINS_AGENT_NAME" ]; then
        case "$@" in
            *"${JENKINS_AGENT_NAME}"*) echo "Warning: AGENT_NAME is defined twice in command-line arguments and the environment variable" ;;
            *)
            OPT_JENKINS_AGENT_NAME="${JENKINS_AGENT_NAME}" ;;
        esac
    fi

    #TODO: Handle the case when the command-line and Environment variable contain different values.
    #It is fine it blows up for now since it should lead to an error anyway.

    exec java $JAVA_OPTS $JNLP_PROTOCOL_OPTS -cp /usr/share/jenkins/slave.jar hudson.remoting.jnlp.Main -headless $TUNNEL $URL $WORKDIR $OPT_JENKINS_SECRET $OPT_JENKINS_AGENT_NAME "$@"
fi
3、maven的配置文件
[root@support jenkins-slave]# cat settings.xml
<?xml version="1.0" encoding="UTF-8"?>
<settings xmlns="http://maven.apache.org/SETTINGS/1.0.0"
          xmlns:xsi="http://www.w3.org/2001/XMLSchema-instance"
          xsi:schemaLocation="http://maven.apache.org/SETTINGS/1.0.0 http://maven.apache.org/xsd/settings-1.0.0.xsd">
  <pluginGroups>
  </pluginGroups>
  <proxies>
  </proxies>
  <servers>
  </servers>
  <mirrors>
    <mirror>
      <id>central</id>
      <mirrorOf>central</mirrorOf>
      <name>aliyun maven</name>
      <url>https://maven.aliyun.com/repository/public</url>
    </mirror>
  </mirrors>
  <profiles>
  </profiles>
</settings>
4、Dockerfile
FROM centos:7
LABEL maintainer lizhenliang

# 使鏡像具有拖git倉庫,編譯java代碼的能力
RUN yum install -y java-1.8.0-openjdk maven curl git libtool-ltdl-devel && \
    yum clean all && \
    rm -rf /var/cache/yum/* && \
    mkdir -p /usr/share/jenkins

# 將獲取到slave.jar放入鏡像
COPY slave.jar /usr/share/jenkins/slave.jar
# jenkins-slave執行腳本
COPY jenkins-slave /usr/bin/jenkins-slave
# settings.xml中設置了aliyun的鏡像
COPY settings.xml /etc/maven/settings.xml
RUN chmod +x /usr/bin/jenkins-slave

ENTRYPOINT ["jenkins-slave"]
把這4個文件放在同級目錄下,接下來我們開始構建slave鏡像
構建鏡像并打上標簽
[root@support jenkins-slave]# docker build . -t 139.9.134.177:8080/jenkinsci/jenkins-slave-jdk:1.8
[root@support jenkins-slave]# docker image ls
REPOSITORY                                       TAG                        IMAGE ID            CREATED             SIZE
139.9.134.177:8080/jenkinsci/jenkins-slave-jdk   1.8                        940e56848837        3 minutes ago       535MB
開始推送鏡像
http登錄拒絕,docker默認是https的,需要修改daemon.json
[root@support jenkins-slave]# docker login 139.9.134.177:8080
Username: admin
Password:
Error response from daemon: Get https://139.9.134.177:8080/v2/: http: server gave HTTP response to HTTPS client
# 增加http的信任
[root@support ~]# cat /etc/docker/daemon.json
{
    "registry-mirrors": ["http://f1361db2.m.daocloud.io"],
    "insecure-registries": ["http://139.9.134.177:8080"]
}
# 成功登錄
[root@support ~]# docker login 139.9.134.177:8080
Username: admin
Password:
WARNING! Your password will be stored unencrypted in /root/.docker/config.json.
Configure a credential helper to remove this warning. See
https://docs.docker.com/engine/reference/commandline/login/#credentials-store

Login Succeeded
所有的k8s主機也需要配置訪問harbor的地址。重啟docker服務。
我們設置信任的地址為內網地址,以保證足夠的速度。
使用以下pipeline腳本動態創建pod
// 鏡像倉庫地址
def registry = "10.0.0.123:8080"

podTemplate(label: 'jenkins-agent', cloud: 'kubernetes',
    containers: [
    containerTemplate(
        name: 'jnlp',
        image: "${registry}/jenkinsci/jenkins-slave-jdk:1.8"
    )],
    volumes: [
        hostPathVolume(mountPath: '/var/run/docker.sock', hostPath: '/var/run/docker.sock'),
        hostPathVolume(mountPath: '/usr/bin/docker', hostPath: '/usr/bin/docker')
    ])
{
  node("jenkins-agent"){
        stage('拉取代碼') { // for display purposes
            git 'http://139.9.134.177:10080/miao/citest.git'
            sh 'ls'
        }
        stage('代碼編譯') {
            echo 'ok'
        }
        stage('部署') {
            echo 'ok'
        }
    }
}使用pipeline腳本將每次提交gitlab的代碼拉取下來,編譯為docker鏡像推送至harbor中。
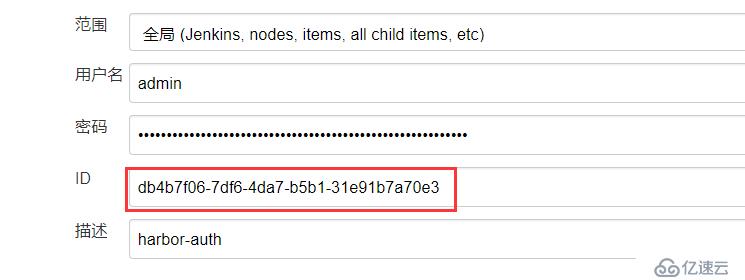
在這里我們需要先配置兩個憑據,因為我們gitlab代碼倉庫是私有的,harbor倉庫也是私有的,只有配置憑據jenkins才能訪問。
輸入gitlab的賬號和密碼,生成一個憑據后,復制憑據的id,在pipeline中引用

輸入harbor的賬號和密碼,生成一個憑據后,復制憑據的id,在pipeline中引用
// 鏡像倉庫地址
def registry = "10.0.0.123:8080"
// 鏡像倉庫項目
def project = "jenkinsci"
// 鏡像名稱
def app_name = "citest"
// 鏡像完整名稱
def image_name = "${registry}/${project}/${app_name}:${BUILD_NUMBER}"
// git倉庫地址
def git_address = "http://139.9.134.177:10080/miao/citest.git"

// 認證
def harbor_auth = "db4b7f06-7df6-4da7-b5b1-31e91b7a70e3"
def gitlab_auth = "53d88c8f-3063-4048-9205-19fc6222b887"

podTemplate(
    label: 'jenkins-agent',
    cloud: 'kubernetes',
    containers: [
        containerTemplate(
            name: 'jnlp',
            image: "${registry}/jenkinsci/jenkins-slave-jdk:1.8"
        )
    ],
    volumes: [
        hostPathVolume(mountPath: '/var/run/docker.sock', hostPath: '/var/run/docker.sock'),
        hostPathVolume(mountPath: '/usr/bin/docker', hostPath: '/usr/bin/docker')
    ]
)
{
  node("jenkins-agent"){
        stage('拉取代碼') { // for display purposes
            checkout([$class: 'GitSCM', branches: [[name: '${Branch}']], userRemoteConfigs: [[credentialsId: "${gitlab_auth}", url: "${git_address}"]]])
            sh "ls"
        }
        stage('代碼編譯') {
            sh "mvn clean package -Dmaven.test.skip=true"
            sh "ls"
        }
        stage('構建鏡像') {
            withCredentials([usernamePassword(credentialsId: "${harbor_auth}", passwordVariable: 'password', usernameVariable: 'username')]) {
                sh """
                    echo '
                        FROM tomcat
                        LABEL maintainer miaocunfa
                        RUN rm -rf /usr/local/tomcat/webapps/*
                        ADD target/*.war /usr/local/tomcat/webapps/ROOT.war
                    ' > Dockerfile

                    docker build -t ${image_name} .
                    docker login -u ${username} -p '${password}' ${registry}
                    docker push ${image_name}
                """
            }
        }
    }
}
寫腳本用來提交gitlab
[root@support ~]# cat gitpush.sh
testdate=$(date)
cd /root/citest
echo $testdate >> pod-slave.log
git add -A
git commit -m "$testdate"
git push origin master
代碼提交已經觸發了編號為33的任務開始構建。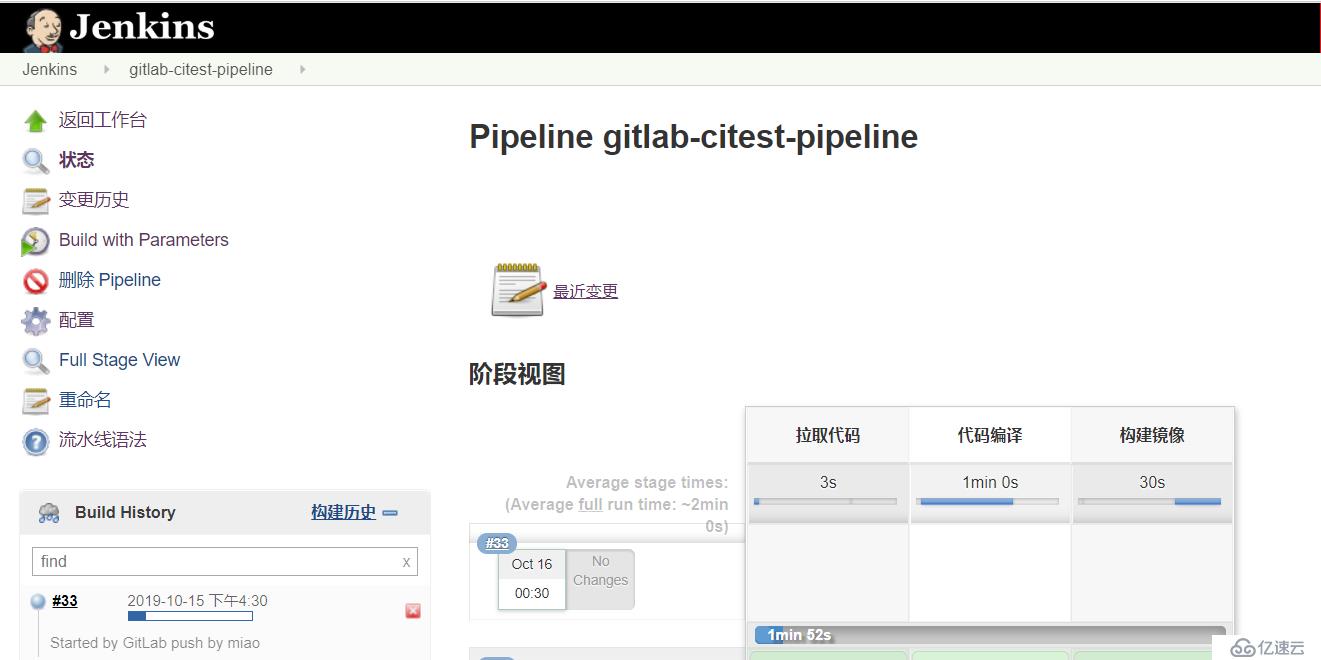
jenkins構建過程中的日志。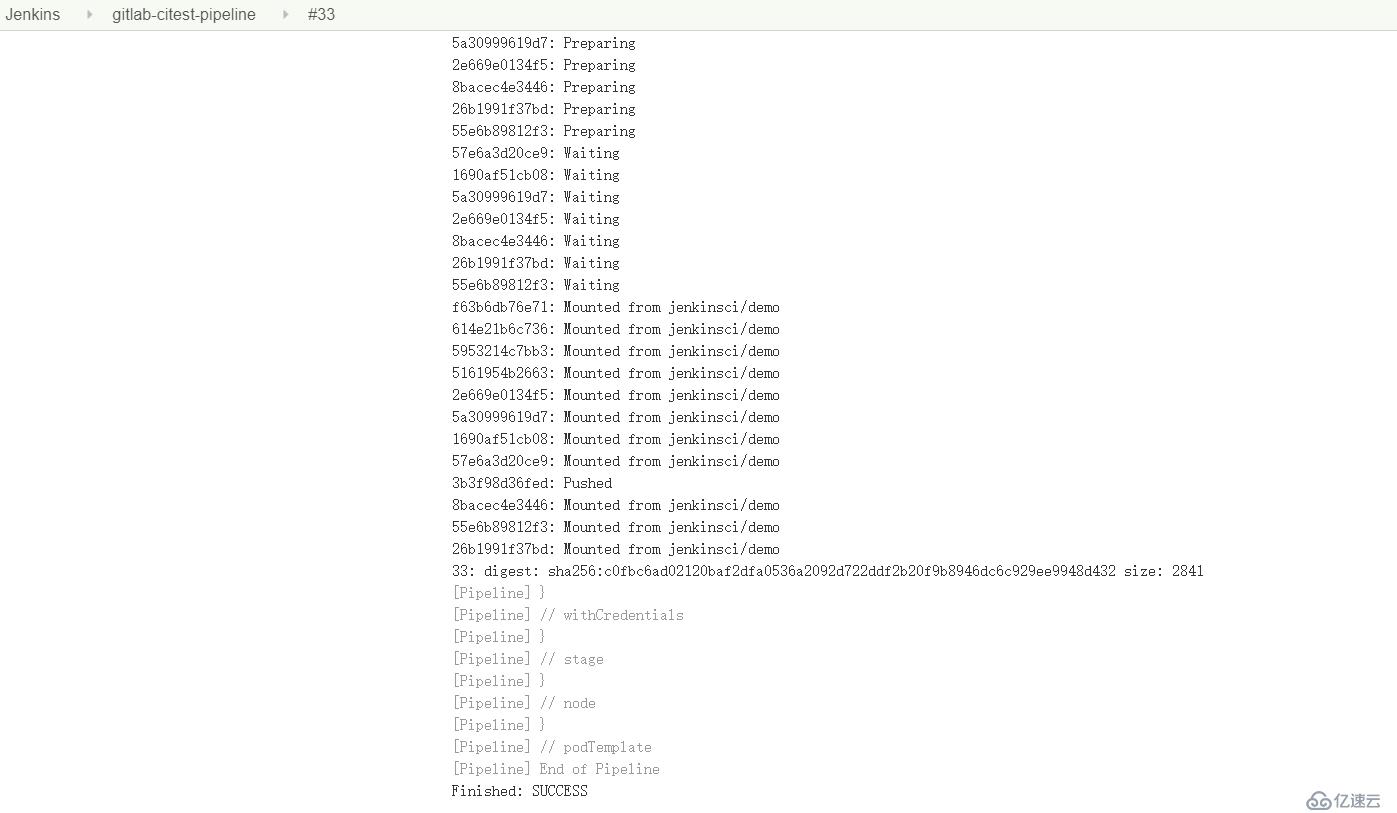
jenkins構建成功后,harbor中已經有了標簽為33的鏡像。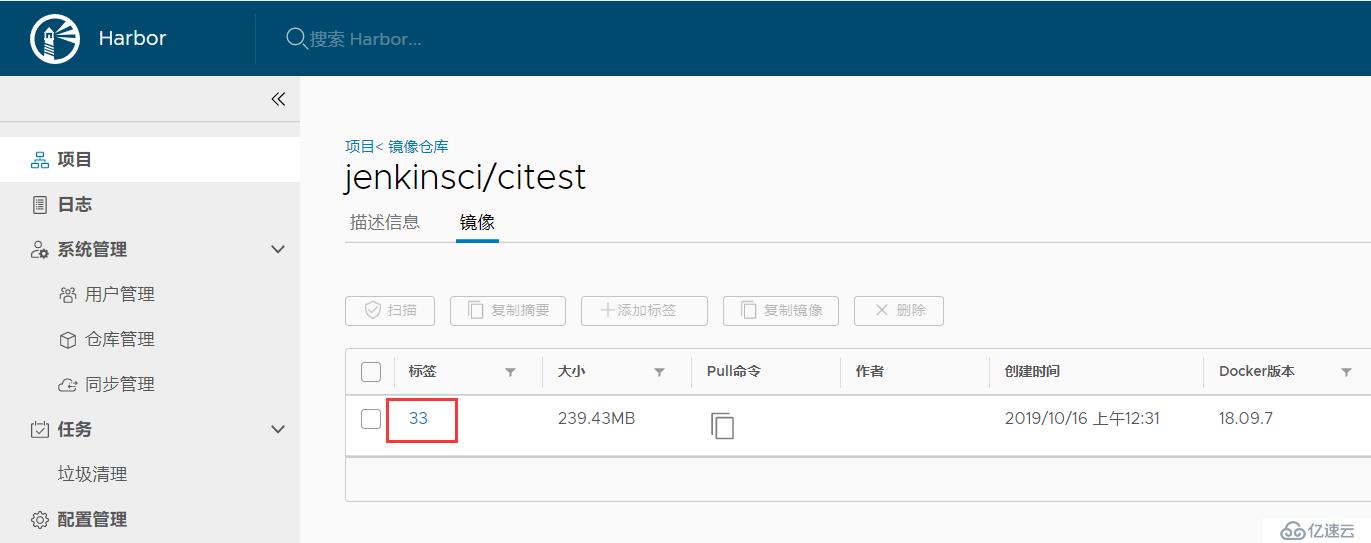
已經成功使用jenkins構建好鏡后,接下來完成將鏡像部署在K8s平臺。這個過程我們需要用到插件Kubernetes Continuous Deploy Plugin
將.kube/config的內容拷貝至jenkins中生成憑據

拷貝憑據的id到pipeline腳本中引用

[root@master ~]# kubectl create secret docker-registry harbor-pull-secret --docker-server='http://10.0.0.123:8080' --docker-username='admin' --docker-password='Harbor12345'
secret/harbor-pull-secret created// 鏡像倉庫地址
def registry = "10.0.0.123:8080"
// 鏡像倉庫項目
def project = "jenkinsci"
// 鏡像名稱
def app_name = "citest"
// 鏡像完整名稱
def image_name = "${registry}/${project}/${app_name}:${BUILD_NUMBER}"
// git倉庫地址
def git_address = "http://139.9.134.177:10080/miao/citest.git"
// 認證
def harbor_auth = "db4b7f06-7df6-4da7-b5b1-31e91b7a70e3"
def gitlab_auth = "53d88c8f-3063-4048-9205-19fc6222b887"
// K8s認證
def k8s_auth = "586308fb-3f92-432d-a7f7-c6d6036350dd"
// harbor倉庫secret_name
def harbor_registry_secret = "harbor-pull-secret"
// k8s部署后暴露的nodePort
def nodePort = "30666"
podTemplate(
label: 'jenkins-agent',
cloud: 'kubernetes',
containers: [
containerTemplate(
name: 'jnlp',
image: "${registry}/jenkinsci/jenkins-slave-jdk:1.8"
)
],
volumes: [
hostPathVolume(mountPath: '/var/run/docker.sock', hostPath: '/var/run/docker.sock'),
hostPathVolume(mountPath: '/usr/bin/docker', hostPath: '/usr/bin/docker')
]
)
{
node("jenkins-agent"){
stage('拉取代碼') { // for display purposes
checkout([$class: 'GitSCM', branches: [[name: '${Branch}']], userRemoteConfigs: [[credentialsId: "${gitlab_auth}", url: "${git_address}"]]])
sh "ls"
}
stage('代碼編譯') {
sh "mvn clean package -Dmaven.test.skip=true"
sh "ls"
}
stage('構建鏡像') {
withCredentials([usernamePassword(credentialsId: "${harbor_auth}", passwordVariable: 'password', usernameVariable: 'username')]) {
sh """
echo '
FROM tomcat
LABEL maintainer miaocunfa
RUN rm -rf /usr/local/tomcat/webapps/*
ADD target/*.war /usr/local/tomcat/webapps/ROOT.war
' > Dockerfile
docker build -t ${image_name} .
docker login -u ${username} -p '${password}' ${registry}
docker push ${image_name}
"""
}
}
stage('部署到K8s'){
sh """
sed -i 's#\$IMAGE_NAME#${image_name}#' deploy.yml
sed -i 's#\$SECRET_NAME#${harbor_registry_secret}#' deploy.yml
sed -i 's#\$NODE_PORT#${nodePort}#' deploy.yml
"""
kubernetesDeploy configs: 'deploy.yml', kubeconfigId: "${k8s_auth}"
}
}
}用來將鏡像部署為deployment控制器控制的pod,放在代碼倉庫中跟代碼一起推送。
kind: Deployment
apiVersion: apps/v1
metadata:
  name: web
spec:
  replicas: 3
  selector:
    matchLabels:
      app: java-demo
  template:
    metadata:
      labels:
        app: java-demo
    spec:
      imagePullSecrets:
      - name: $SECRET_NAME
      containers:
      - name: tomcat
        image: $IMAGE_NAME
        ports:
        - containerPort: 8080
          name: web
        livenessProbe:
          httpGet:
            path: /
            port: 8080
          initialDelaySeconds: 20
          timeoutSeconds: 5
          failureThreshold: 3
        readinessProbe:
          httpGet:
            path: /
            port: 8080
          initialDelaySeconds: 20
          timeoutSeconds: 5
          failureThreshold: 3

---

kind: Service
apiVersion: v1
metadata:
  name: web
spec:
  type: NodePort
  selector:
    app: java-demo
  ports:
    - protocol: TCP
      port: 80
      targetPort: 8080
nodePort: $NODE_PORT下面是整個完整的CI/CD流程
1、git推送代碼至gitlab代碼倉庫
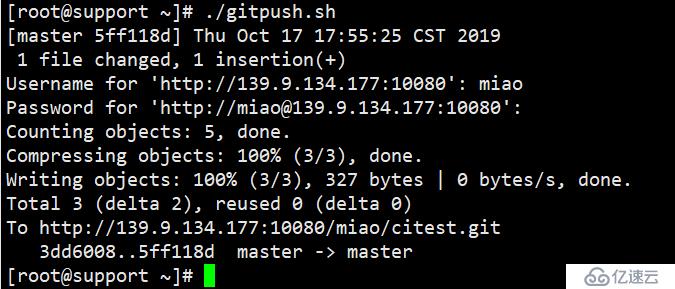
2、gitlab使用webhook觸發jenkins任務
左下角webhook已經觸發,編號為53的jenkins任務已經開始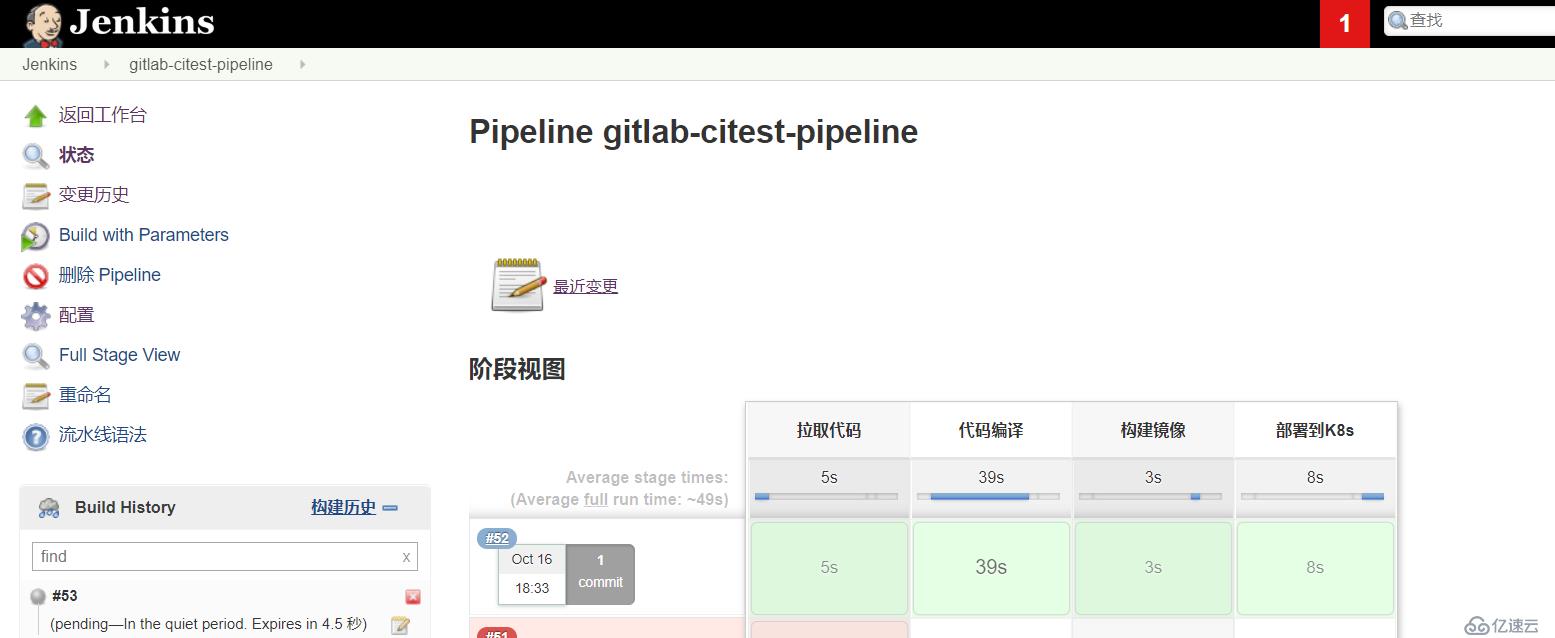
jenkins任務流程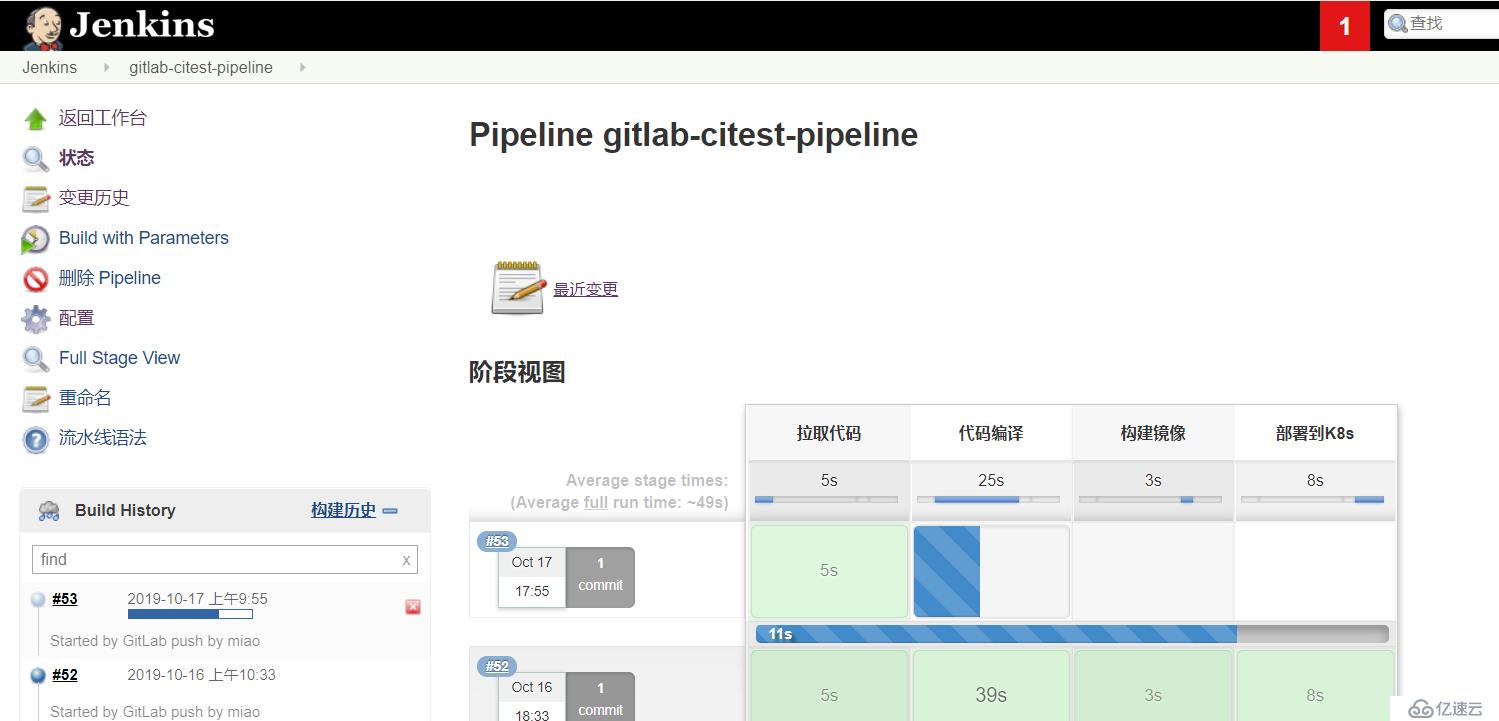
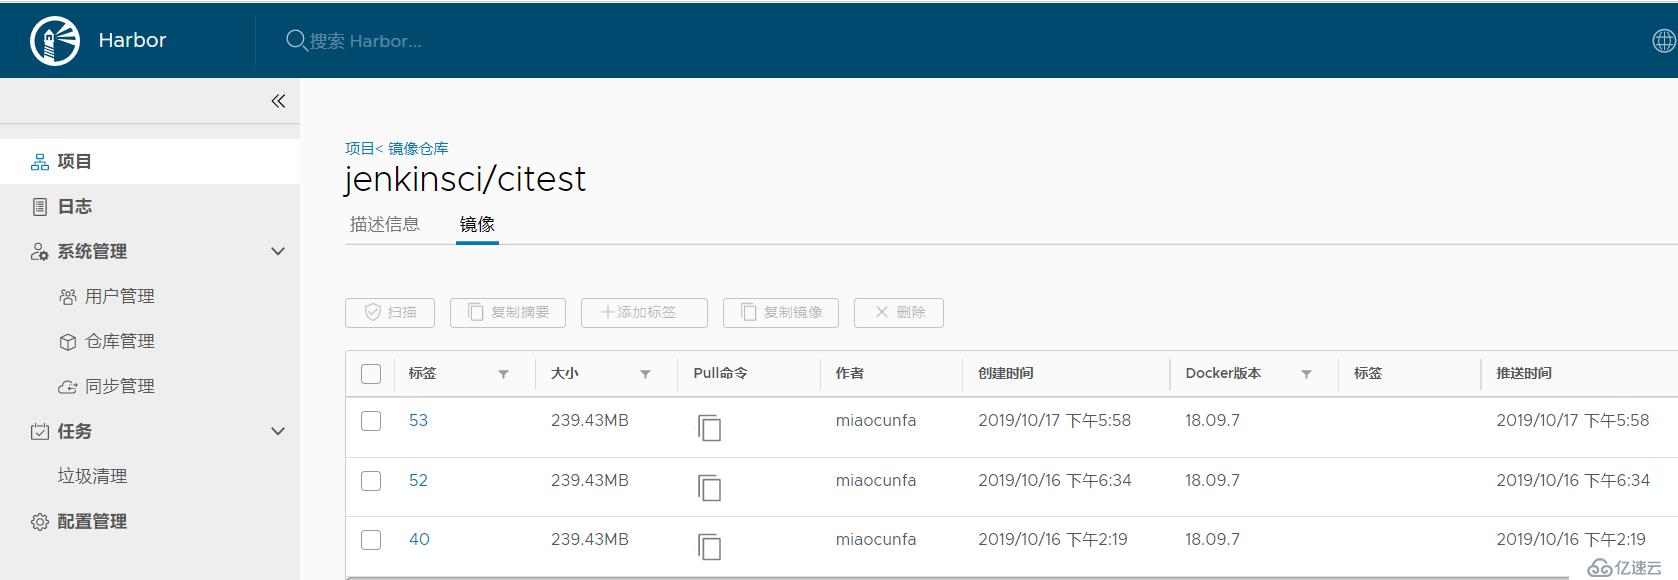
3、harbor鏡像倉庫
tag標簽為53的鏡像也已經推送至harbor
4、使用kubectl監控pods的變化
jenkins在任務流程中會先構建slave pod,在執行完將鏡像部署到kubernetes后,slave pod會銷毀,web鏡像處于running狀態。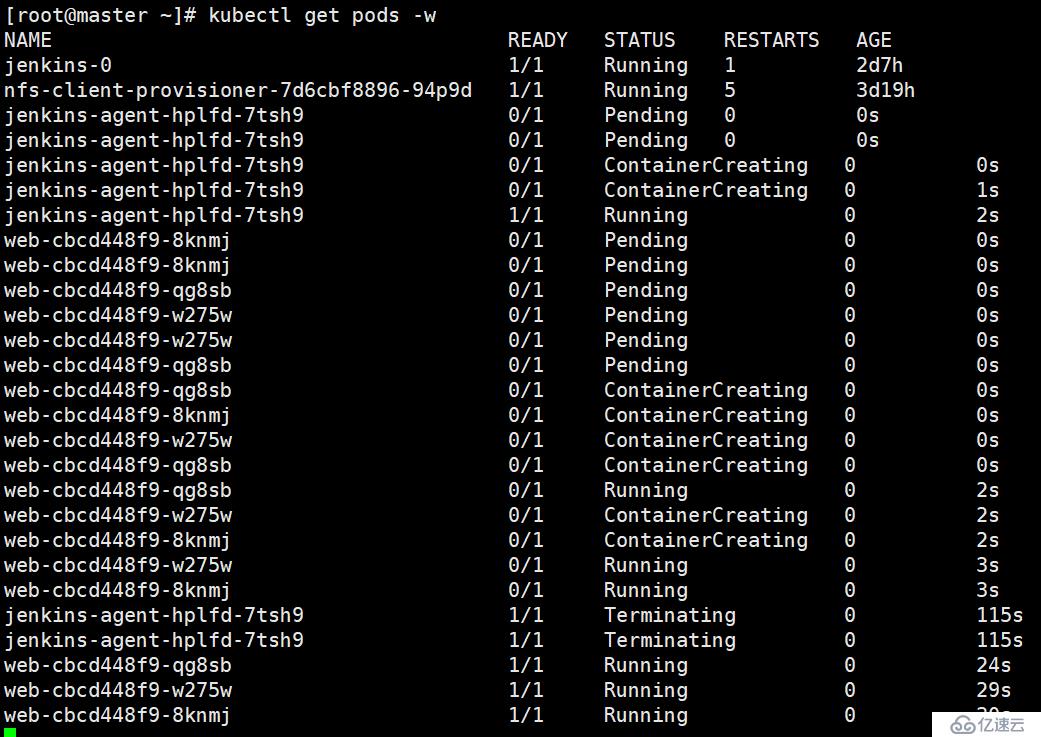
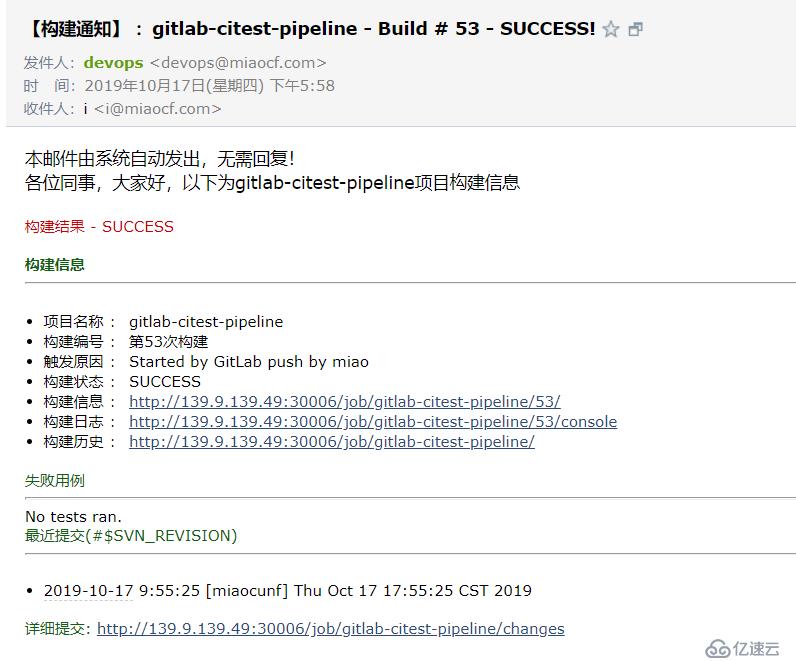
5、郵件通知
在整個jenkins任務執行成功后,發送郵件通知
郵件的配置會在4.8優化部分貼出來。
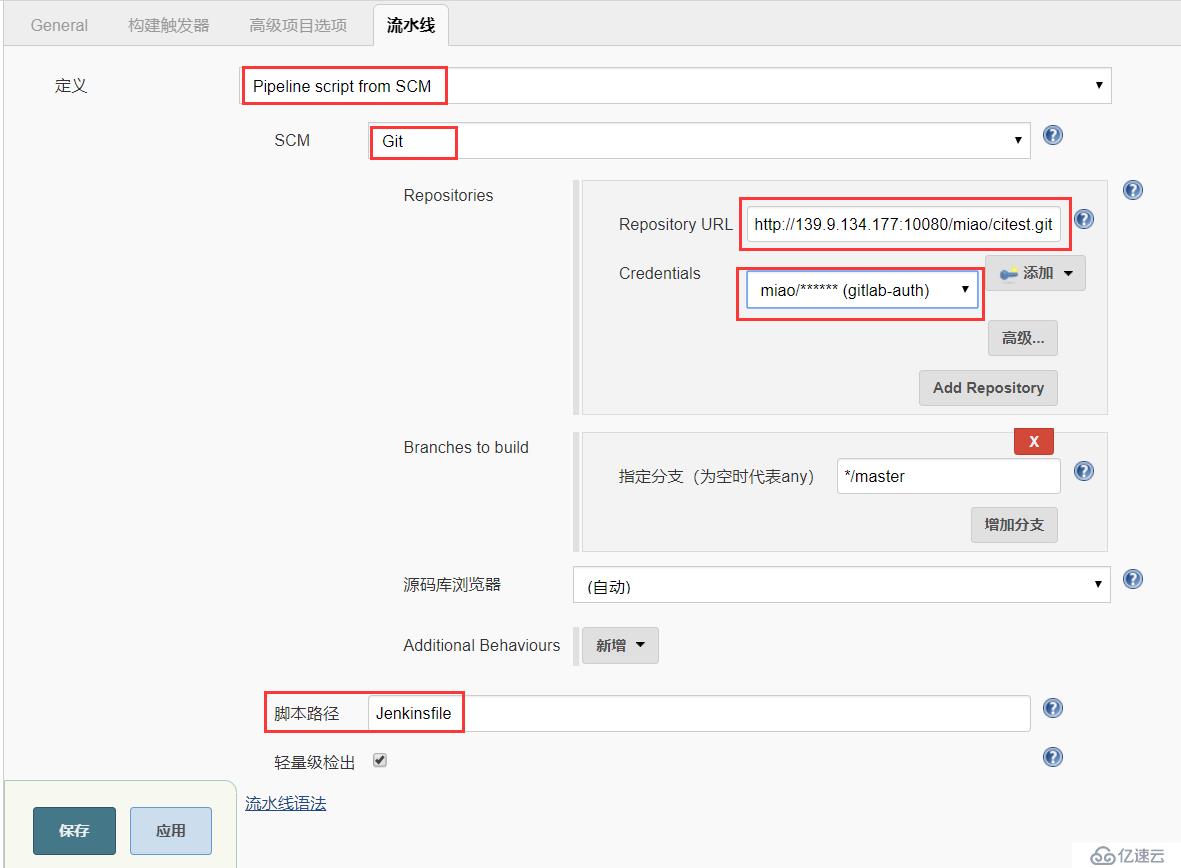
Jenkinsfile放在代碼倉庫的好處就是,可以對Jenkinsfile也做一個版本的管理,與當前項目生命周期是一致的。
首先將pipeline腳本保存至本地git倉庫中,文件名為Jenkinsfile
jenkins配置如下
1、郵件通知需要用到已經安裝好的一個插件Email Extension
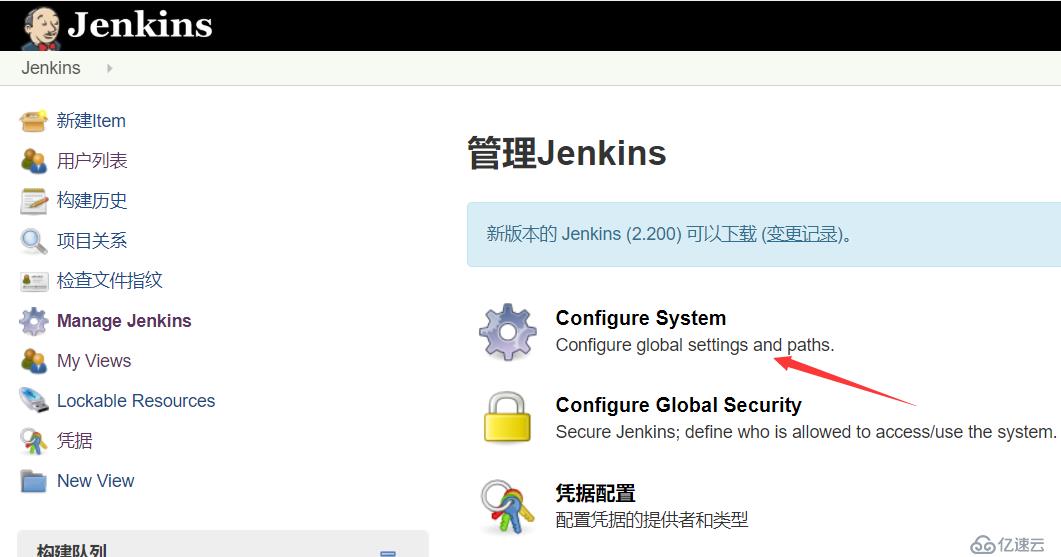
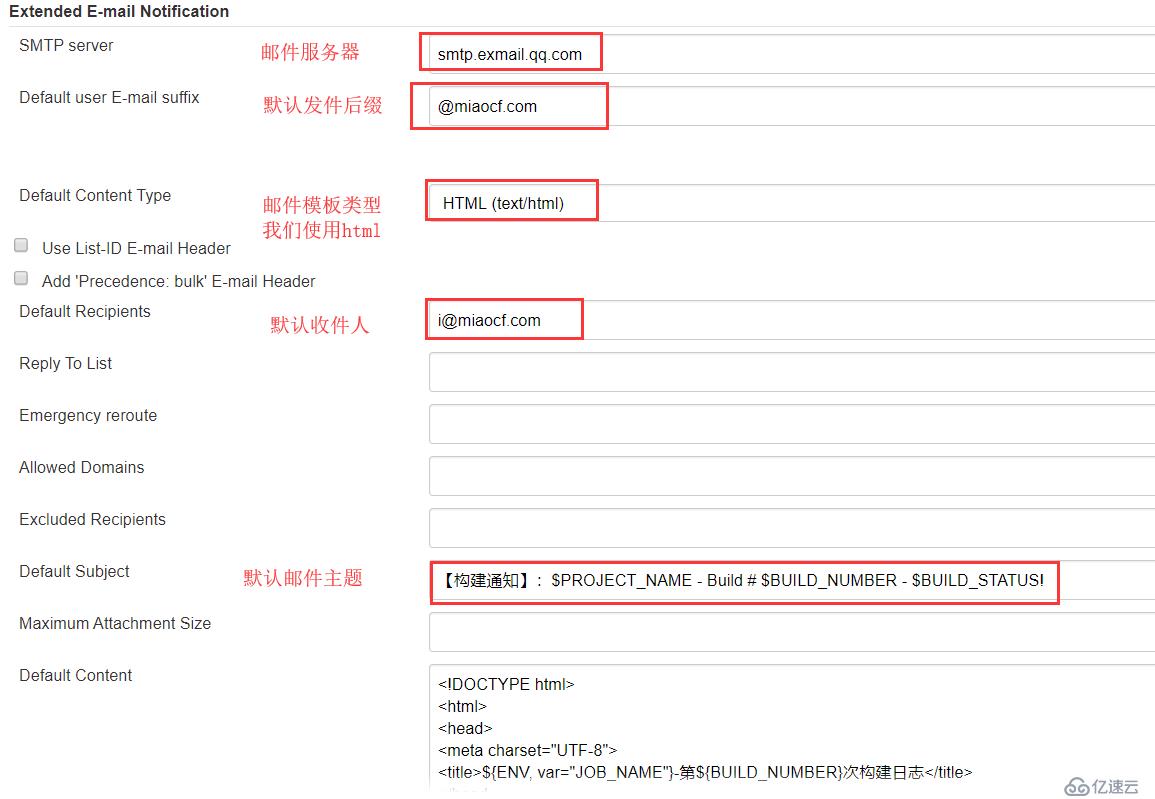
2、Email Extension的配置
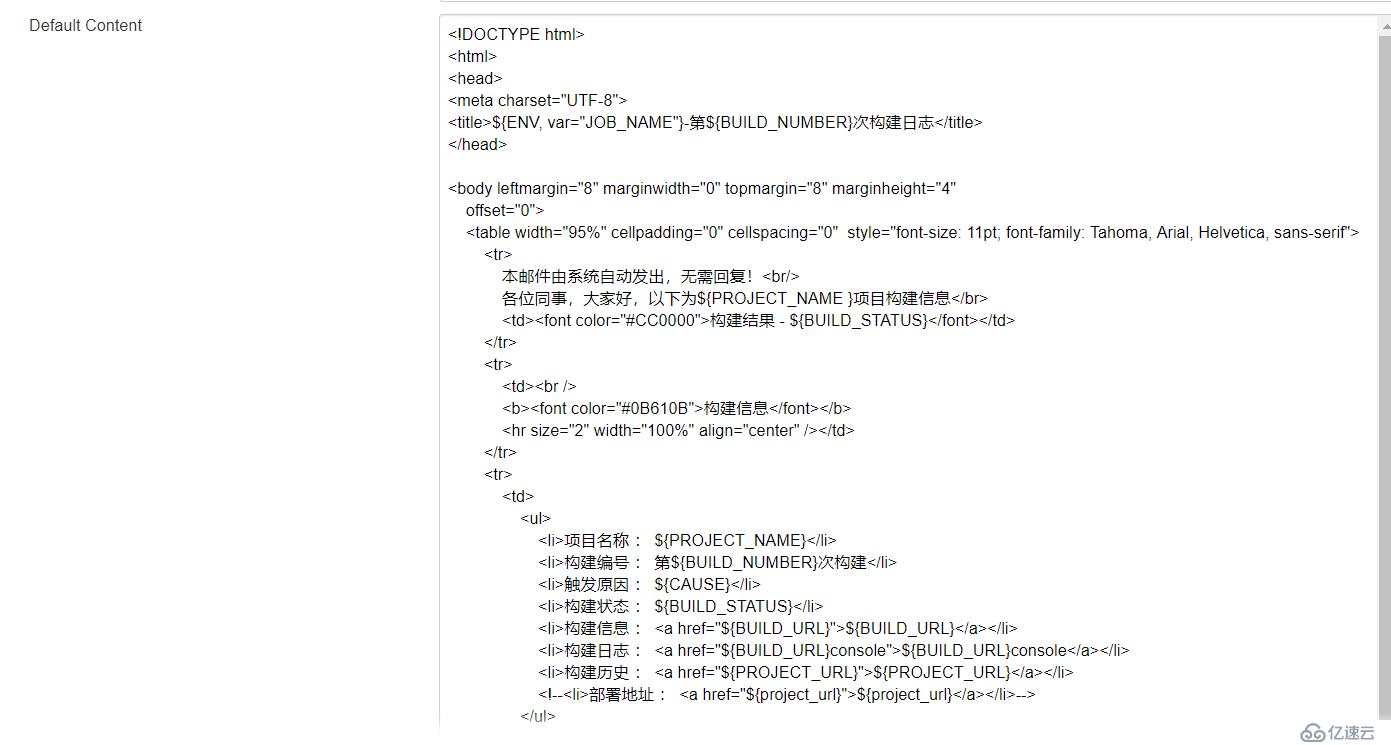
3、郵件模板內容,html模板
4、系統默認郵件服務配置,配置完可以發送測試郵件。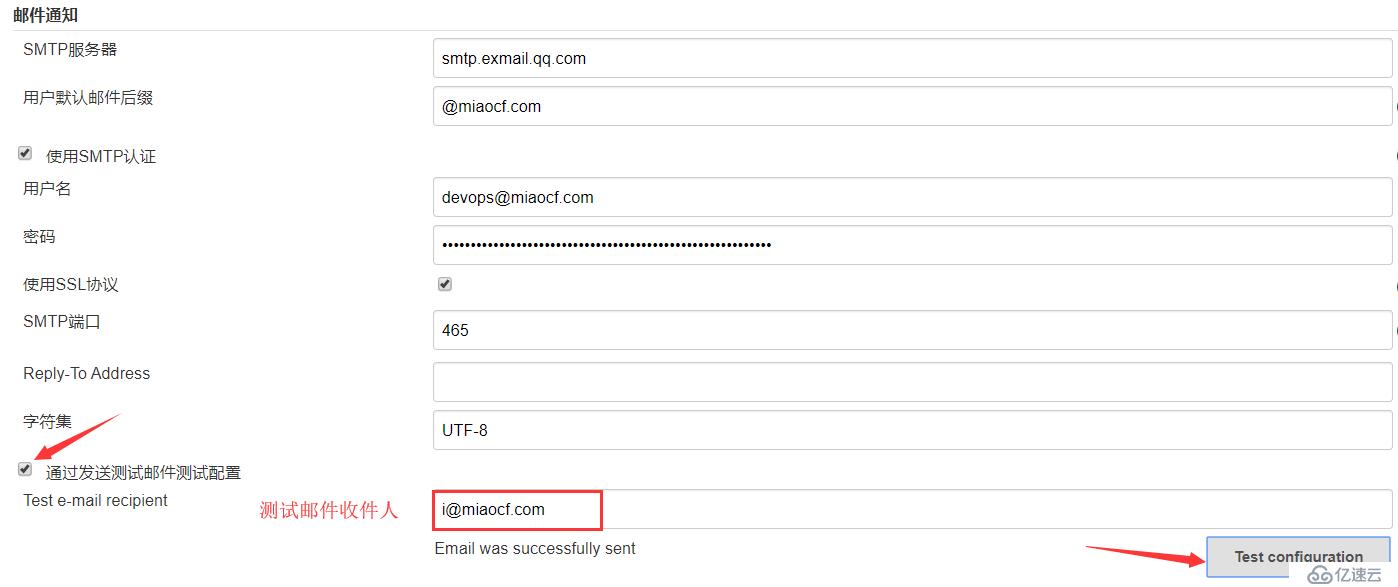
5、測試郵件內容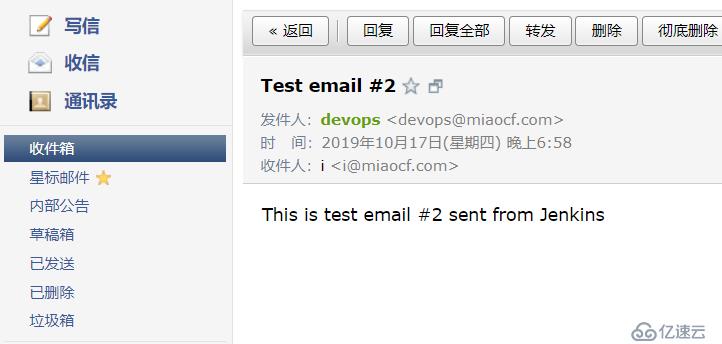
<!DOCTYPE html>
<html>
<head>
<meta charset="UTF-8">
<title>${ENV, var="JOB_NAME"}-第${BUILD_NUMBER}次構建日志</title>
</head>

<body leftmargin="8" marginwidth="0" topmargin="8" marginheight="4"
    offset="0">
    <table width="95%" cellpadding="0" cellspacing="0"  >
        <tr>
            本郵件由系統自動發出,無需回復!<br/>
            各位同事,大家好,以下為${PROJECT_NAME }項目構建信息</br>
            <td><font color="#CC0000">構建結果 - ${BUILD_STATUS}</font></td>
        </tr>
        <tr>
            <td><br />
            <b><font color="#0B610B">構建信息</font></b>
            <hr size="2" width="100%" align="center" /></td>
        </tr>
        <tr>
            <td>
                <ul>
                    <li>項目名稱 : ${PROJECT_NAME}</li>
                    <li>構建編號 : 第${BUILD_NUMBER}次構建</li>
                    <li>觸發原因 : ${CAUSE}</li>
                    <li>構建狀態 : ${BUILD_STATUS}</li>
            <li>構建信息 : <a href="${BUILD_URL}">${BUILD_URL}</a></li>
                    <li>構建日志 : <a href="${BUILD_URL}console">${BUILD_URL}console</a></li>
                    <li>構建歷史 : <a href="${PROJECT_URL}">${PROJECT_URL}</a></li>
            <!--<li>部署地址 : <a href="${project_url}">${project_url}</a></li>-->
                </ul>

                <h5><font color="#0B610B">失敗用例</font></h5>
                <hr size="2" width="100%" />
                $FAILED_TESTS<br/>

                <h5><font color="#0B610B">最近提交(#$SVN_REVISION)</font></h5>
                <hr size="2" width="100%" />
                <ul>
                ${CHANGES_SINCE_LAST_SUCCESS, reverse=true, format="%c", changesFormat="<li>%d [%a] %m</li>"}
                </ul>
                <font color="#0B610B">詳細提交: </font><a href="${PROJECT_URL}changes">${PROJECT_URL}changes</a><br/>

            </td>
        </tr>
    </table>
</body>
</html>
在持續集成這一塊我還是一個初學者,期望得到您的指點。
免責聲明:本站發布的內容(圖片、視頻和文字)以原創、轉載和分享為主,文章觀點不代表本網站立場,如果涉及侵權請聯系站長郵箱:is@yisu.com進行舉報,并提供相關證據,一經查實,將立刻刪除涉嫌侵權內容。