您好,登錄后才能下訂單哦!
您好,登錄后才能下訂單哦!
這篇文章將為大家詳細講解有關使用uni app怎么實現微信頂部導航條功能,文章內容質量較高,因此小編分享給大家做個參考,希望大家閱讀完這篇文章后對相關知識有一定的了解。
在page.json里配置app-plus即可
{
 "path": "pages/ucenter/index",
 "style": {
 "navigationBarTitleText": "我的",
 "app-plus": {
  "titleNView": {
  "buttons": [
   {
   "text": "\ue670",
   "fontSrc": "/static/iconfont.ttf",
   "fontSize": "22px",
   "float": "left"
   },
   {
   "text": "\ue62c",
   "fontSrc": "/static/iconfont.ttf",
   "fontSize": "22px"
   }
  ],
  "searchInput":{
   ...
  }
  }
 }
 }
},對于如何監聽按鈕、輸入框事件,uni-app給出了相應API,只需把onNavigationBarButtonTap和onNavigationBarSearchInputChanged,寫在響應的頁面中即可。
那如何可以實現像京東、淘寶、微信頂部導航欄,如加入城市定位、搜索、自定圖片/圖標、圓點提示。。。
上面的方法是可以滿足一般項目需求,但是在小程序里則失效了,而且一些復雜的導航欄就不能很好兼顧,這時只能尋求其它替代方法了
將navigationStyle設為custom或titleNView設為false時,原生導航欄不顯示,這時就能自定義導航欄
"globalStyle": { "navigationStyle": "custom" }下面是簡單測試實例:

這里要注意的是,H5、小程序、App端狀態欄都不一樣,需要重新計算處理,我這里已經處理好了,可直接使用,在App.vue里面設置即可
onLaunch: function() {
 uni.getSystemInfo({
 success:function(e){
  Vue.prototype.statusBar = e.statusBarHeight
  // #ifndef MP
  if(e.platform == 'android') {
  Vue.prototype.customBar = e.statusBarHeight + 50
  }else {
  Vue.prototype.customBar = e.statusBarHeight + 45
  }
  // #endif

  // #ifdef MP-WEIXIN
  let custom = wx.getMenuButtonBoundingClientRect()
  Vue.prototype.customBar = custom.bottom + custom.top - e.statusBarHeight
  // #endif

  // #ifdef MP-ALIPAY
  Vue.prototype.customBar = e.statusBarHeight + e.titleBarHeight
  // #endif
 }
 })
},
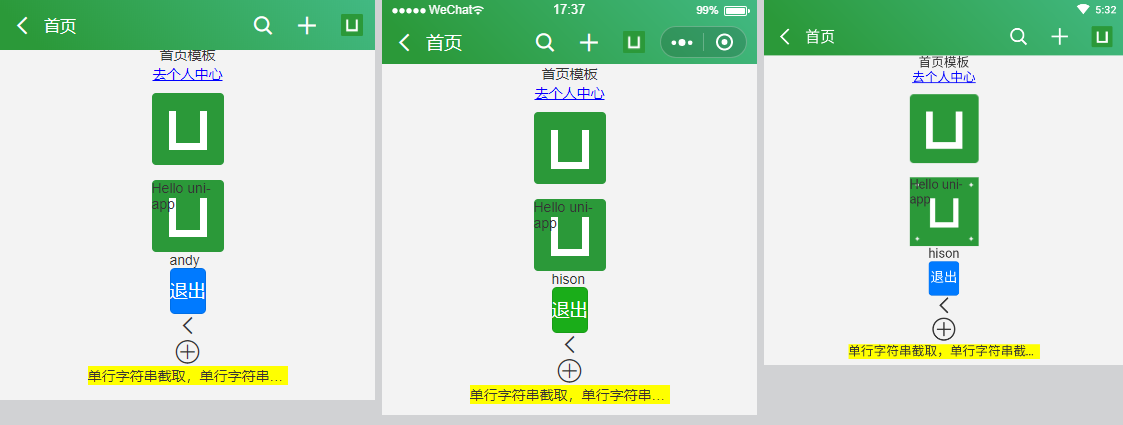
嘖嘖嘖,看下面的效果,是不是覺得很眼熟,沒錯,就是基于uni-app簡單的實現了一個仿微信頂部導航條
頂部的圖標使用iconfont字體圖標、另外還可自定傳入圖片

<header-bar :isBack="false" title="標題信息" titleTintColor="#fff">
 <text slot="back" class="uni_btnIco iconfont icon-arrL"></text>
 <text slot="iconfont" class="uni_btnIco iconfont icon-search" @tap="aaa"></text>
 <text slot="iconfont" class="uni_btnIco iconfont icon-tianjia" @tap="bbb"></text>
 <!-- <text slot="string" class="uni_btnString" @tap="ccc">添加好友</text> -->
 <image slot="image" class="uni_btnImage" src="../../static/logo.png" mode="widthFix" @tap="ddd"></image>
</header-bar>


<header-bar :isBack="true" titleTintColor="#fff" :bgColor="{'background-image': 'linear-gradient(45deg, #007AFF 10%, #005cbf)'}" search>
 <text slot="back" class="uni_btnIco iconfont icon-arrL"></text>
 <text slot="iconfont" class="uni_btnIco iconfont icon-choose03" @tap="aaa"></text>
 <image slot="image" class="uni_btnImage" src="../../static/logo.png" mode="widthFix" @tap="ddd"></image>
</header-bar>
<header-bar :isBack="true" title="我的" titleTintColor="#fff" :bgColor="{background: '#353535'}">
 <text slot="back" class="uni_btnIco iconfont icon-close"></text>
 <text slot="iconfont" class="uni_btnIco iconfont icon-search"></text>
 <text slot="string" class="uni_btnString" >添加好友</text>
</header-bar>


<header-bar :isBack="true" title="我的" titleTintColor="#fff" :bgColor="{background: '#353535'}">
 <text slot="back" class="uni_btnIco iconfont icon-close"></text>
 <text slot="iconfont" class="uni_btnIco iconfont icon-search"></text>
 <text slot="string" class="uni_btnString" >添加好友</text>
</header-bar>
支持傳入的屬性,另外還用到了vue插槽slot
/***
  isBack    是否返回按鈕
  title    標題
  titleTintColor  標題顏色
  bgColor    背景
  center    標題居中
  search    搜索條
  searchRadius  圓形搜索條
  fixed    是否固定
*/
<template>
 <view class="uni_topbar" :>
  <view class="inner flexbox flex_alignc" :class="[fixed ? 'fixed' : '']" :>
   <!-- 返回 -->
   <!-- <text class="uni_icoBack iconfont icon-arrL" v-if="isBack" @tap="goBack"></text> -->
   <view v-if="isBack" @tap="goBack">
    <slot name="back"></slot>
   </view>
   <slot name="headerL"></slot>
   <!-- 標題 -->
   <!-- #ifndef MP -->
   <view class="flex1" v-if="!search && center"></view>
   <!-- #endif -->
   <view class="uni_title flex1" :class="[center ? 'uni_titleCenter' : '']" : v-if="!search && title">
    {{title}}
   </view>
   <view class="uni_search flex1" :class="[searchRadius ? 'uni_searchRadius' : '']" v-if="search"> />
    <input class="uni_searchIpt flex1" type="text" placeholder="搜索" placeholder- />
   </view>
   <!-- 右側 -->
   <view class="uni_headerRight flexbox flex_row flex_alignc">
    <slot name="iconfont"></slot>
    <slot name="string"></slot>
    <slot name="image"></slot>
   </view>
  </view>
 </view>
</template>

<script>
 export default {
  data() {
   return {
    statusBarH: this.statusBar,
    customBarH: this.customBar
   }
  },
  props: {
   isBack: { type: [Boolean, String], default: true },
   title: { type: String, default: '' },
   titleTintColor: { type: String, default: '#fff' },
   bgColor: Object,
   center: { type: [Boolean, String], default: false },
   search: { type: [Boolean, String], default: false },
   searchRadius: { type: [Boolean, String], default: false },
   fixed: { type: [Boolean, String], default: false },
  },
  computed: {
   style() {
    let _style = `height: ${this.customBarH}px;`
    return _style
   }
  },
  methods: {
   goBack() {
    uni.navigateBack()
   }
  }
 }
</script>
關于使用uni app怎么實現微信頂部導航條功能就分享到這里了,希望以上內容可以對大家有一定的幫助,可以學到更多知識。如果覺得文章不錯,可以把它分享出去讓更多的人看到。
免責聲明:本站發布的內容(圖片、視頻和文字)以原創、轉載和分享為主,文章觀點不代表本網站立場,如果涉及侵權請聯系站長郵箱:is@yisu.com進行舉報,并提供相關證據,一經查實,將立刻刪除涉嫌侵權內容。