您好,登錄后才能下訂單哦!
您好,登錄后才能下訂單哦!
這篇文章將為大家詳細講解有關TFRecord格式存儲數據與隊列讀取的示例分析,小編覺得挺實用的,因此分享給大家做個參考,希望大家閱讀完這篇文章后可以有所收獲。
Tensor Flow官方網站上提供三種讀取數據的方法
1. 預加載數據:在Tensor Flow圖中定義常量或變量來保存所有數據,將數據直接嵌到數據圖中,當訓練數據較大時,很消耗內存。
如
x1=tf.constant([0,1])
x2=tf.constant([1,0])
y=tf.add(x1,x2)
2.填充數據:使用sess.run()的feed_dict參數,將Python產生的數據填充到后端,之前的MNIST數據集就是通過這種方法。也有消耗內存,數據類型轉換耗時的缺點。
3. 從文件讀取數據:從文件中直接讀取,讓隊列管理器從文件中讀取數據。分為兩步
先把樣本數據寫入TFRecords二進制文件
再從隊列中讀取
TFRecord是TensorFlow提供的一種統一存儲數據的二進制文件,能更好的利用內存,更方便的復制和移動,并且不需要單獨的標記文件。下面通過代碼來將MNIST轉換成TFRecord的數據格式,其他數據集也類似。
#生成整數型的屬性
def _int64_feature(value):
 return tf.train.Feature(int64_list=tf.train.Int64List(value=[value]))
#生成字符串型的屬性
def _bytes_feature(value):
 return tf.train.Feature(bytes_list=tf.train.BytesList(value=[value]))
def convert_to(data_set,name):
 '''
 將數據填入到tf.train.Example的協議緩沖區(protocol buffer)中,將協議緩沖區序列
 化為一個字符串,通過tf.python_io.TFRecordWriter寫入TFRecords文件
 '''
 images=data_set.images
 labels=data_set.labels
 num_examples=data_set.num_examples
 if images.shape[0]!=num_examples:
  raise ValueError ('Imagessize %d does not match label size %d.'\
       %(images.shape[0],num_examples))
 rows=images.shape[1] #28
 cols=images.shape[2] #28
 depth=images.shape[3] #1 是黑白圖像

 filename = os.path.join(FLAGS.directory, name + '.tfrecords')
 #使用下面語句就會將三個文件存儲為一個TFRecord文件,當數據量較大時,最好將數據寫入多個文件
 #filename="C:/Users/dbsdz/Desktop/TF練習/TFRecord"
 print('Writing',filename)
 writer=tf.python_io.TFRecordWriter(filename)
 for index in range(num_examples):
  image_raw=images[index].tostring() #將圖像矩陣化為一個字符串

  #寫入協議緩沖區,height、width、depth、label編碼成int 64類型,image——raw編碼成二進制
  example=tf.train.Example(features=tf.train.Features(feature={
    'height':_int64_feature(rows),
    'width':_int64_feature(cols),
    'depth':_int64_feature(depth),
    'label':_int64_feature(int(labels[index])),
    'image_raw':_bytes_feature(image_raw)}))
  writer.write(example.SerializeToString())  #序列化字符串
 writer.close()
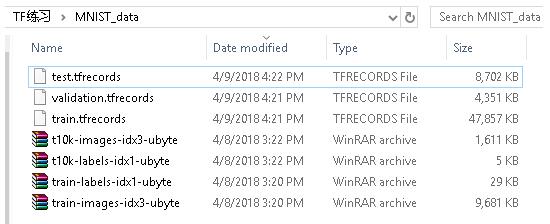
上面程序可以將MNIST數據集中所有的訓練數據存儲到三個TFRecord文件中。結果如下圖

從隊列中TFRecord文件,過程分三步
1. 創建張量,從二進制文件中讀取一個樣本
2. 創建張量,從二進制文件中隨機讀取一個mini-batch
3. 把每一批張量傳入網絡作為輸入節點
具體代碼如下
def read_and_decode(filename_queue):  #輸入文件名隊列
 reader=tf.TFRecordReader()
 _,serialized_example=reader.read(filename_queue)
 #解析一個example,如果需要解析多個樣例,使用parse_example函數
 features=tf.parse_single_example(
   serialized_example,
   #必須寫明feature里面的key的名稱
   features={
   #TensorFlow提供兩種不同的屬性解析方法,一種方法是tf.FixedLenFeature,
   #這種方法解析的結果為一個Tensor。另一個方法是tf.VarLenFeature,
   #這種方法得到的解析結果為SparseTensor,用于處理稀疏數據。
   #這里解析數據的格式需要和上面程序寫入數據的格式一致
     'image_raw':tf.FixedLenFeature([],tf.string),#圖片是string類型
      'label':tf.FixedLenFeature([],tf.int64), #標記是int64類型
      })
 #對于BytesList,要重新進行編碼,把string類型的0維Tensor變成uint8類型的一維Tensor
 image = tf.decode_raw(features['image_raw'], tf.uint8)
 image.set_shape([IMAGE_PIXELS])
 #tensor("input/DecodeRaw:0",shape=(784,),dtype=uint8)

 #image張量的形狀為:tensor("input/sub:0",shape=(784,),dtype=float32)
 image = tf.cast(image, tf.float32) * (1. / 255) - 0.5

 #把標記從uint8類型轉換為int32類性
 #label張量的形狀為tensor(“input/cast_1:0",shape=(),dtype=int32)
 label = tf.cast(features['label'], tf.int32)
 return image,label
def inputs(train,batch_size,num_epochs):
 #輸入參數:
 #train:選擇輸入訓練數據/驗證數據
 #batch_size:訓練的每一批有多少個樣本
 #num_epochs:過幾遍數據,設置為0/None表示永遠訓練下去
 '''
 返回結果: A tuple (images,labels)
 *images:類型為float,形狀為【batch_size,mnist.IMAGE_PIXELS],范圍【-0.5,0.5】。
 *label:類型為int32,形狀為【batch_size],范圍【0,mnist.NUM_CLASSES]
 注意tf.train.QueueRunner必須用tf.train.start_queue_runners()來啟動線程

 '''
 if not num_epochs:num_epochs=None
 #獲取文件路徑,即./MNIST_data/train.tfrecords,./MNIST_data/validation.records
 filename=os.path.join(FLAGS.train_dir,TRAIN_FILE if train else VALIDATION_FILE)
 with tf.name_scope('input'):
  #tf.train.string_input_producer返回一個QueueRunner,里面有一個FIFOQueue
  filename_queue=tf.train.string_input_producer(#如果樣本量很大,可以分成若干文件,把文件名列表傳入
    [filename],num_epochs=num_epochs)
  image,label=read_and_decode(filename_queue)
  #隨機化example,并把它們整合成batch_size大小
  #tf.train.shuffle_batch生成了RandomShuffleQueue,并開啟兩個線程
  images,sparse_labels=tf.train.shuffle_batch(
    [image,label],batch_size=batch_size,num_threads=2,
    capacity=1000+3*batch_size,
    min_after_dequeue=1000) #留下一部分隊列,來保證每次有足夠的數據做隨機打亂
  return images,sparse_labels
最后,構建一個三層的神經網絡,包含兩層卷積層以及一層使用SoftMax層,附上完整代碼如下
# -*- coding: utf-8 -*-
"""
Created on Sun Apr 8 11:06:16 2018

@author: dbsdz

https://blog.csdn.net/xy2953396112/article/details/54929073
"""
import tensorflow as tf
import os
import time
import math
from tensorflow.examples.tutorials.mnist import input_data
mnist = input_data.read_data_sets("MNIST_data/", one_hot=True)


# Basic model parameters as external flags.
flags = tf.app.flags
flags.DEFINE_float('learning_rate', 0.01, 'Initial learning rate.')
flags.DEFINE_integer('hidden1', 128, 'Number of units in hidden layer 1.')
flags.DEFINE_integer('hidden2', 32, 'Number of units in hidden layer 2.')
flags.DEFINE_integer('batch_size', 100, 'Batch size. '
      'Must divide evenly into the dataset sizes.')
flags.DEFINE_string('train_dir', 'Mnist_data/', 'Directory to put the training data.')
flags.DEFINE_string('directory', './MNIST_data',
       'Directory to download data files and write the '
       'converted result')
flags.DEFINE_integer('validation_size', 5000,
       'Number of examples to separate from the training '
       'data for the validation set.')
flags.DEFINE_integer('num_epochs',10,'num_epochs set')
FLAGS = tf.app.flags.FLAGS
IMAGE_SIZE = 28
IMAGE_PIXELS = IMAGE_SIZE * IMAGE_SIZE  #圖片像素728
TRAIN_FILE = "train.tfrecords"
VALIDATION_FILE="validation.tfrecords"
#生成整數型的屬性
def _int64_feature(value):
 return tf.train.Feature(int64_list=tf.train.Int64List(value=[value]))
#生成字符串型的屬性
def _bytes_feature(value):
 return tf.train.Feature(bytes_list=tf.train.BytesList(value=[value]))
def convert_to(data_set,name):
 '''
 將數據填入到tf.train.Example的協議緩沖區(protocol buffer)中,將協議緩沖區序列
 化為一個字符串,通過tf.python_io.TFRecordWriter寫入TFRecords文件
 '''
 images=data_set.images
 labels=data_set.labels
 num_examples=data_set.num_examples
 if images.shape[0]!=num_examples:
  raise ValueError ('Imagessize %d does not match label size %d.'\
       %(images.shape[0],num_examples))
 rows=images.shape[1] #28
 cols=images.shape[2] #28
 depth=images.shape[3] #1 是黑白圖像

 filename = os.path.join(FLAGS.directory, name + '.tfrecords')
 #使用下面語句就會將三個文件存儲為一個TFRecord文件,當數據量較大時,最好將數據寫入多個文件
 #filename="C:/Users/dbsdz/Desktop/TF練習/TFRecord"
 print('Writing',filename)
 writer=tf.python_io.TFRecordWriter(filename)
 for index in range(num_examples):
  image_raw=images[index].tostring() #將圖像矩陣化為一個字符串

  #寫入協議緩沖區,height、width、depth、label編碼成int 64類型,image——raw編碼成二進制
  example=tf.train.Example(features=tf.train.Features(feature={
    'height':_int64_feature(rows),
    'width':_int64_feature(cols),
    'depth':_int64_feature(depth),
    'label':_int64_feature(int(labels[index])),
    'image_raw':_bytes_feature(image_raw)}))
  writer.write(example.SerializeToString())  #序列化字符串
 writer.close()


def inference(images, hidden1_units, hidden2_units):
 with tf.name_scope('hidden1'):
 weights = tf.Variable(
  tf.truncated_normal([IMAGE_PIXELS, hidden1_units],
       stddev=1.0 / math.sqrt(float(IMAGE_PIXELS))),name='weights')
 biases = tf.Variable(tf.zeros([hidden1_units]),name='biases')
 hidden1 = tf.nn.relu(tf.matmul(images, weights) + biases)
 with tf.name_scope('hidden2'):
 weights = tf.Variable(
  tf.truncated_normal([hidden1_units, hidden2_units],
       stddev=1.0 / math.sqrt(float(hidden1_units))),
  name='weights')
 biases = tf.Variable(tf.zeros([hidden2_units]),
       name='biases')
 hidden2 = tf.nn.relu(tf.matmul(hidden1, weights) + biases)
 with tf.name_scope('softmax_linear'):
 weights = tf.Variable(
  tf.truncated_normal([hidden2_units,FLAGS.num_epochs],
       stddev=1.0 / math.sqrt(float(hidden2_units))),name='weights')
 biases = tf.Variable(tf.zeros([FLAGS.num_epochs]),name='biases')
 logits = tf.matmul(hidden2, weights) + biases
 return logits
def lossFunction(logits, labels):
 labels = tf.to_int64(labels)
 cross_entropy = tf.nn.sparse_softmax_cross_entropy_with_logits(
  logits=logits, labels=labels, name='xentropy')
 loss = tf.reduce_mean(cross_entropy, name='xentropy_mean')
 return loss
def training(loss, learning_rate):
 tf.summary.scalar(loss.op.name, loss)
 optimizer = tf.train.GradientDescentOptimizer(learning_rate)
 global_step = tf.Variable(0, name='global_step', trainable=False)
 train_op = optimizer.minimize(loss, global_step=global_step)
 return train_op
def read_and_decode(filename_queue):  #輸入文件名隊列
 reader=tf.TFRecordReader()
 _,serialized_example=reader.read(filename_queue)
 #解析一個example,如果需要解析多個樣例,使用parse_example函數
 features=tf.parse_single_example(
   serialized_example,
   #必須寫明feature里面的key的名稱
   features={
   #TensorFlow提供兩種不同的屬性解析方法,一種方法是tf.FixedLenFeature,
   #這種方法解析的結果為一個Tensor。另一個方法是tf.VarLenFeature,
   #這種方法得到的解析結果為SparseTensor,用于處理稀疏數據。
   #這里解析數據的格式需要和上面程序寫入數據的格式一致
     'image_raw':tf.FixedLenFeature([],tf.string),#圖片是string類型
      'label':tf.FixedLenFeature([],tf.int64), #標記是int64類型
      })
 #對于BytesList,要重新進行編碼,把string類型的0維Tensor變成uint8類型的一維Tensor
 image = tf.decode_raw(features['image_raw'], tf.uint8)
 image.set_shape([IMAGE_PIXELS])
 #tensor("input/DecodeRaw:0",shape=(784,),dtype=uint8)

 #image張量的形狀為:tensor("input/sub:0",shape=(784,),dtype=float32)
 image = tf.cast(image, tf.float32) * (1. / 255) - 0.5

 #把標記從uint8類型轉換為int32類性
 #label張量的形狀為tensor(“input/cast_1:0",shape=(),dtype=int32)
 label = tf.cast(features['label'], tf.int32)
 return image,label

def inputs(train,batch_size,num_epochs):
 #輸入參數:
 #train:選擇輸入訓練數據/驗證數據
 #batch_size:訓練的每一批有多少個樣本
 #num_epochs:過幾遍數據,設置為0/None表示永遠訓練下去
 '''
 返回結果: A tuple (images,labels)
 *images:類型為float,形狀為【batch_size,mnist.IMAGE_PIXELS],范圍【-0.5,0.5】。
 *label:類型為int32,形狀為【batch_size],范圍【0,mnist.NUM_CLASSES]
 注意tf.train.QueueRunner必須用tf.train.start_queue_runners()來啟動線程

 '''
 if not num_epochs:num_epochs=None
 #獲取文件路徑,即./MNIST_data/train.tfrecords,./MNIST_data/validation.records
 filename=os.path.join(FLAGS.train_dir,TRAIN_FILE if train else VALIDATION_FILE)
 with tf.name_scope('input'):
  #tf.train.string_input_producer返回一個QueueRunner,里面有一個FIFOQueue
  filename_queue=tf.train.string_input_producer(#如果樣本量很大,可以分成若干文件,把文件名列表傳入
    [filename],num_epochs=num_epochs)
  image,label=read_and_decode(filename_queue)
  #隨機化example,并把它們整合成batch_size大小
  #tf.train.shuffle_batch生成了RandomShuffleQueue,并開啟兩個線程
  images,sparse_labels=tf.train.shuffle_batch(
    [image,label],batch_size=batch_size,num_threads=2,
    capacity=1000+3*batch_size,
    min_after_dequeue=1000) #留下一部分隊列,來保證每次有足夠的數據做隨機打亂
  return images,sparse_labels
def run_training():
 with tf.Graph().as_default():
  #輸入images和labels
  images,labels=inputs(train=True,batch_size=FLAGS.batch_size,
        num_epochs=3)  #num_epochs就是訓練的輪數
  #構建一個從推理模型來預測數據的圖
  logits=inference(images,FLAGS.hidden1,FLAGS.hidden2)
  loss=lossFunction(logits,labels) #定義損失函數
  #Add to the Graph operations that train the model
  train_op=training(loss,FLAGS.learning_rate)
  #初始化參數,特別注意:string——input_producer內部創建了一個epoch計數變量
  #歸入tf.graphkey.local_variables集合中,必須單獨用initialize_local_variables()初始化
  init_op=tf.group(tf.global_variables_initializer(),
       tf.local_variables_initializer())
  sess=tf.Session()
  sess.run(init_op)
  #Start input enqueue threads
  coord =tf.train.Coordinator()
  threads=tf.train.start_queue_runners(sess=sess,coord=coord)
  try:
   step=0
   while not coord.should_stop(): #進入永久循環
    start_time=time.time()
    _,loss_value=sess.run([train_op,loss])

    #每100次訓練輸出一次結果
    if step % 100 ==0:
     duration=time.time()-start_time
     print('Step %d: loss=%.2f (%.3f sec)'%(step,loss_value,duration))
    step+=1
  except tf.errors.OutOfRangeError:
   print('Done training for %d epochs,%d steps.'%(FLAGS.num_epochs,step))
  finally:
   coord.request_stop()#通知其他線程關閉
  coord.join(threads)
  sess.close()

def main(unused_argv):

 #獲取數據
 data_sets=input_data.read_data_sets(FLAGS.directory,dtype=tf.uint8,reshape=False,
         validation_size=FLAGS.validation_size)

 #將數據轉換成tf.train.Example類型,并寫入TFRecords文件

 convert_to(data_sets.train,'train')

 convert_to(data_sets.validation,'validation')

 convert_to(data_sets.test,'test')
 print('convert finished')
 run_training()

if __name__ == '__main__':
 tf.app.run()
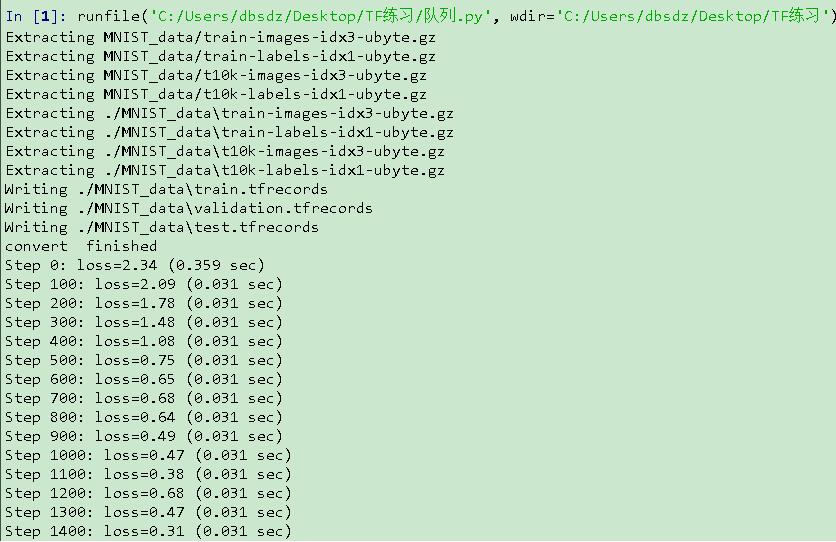
運行結果如圖

關于“TFRecord格式存儲數據與隊列讀取的示例分析”這篇文章就分享到這里了,希望以上內容可以對大家有一定的幫助,使各位可以學到更多知識,如果覺得文章不錯,請把它分享出去讓更多的人看到。
免責聲明:本站發布的內容(圖片、視頻和文字)以原創、轉載和分享為主,文章觀點不代表本網站立場,如果涉及侵權請聯系站長郵箱:is@yisu.com進行舉報,并提供相關證據,一經查實,將立刻刪除涉嫌侵權內容。