您好,登錄后才能下訂單哦!
您好,登錄后才能下訂單哦!
這篇文章將為大家詳細講解關于vue 組件的介紹,小編覺得挺實用的,因此分享給大家做個參考,希望大家閱讀完這篇文章后可以有所收獲。
Vue的兩大核心
1. 數據驅動 - 數據驅動界面顯示
2. 模塊化 - 復用公共模塊,組件實現模塊化提供基礎
組件渲染過程
template ---> ast(抽象語法樹) ---> render ---> VDom(虛擬DOM) ---> 真實的Dom ---> 頁面
Vue組件需要編譯,編譯過程可能發生在
對應的兩種方式 runtime-only vs runtime-compiler
runtime-only(默認)
runtime-compiler
啟用runtime-compiler
vue.config.js(若沒有手動創建一個)
module.exports = {
 runtimeCompiler: true //默認false
}1. 字符串形式定義(不推薦)
例子
const CustomButton = {
 template: "<button>自定義按鈕</button>"
};
這種形式在運行時才把template編譯成render函數,因此需要啟用運行時編譯(runtime-compiler)
2. 單文件組件(推薦)
創建.vue后綴的文件,定義如下
<template>
 <div>
 <button>自定義按鈕</button>
 </div>
</template>
<template> 里只能有一個根節點,即第一層只能有一個節點,不能多個節點平級
這種形式在打包的時就編譯成render函數,因此跟推薦這種方式定義組件
1. 全局注冊
全局注冊是通過Vue.component()注冊
import CustomButton from './components/ComponentDemo.vue'
Vue.component('CustomButton', CustomButton)
優點
缺點
適合
2. 局部注冊
在需要的地方導入
<template>
 <div id="app">
 <customButton></customButton>
 </div>
</template>
<script>
import CustomButton from "./components/ComponentDemo.vue";

export default {
 name: "App",
 components: { CustomButton }
};
</script>
優點
缺點
適合
組件復用
<template>
 <div id="app">
 <img alt="Vue logo" src="./assets/logo.png" />
 <customButton></customButton>
 <customButton></customButton>
 <customButton></customButton>
 </div>
</template>
customButton 組件
<template>
 <div id="app">
 <button @click="increment">click me {{times}} times</button>
 </div>
</template>
<script>
export default {
 data() {
 return { times: 0 };
 },
 methods: {
 increment() {
 return this.times++;
 }
 }
};
</script>
每個組件都會創建一個新實例,組件的data必須是function,因為每個實例維護自己的data數據
1. 通過props屬性
定義一個button,按鈕文本通過props傳入
<template>
 <button> {{buttonText}} </button>
</template>
<script>
export default {
 props: {
 buttonText: String
 }
};
</script>
調用者通過attribute傳入
<customButton buttonText="Button 1"></customButton>
<customButton buttonText="Button 2"></customButton>
<customButton buttonText="Button 3"></customButton>
運行效果

2. 通過插槽<slot></slot>
組件在需要替換的地方放入插槽<slot></slot>
<template>
 <button ><slot>Defalt Button</slot></button>
</template>
<script>
export default {
 props: {
 buttonText: String
 }
};
</script>
調用者的innerHtml會替換插槽的值,若為空,使用默認的
運行效果

注意:看到是用自定義組件的innerHtml替換插槽,若插槽只有一個,可以不寫name attribute,若多個插槽需指定插槽name attribute
1. 在組件內部調用this.$emit觸發自定義事件
<template>
 <div >
 <button @click="increment">
 <slot>Defalt Button</slot>
 </button>
 <span>Click me {{times}} times</span>
 </div>
</template>
<script>
export default {
 props: {
 buttonText: String
 },
 data() {
 return { times: 0 };
 },
 methods: {
 increment() {
 this.times++;
 ("increment");
 }
 }
};
</script>
2. 調用者監聽自定義事件
<template>
 <div id="app">
 <customButton @increment="handleIncrement"></customButton>
 <customButton @increment="handleIncrement">
 <span >Button 2</span>
 </customButton>
 <customButton @increment="handleIncrement">Button 3</customButton>
 <p>Total click {{totalClicks}} times</p>
 </div>
</template>
<script>
import CustomButton from "./components/ComponentDemo.vue";

export default {
 name: "App",
 components: { CustomButton },
 data() {
 return { totalClicks: 0 };
 },
 methods: {
 handleIncrement() {
 this.totalClicks++;
 }
 }
};
</script>
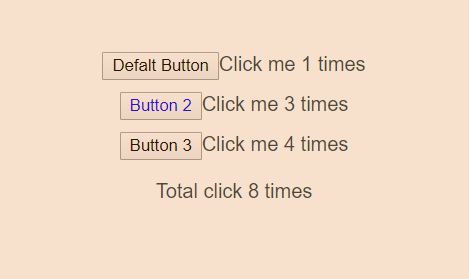
3. 運行效果

關于vue 組件的介紹就分享到這里了,希望以上內容可以對大家有一定的幫助,可以學到更多知識。如果覺得文章不錯,可以把它分享出去讓更多的人看到。
免責聲明:本站發布的內容(圖片、視頻和文字)以原創、轉載和分享為主,文章觀點不代表本網站立場,如果涉及侵權請聯系站長郵箱:is@yisu.com進行舉報,并提供相關證據,一經查實,將立刻刪除涉嫌侵權內容。