您好,登錄后才能下訂單哦!
您好,登錄后才能下訂單哦!
本篇文章給大家分享的是有關怎么在Nginx中使用Rewrite模塊,小編覺得挺實用的,因此分享給大家學習,希望大家閱讀完這篇文章后可以有所收獲,話不多說,跟著小編一起來看看吧。
部署環境
一臺Linux服務器(192.168.142.130)
一臺測試主機windows 7
1,安裝Nginx服務
[root@localhost ~]# rpm -Uvh http://nginx.org/packages/centos/7/noarch/RPMS/nginx-release-centos-7-0.el7.ngx.noarch.rpm
#安裝nginx官方源

[root@localhost ~]# yum install nginx -y
#yum安裝nginx
2,修改nginx默認配置文件
[root@localhost ~]# vim /etc/nginx/conf.d/default.conf ##修改默認配置文件
server {
    listen    80;
    server_name www.accp.com;  ##修改主機名

    #charset koi8-r;
    access_log /var/log/nginx/www.accp.com-access.log main;  ##開啟日志服務
3,安裝bind解析服務
[root@localhost ~]# yum install bind -y
4,修改主配置文件(named.conf)
[root@localhost ~]# vim /etc/named.conf
options {
                listen-on port 53 { any; };     ##監聽所有
                ...
                allow-query   { any; };      ##允許所有
5,修改區域配置文件(named.rfc1912.zones)
[root@localhost ~]# vim /etc/named.rfc1912.zones  ##配置區域配置文件

zone "accp.com" IN {
                type master;
                file "accp.com.zone";       ##accp區域數據配置文件
                allow-update { none; };
};
6,修改區域數據配置文件(accp.com.zone)
[root@localhost ~]# cd /var/named/
[root@localhost named]# cp -p named.localhost accp.com.zone  ##復制模板
[root@localhost named]# vim accp.com.zone  ##修改區域配置文件

$TTL 1D
@    IN SOA @ rname.invalid. (
                                    1D   ; refresh
                                    1H   ; retry
                                    1W   ; expire
                                    3H )  ; minimum
                NS   @
                A    127.0.0.1
www IN A    192.168.142.130         ##本機地址
[root@localhost named]# systemctl start named   ##開啟dns服務
[root@localhost named]# systemctl stop firewalld.service  ##關閉防火墻
[root@localhost named]# setenforce 0
[root@localhost named]# systemctl start nginx  ##開啟nginx服務
7,用測試機測試網頁

8,修改配置文件,設置域名跳轉
[root@localhost named]# vim /etc/nginx/conf.d/default.conf ##修改配置文件
  server {
      listen    80;
      server_name www.accp.com;

      #charset koi8-r;
      access_log /var/log/nginx/www.accp.com-access.log main;

      location / {
          if ($host = "www.accp.com"){    ##匹配如果域名是老域名
                  rewrite ^/(.*)$ http://www.kgc.com/$1 permanent;  ##則永久設置跳轉新域名
          }
          root  /usr/share/nginx/html;
          index index.html index.htm;
      }
9,添加新域名解析
[root@localhost named]# vim /etc/named.rfc1912.zones

zone "kgc.com" IN {
                type master;
                file "kgc.com.zone";       ##accp區域數據配置文件
                allow-update { none; };
};

[root@localhost named]# cp -p /var/named/accp.com.zone /var/named/kgc.com.zone
##復制區域數據配置文件為kgc的數據配置文件
[root@localhost named]# systemctl restart named  ##重啟解析服務
[root@localhost named]# systemctl restart nginx   ##重啟nginx服務
10,用舊域名訪問,查看網頁跳轉


11,舊域名后加上參數,查看跳轉新域名時是否有參數


應用場景2——基于客戶端IP訪問跳轉
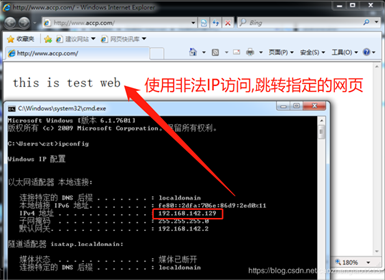
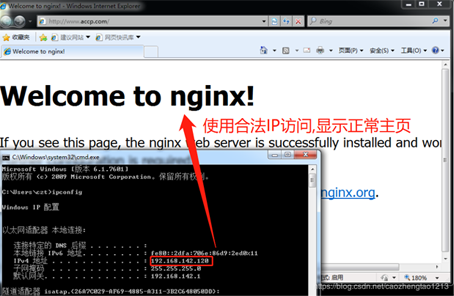
公司業務版本上線,所有IP訪問任何內容都顯示一個固定維護頁面,只有公司IP訪問正常
1,修改Nginx默認配置文件
[root@localhost ~]# cd /etc/nginx/conf.d/
[root@localhost conf.d]# vim default.conf

server {
    listen    80;
    server_name www.accp.com;
    #charset koi8-r;
    access_log /var/log/nginx/www.accp.com-access.log main;
    #設置是否合法的IP標志
    set $rewrite true;     ##設置變量為真
    #判斷是否為合法的IP
    if ($remote_addr = "192.168.142.120"){
        set $rewrite false;  ##匹配合法IP,將變量設置為假,正常跳轉頁面
    }
    #非法IP進行判斷打上標記
    if ($rewrite = true){        ##匹配非法IP,跳轉到main的網頁
        rewrite (.+) /main.html;
    }
    #匹配標記進行跳轉站點
    location = /main.html {       ##精確匹配
        root /usr/share/nginx/html;  ##站點路徑
    }

    location / {
        root  /usr/share/nginx/html;
        index index.html index.htm;
    }
2,創建非法IP站點及main的網頁頁面
[root@localhost conf.d]# cd /usr/share/nginx/html/ ##切換到站點中
[root@localhost html]# vim main.html  ##編輯非法IP訪問網頁內容
<h2>this is test web</h2>
[root@localhost html]# systemctl restart nginx  ##重啟Nginx服務
3,訪問測試網頁


應用場景3——基于舊,新域名跳轉并加目錄
將域名http://bbs.accp.com 下面的發帖都跳轉到http://www.accp.com/bbs 且域名跳轉后保持參數不變
1,修改Nginx默認配置文件
[root@localhost ~]# cd /etc/nginx/conf.d/
[root@localhost conf.d]# vim default.conf  ##修改默認配置文件
server {
    listen    80;
    server_name bbs.accp.com;  ##修改服務名稱

    #charset koi8-r;
    access_log /var/log/nginx/www.accp.com-access.log main;
    location /post {     ##用location匹配post目錄
        rewrite (.+) http://www.accp.com/bbs$1 permanent;  ##永久重定向跳轉
    }
2,修改dns的區域數據配置文件(accp.com.zone)
[root@localhost conf.d]# cd /var/named/
[root@localhost named]# vim accp.com.zone  ##修改區域數據配置文件
$TTL 1D
@    IN SOA @ rname.invalid. (
                          0    ; serial
                          1D   ; refresh
                          1H   ; retry
                          1W   ; expire
                          3H )  ; minimum
        NS   @
        A    127.0.0.1
bbs IN A    192.168.142.130
[root@localhost named]# systemctl restart named  ##重啟解析服務
[root@localhost named]# systemctl restart nginx   ##重啟Nginx服務
[root@localhost named]# echo "nameserver 192.168.142.130" > /etc/resolv.conf
##將解析服務器地址放到本地解析配置文件中
3,測試網頁


應用場景4——基于參數匹配的跳轉
瀏覽器訪問:http://www.accp.com/100-(100|200)-100.html 跳轉到http://www.accp.com 頁面
1,修改Nginx默認配置文件
[root@localhost ~]# cd /etc/nginx/conf.d/
[root@localhost conf.d]# vim default.conf

server {
    listen    80;
    server_name www.accp.com;
    #charset koi8-r;
    access_log /var/log/nginx/www.accp.com-access.log main;
    if ($request_uri ~ ^/100-(100|200)-(\d+).html$){
    ##匹配正則開頭為100-(100|200)-一次多次的整數html為結尾的
        rewrite (.*) http://www.accp.com permanent;    ##永久重定向跳轉到主頁
    }
2,修改dns區域數據配置文件
  [root@localhost conf.d]# vim /var/named/accp.com.zone ##修改區域數據配置文件
  www IN A    192.168.142.130
  [root@localhost conf.d]# systemctl restart named ##重啟解析服務
  [root@localhost conf.d]# systemctl restart nginx   ##重啟Nginx服務
3,測試網頁


應用場景5——基于目錄下所有PHP文件跳轉
訪問http://www.accp.com/upload/1.php 跳轉到首頁
1,修改Nginx默認配置文件
[root@localhost ~]# cd /etc/nginx/conf.d/
  [root@localhost conf.d]# vim default.conf  ##修改默認配置文件
  server {
      listen    80;
      server_name www.accp.com;
      #charset koi8-r;
      access_log /var/log/nginx/www.accp.com-access.log main;
      location ~* /upload/.*\.php$ {     ##匹配不分大小寫,匹配upload后零次或多次以.php為結尾的
          rewrite (.+) http://www.accp.com permanent;  ##跳轉到首頁
      }
  [root@localhost conf.d]# systemctl restart nginx  ##重啟Nginx服務
2,測試網頁


應用場景6——基于最普通url請求的跳轉,訪問一個具體的頁面跳轉到首頁
1,修改Nginx默認配置文件
[root@localhost ~]# cd /etc/nginx/conf.d/
  [root@localhost conf.d]# vim default.conf  ##修改Nginx默認配置文件
  server {
      listen    80;
      server_name www.accp.com;
      #charset koi8-r;
      access_log /var/log/nginx/www.accp.com-access.log main;
      location ~* ^/abc/123.html {    ##匹配某一個特定的網頁
          rewrite (.+) http://www.accp.com permanent; ##跳轉到首頁
      }
  [root@localhost conf.d]# systemctl restart nginx  ##重啟Nginx服務
2,測試網頁


以上就是怎么在Nginx中使用Rewrite模塊,小編相信有部分知識點可能是我們日常工作會見到或用到的。希望你能通過這篇文章學到更多知識。更多詳情敬請關注億速云行業資訊頻道。
免責聲明:本站發布的內容(圖片、視頻和文字)以原創、轉載和分享為主,文章觀點不代表本網站立場,如果涉及侵權請聯系站長郵箱:is@yisu.com進行舉報,并提供相關證據,一經查實,將立刻刪除涉嫌侵權內容。